
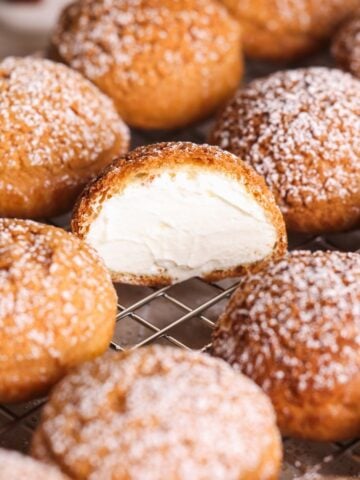
If you're looking for a dessert that feels fancy but is surprisingly simple to make, these Mini Cheesecake Pavlovas are about to become your new favorite. They are light and crispy outside, chewy and marshmallowy inside, filled with a luscious cheesecake filling, and topped with berries. They're elegant enough for special occasions but easy enough for a casual weekend treat-plus, their mini individual size makes them irresistibly cute and perfect for sharing (or not!).

Read the full blog post below for detailed notes, tips, tricks, photos and videos.
Jump to:


Why you'll be OBSESSED with these pavlovas
I'll admit it-I spent most of my life firmly in the "pavlova skeptic" camp without ever actually trying one. Something about baked egg whites just didn't sound appealing. But wow, was I missing out. Whether you're a longtime pavlova lover or a first-timer like I was, here's why you need to try this mini cheesecake pavlova recipe:
The texture is heavenly. These little pavlovas are light as air, with a crisp, delicate shell that gives way to a chewy, marshmallow-like center. They practically melt in your mouth and are the perfect vessel for the creamy, dreamy cheesecake filling.
The flavor combo is next level. You get just the right amount of sweetness from the pavlova, richness and tang from the cheesecake filling, and a fresh burst from the berries on top. It's a match made in dessert heaven, and trust me-you'll keep coming back for more.
They're surprisingly simple. Despite their elegant look, these mini pavlovas are easy to make. Each part requires just a handful of ingredients and a few simple steps. No fancy techniques needed-just big rewards!
Components of Mini Cheesecake Pavlovas
These Mini Cheesecake Pavlovas come together with just three simple (but delicious) components:
- Mini Pavlova Shells - Light and crisp, these shells are made with a classic French meringue that's piped into mini cups and baked low and slow until perfectly dried and crunchy on the outside, with a soft, chewy center
- Cheesecake Filling - Once baked and cooled, the pavlovas are filled with a rich, creamy cheesecake mixture that comes together with just a few ingredients. It adds the perfect touch of tanginess and decadence to balance the sweet meringue
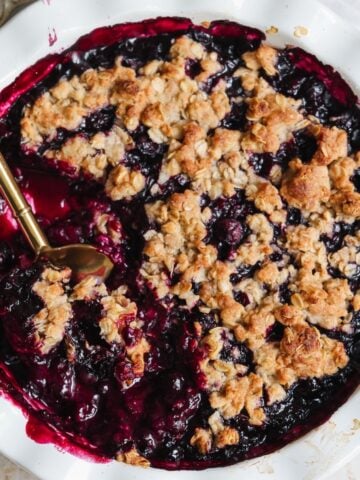
- Berry Glaze + Fresh Berries - To finish, a quick berry glaze is spooned over the top for a pop of fruity flavor and color, then each pavlova is crowned with fresh berries for that final wow factor

Step by step photos
The detailed recipe is provided in the recipe card at the bottom of this post, but let's go over the steps with photos to help you visualize everything.
Whisk the egg whites with salt and cream of tartar until foamy. Then add sugar one spoon at a time while continuing to whisk until a stiff, glossy meringue forms:


Transfer to a piping bag and pipe mini pavlova cups on a baking sheet. Bake until crispy:


For the cheesecake filling, whisk the cream cheese, sugar, vanilla, salt and lemon juice until creamy:


Add heavy cream and whisk again until a pipeable cheesecake filling forms:


Make the berry glaze by cooking together jam, sugar and water until they start to thicken:


To assemble, add a spoon of the berry glaze into each pavlova cup. Then pipe on a swirl of the cheesecake filling:


Decorate with a drizzle of the berry glaze and fresh berries. Then serve & enjoy!


Tips to perfect pavlova
Perfecting pavlova starts with mastering meringue. While meringue is made from just a few simple ingredients, it can be a little finicky-small missteps can lead to deflation, cracking, or weeping. But don't worry! With these tried-and-true tips, you'll be well on your way to pavlova perfection:
1. Keep everything fat-free. Any trace of fat can prevent your egg whites from whipping properly. That means no specks of yolk in your whites, and absolutely no oil or butter residue on your mixing bowl or whisk. To be extra safe, wipe down your tools with a bit of vinegar on a paper towel to ensure they're squeaky clean.
2. Whisk on medium speed. It might be tempting to crank up the speed, but whipping too fast introduces large, unstable air bubbles that can cause the meringue to collapse or split. Medium speed allows for a smoother, more stable meringue that holds its structure beautifully.
3. Add sugar gradually. Slowly incorporating the sugar helps stabilize the egg whites and prevents them from deflating. Rushing this step can lead to a flat, grainy meringue-take your time and add it spoonful by spoonful.
4. Whip to stiff, glossy peaks-but don't overdo it. The meringue should be smooth, shiny, and form stiff peaks that hold their shape when you lift the whisk. Under-whipping will result in a runny mixture that won't set, while over-whipping can cause the meringue to split and become dry or grainy.
5. Bake low and slow. Patience is key. While many recipes recommend baking pavlovas for 60-70 minutes, I find that around 90 minutes at a low temperature yields the best texture. The pavlovas should feel firm to the touch when they're done. This extra time ensures a crisp exterior and that signature chewy, marshmallowy center once cooled.
Storing pavlova
In order to store baked, unfilled pavlova cups / shells, first let them cool down and dry out fully at room temperature so no moisture remains in them. Then place in an airtight, dry container and keep in a dark place at room temperature for up to 2-3 days. They should retain their crispiness. If they don't, bake them again at 220F for a few minutes until they become fresh again!
Once filled, pavlovas should be served immediately. They absorb moisture and become sticky quickly.
Frequently asked questions
You can bake the pavlova cups ahead of time, but do not fill them. They must be served immediately once the cheesecake filling is added, as pavlova starts to become sticky due to moisture. See section above on storing pavlova.
Yes, you can turn this into one giant pavlova, too! I only recommend this if you have experience making pavlovas, though, so you know how to shape and bake appropriately.
Related recipes
Here are a few more summery recipes you will enjoy:

Mini Cheesecake Pavlovas Recipe
- Total Time: 2 hours
- Yield: 10 mini pavlovas
Description
Light, crispy, and chewy and delicious mini pavlovas filled with a luscious cheesecake filling and topped with berries
Ingredients
Mini pavlova shells:
- 5 large egg whites
- ½ teaspoon cream of tartar
- ½ tsp salt
- 1 cup + 2 tablespoon granulated sugar (225g)
- 1 teaspoon pure vanilla extract
Cheesecake filling:
- 12oz cream cheese (340g), room temp
- ½ cup sugar (100g)
- 1 tsp vanilla
- ¼ tsp salt
- 2-3 tablespoon lemon juice
- 1 cup heavy cream (240g)
Berry glaze:
- 4 tbsp berry jam of choice
- 2 tbsp water
- 1 tbsp sugar
- Fresh berries of choice for decoration
Instructions
Mini pavlova shells:
- Pre-heat oven to 220F and line a large baking sheet (light colored preferred) with parchment paper
- Add the egg whites to the clean bowl of a stand mixer. Make sure there are no yolk specks in the egg whites, and make sure the bowl and whisk are completely clean with no grease on them. Add the cream of tartar and salt
- Use the balloon whisk attachment (or standard paddle beaters of an electric mixer) to whisk on medium speed for a few minutes until the egg whites look frothy and white
- Add the sugar one spoon at a time while continuing to whisk on medium speed. Towards the end, add the vanilla extract too
- Keep whisking until the egg whites turn into a stiff and glossy meringue that starts to collect in ripples around the whisk and leaves a stiff peak when the whisk is lifted out of it. This process can take several minutes. Do not overmix, as that will cause the meringue to separate and leak water
- Transfer the meringue to a piping bag and cut a ~½" hole in it
- Pipe mini pavlova cups onto the baking sheet, about ~3" in diameter. Make sure to pipe raised edges so the pavlovas can hold the cheesecake filling, and ensure there aren't any large gaping holes in them (see video tutorial). You should get ~10 mini pavlovas
- Bake at 220F for ~90 minutes or until the pavlovas look a light golden color and are firm to touch (i.e., not sticky)
- Remove from the oven and let them cool down fully. Once cooled, they should become crispy and should easily come off the parchment paper
Cheesecake filling:
- Make the filling while the pavlovas are baking
- Add the cream cheese, sugar, salt, vanilla and lemon juice to a bowl and whisk until the mixture looks creamy. Scrape the bowl along the way
- Add the heavy whipping cream and whisk for a few seconds until a thick, pipeable mixture forms
- Transfer to a piping bag and keep refrigerated
Berry glaze:
- Add the jam, water and sugar to a saucepan. Cook and stir on low heat for a few minutes until a smooth glaze forms that just starts to thicken up. Remove from heat and let cool down
Assembly:
- Once the pavlovas have completely cooled down, it's time to assemble
- Add a small spoon of the glaze to the bottom of each pavlova. Then pipe a generous swirl of the cheesecake filling into each pavlova (I like to use a star piping tip for this)
- Decorate with a drizzle of the berry glaze and top off with fresh berries
- Serve immediately & enjoy!
Video Tutorial:
Notes
It is critical to serve pavlova immediately after filling, as it can become soggy within an hour. See blog post above for tips on storing unfilled pavlovas.
- Prep Time: 40 min
- Cook Time: 90 min
- Category: Dessert
- Cuisine: American
Nikki says
Hi,
Can you make the pavlova ahead of time and just pipe it the next day to serve?
Regina says
What a great recipe and the instructions are perfect, thanks for sharing! I really appreciated the tip about when to assemble them. I made pavlova one other time and they got soggy because I assembled them the night before but I didn’t know that’s what went wrong until I read your tip.🙂
Zoha says
I'm so glad you made and loved them! 🙂
Safana Hussain says
I only have a lower oven setting—will my pavlova still turn out fine?
Zoha says
Yes, my oven also only has a heating rod on the bottom!
Nyree says
It was super yummy! First time making pavlova. My little pavlovas cracked when I was cooking them. Was I supposed to turn the oven off and let it cool? Also it was a bit sweet. If I use less sugar would it still be good?
Zoha says
Hi Nyree! Pavlovas do tend to be sweet but I recommend countering that wit the fillings instead of reducing sugar in the meringue. The crackign could be due to oven temperature - what type of oven do you have?
Safana Hussain says
JazakiAllahu khair, Zoha ❤️ The pavlova turned out amazing, Alhamdulillah! I was honestly really nervous to try it, especially since my first two attempts didn’t go well—the temperature wasn’t right and the sugar had leaked out. But this time, Alhamdulillah, it came out perfect and everyone at home loved it.
For next time, if I want to double the recipe, can I bake both trays at the same time in the oven? Or is it better to make two separate batches and bake them one after the other? I’m a bit hesitant to use two trays at once because I’m not sure if the heat will distribute properly to the top tray. At the same time, making two separate batches feels like a lot of extra work. What would you suggest?
Zoha Malik says
Thank you so much, Safana! So happy you liked these. It should be ok to bake 2 trays at the same time, actually. You can swap their positions halfway through the bake. They may develop small cracks but it doesnt matter as they get covered anyways 🙂