
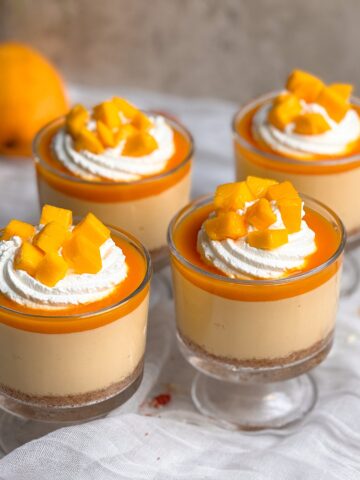
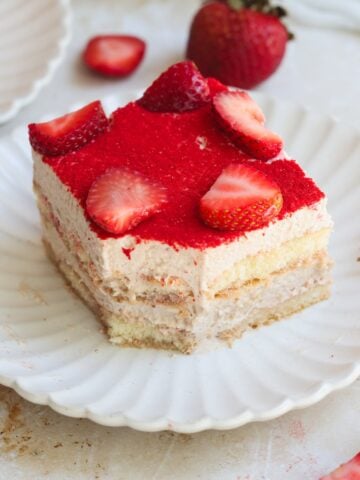
These No Bake Salted Caramel Cheesecake Cups are like salted caramel ice cream and cheesecake in one dessert! Made with only 7 ingredients, minimal effort and no gelatin, they are silky, luscious and delicious with a beautifully balanced caramel flavor. They're perfect for hosting, and can be served individually or as one large cheesecake.

In the mood for a baked version instead? Check out my personal favorite Salted Caramel Cheesecake Recipe. And for a full sized cheesecake, check out my No Bake Biscoff Salted Caramel Cheesecake.
Read the full blog post below for detailed notes, tips, tricks, photos and videos.
Jump to:


Why you'll love this recipe
It is incredibly easy. The hardest component is probably the salted caramel sauce, but you're welcome to use ready made, or try my cheat's version made using caramel candy! This recipe includes both options.
It tastes divine. The lovely bitter caramel notes pair beautifully with the fresh tanginess of cream cheese with a hint of salt to create a really balanced flavor which is not overpowering at all. Even if you're not usually a caramel fan, you might be pleasantly surprised!
The texture is SO good! Since this is a no bake cheesecake recipe, the texture is ultra silky and creamy. It really feels like cheesecake and ice cream made a baby.
It's perfect for serving. Make it in a large dish and serve it by the spoonful, or serve in individual dessert cups - this cheesecake is perfect for all hosting occasions!
Components of No Bake Salted Caramel Cheesecake
These No Bake Salted Caramel Cheesecake Cups are made with 3 simple components:
- A Biscoff cookie crust. Biscoff has caramel notes in it, making it ideal for the crust in caramel cheesecakes
- Salted caramel sauce. Whether you make one from scratch, use store-bought, or make my cheat's version, this sauce is folded into the cheesecake mixture and then poured on top of the cheesecakes too
- Salted caramel cheesecake filling. A simple, silky and luscious cheesecake filling made with cream cheese, sugar, salted caramel sauce and whipped cream makes the heart of this dessert
Optionally, I like to decorate the cheesecakes with whipped cream, but you can decorate however you like (e.g., just a sprinkle of sea salt).

Step by step photos
The detailed recipe is provided in the recipe card at the bottom of this post, but let's go over the steps with photos to help you visualize everything.
Make the salted caramel sauce and let it cool down - I recommend reading my detailed blog post with step-by-step pictures to get it right.


Grind the Biscoff cookies with melted butter, then divide between the dessert cups and press down gently:


For the cheesecake, whisk the cream cheese, sugar and vanilla until smooth:


Whisk in some of the salted caramel sauce:


Whip heavy cream to medium peaks and gently fold it in:


Divide the cheesecake mixture evenly between the dessert cups, spread out and chill:


When chilled, top the cups with more salted caramel sauce and decorate with whipped cream:


Tips to perfect this recipe
This recipe is simple, but a few key tips can make all the difference between good and amazing:
Don't press the crust too tightly. Although I always recommend that when making full sized cheesecakes, a very tightly packed crust in dessert cups is nearly impossible to spoon out.
Use good quality, full fat cream cheese. Philadelphia is always a safe choice, and make sure you let it come to room temperature first!
Do not overmix the cheesecake batter! Only mix until the ingredients are combined at every stage, and scrape the bowl often. This will help get a really creamy result.
Chill thoroughly. Rushing the chilling process is a surefire way to ruin an otherwise perfect dessert.
If you're making the salted caramel sauce from scratch, which I do recommend, check out my detailed blog post with lots of tips!
My dessert cups
Because I always get asked, here are my dessert cups! They're made of glass, sturdy quality, and the perfect single serving size.
Frequently asked questions
Yes, you may, but I always recommend homemade for the best results.
Yes, you can, but you will need to chill overnight and it might lose shape when left out of the fridge too long. To be safe, I would recommend making it in a glass dish and serving straight from it.
You can choose any size that works for you! My cups are 7oz each.
Yes! Layer the crust and cheesecake filling in your dessert cups and refrigerate for up to 3 days (covered). Then drizzle on the salted caramel sauce and whipped cream whenever you're ready to serve.
Related recipes
If you love cheesecake and / or no bake desserts, check out these recipes too:


No Bake Salted Caramel Cheesecake Cups
- Total Time: 45 min + cooling
- Yield: 6 cheesecake cups
Description
Easy, luscious and beautifully balanced no bake salted caramel cheesecake cups made with just 7 ingredients and no gelatin!
Ingredients
Salted caramel sauce option 1 (from scratch):
- ¾ cup granulated sugar (150g)
- 4 tbsp unsalted butter, room temp and sliced (56g)
- ⅓ cup heavy cream, room temp (80g)
- 1 tsp vanilla extract
- ¾ tsp salt
Salted caramel sauce option 2 (with candy):
- 20 Werther's Original Chewy Caramels
- 2 tbsp heavy cream
- ½ tsp salt
Crust:
- 200g Biscoff cookies (about 26 cookies)
- 6 tbsp unsalted butter, melted (85g)
Cheesecake filling:
- 16oz cream cheese, room temp (450g)
- ⅓ cup sugar (65g)
- 1 tsp vanilla
- ⅓ cup salted caramel sauce from option 1 or option 2 above
- ⅔ cup heavy cream, chilled (160g)
Serving:
- 1 cup heavy cream, chilled (240g) - optional
Instructions
Salted caramel sauce option 1 (from scratch):
- Add the sugar to a wide-bottomed, light-colored pan and place on the lowest flame on the stove (do not use high flame as the sugar can easily burn). Let the sugar heat until you see that it has started to melt on the bottom. At this point, use a dry utensil to slowly stir the sugar and encourage it to melt evenly. It will look grainy and lumpy, but keep slowly stirring and allowing the sugar to heat on low flame, and eventually all the lumps and grains will melt. Once the sugar has fully melted, continue to cook until it reaches a deep golden, caramel color. This entire process can take 15+ minutes depending on your pan and stove
- Turn off the heat. Add the softened butter, and whisk it in until it has fully melted. The butter will not dissolve in the sugar and will look separated, which is totally ok
- Once the butter has fully melted, add the warm cream (make sure it is warm to touch; you can heat it in the microwave for 20-30s) and whisk it in. The cream will become very bubbly and frothy at first, but will quickly settle and create a smooth caramel sauce. If you feel that the sauce is becoming too thick or seizing up, turn the heat back on the lowest setting and gently stir until the sauce looks like the right consistency, then turn off the heat again
- Add vanilla and salt (start with ½ tsp, taste, and add more as needed) and mix in
- At this point, you should have a smooth but runny dark golden caramel sauce. Pour it into a heat-safe glass bowl or jar, and let it cool down fully at room temperature
Salted caramel sauce option 2 (with candy):
- Add the Werther's candies (unwrapped) to a nonstick saucepan along with the heavy cream. Cook and stir on the lowest flame until the candy has melted and a smooth sauce has formed
- Turn off the heat and stir in the salt
- Transfer to a heat-safe container and let cool completely to room temperature
Crust:
- Add the cookies and melted butter to a food processor and blitz until a fine crumb forms
- Divide the crumb evenly between 6 dessert cups (7oz each)
- Press down gently using the bottom of a narrow glass - don't pack too tightly! Keep in the fridge while you work on the filling
Cheesecake filling:
- Add the room temperature cream cheese, sugar and vanilla to the bowl of a stand mixer. Use the paddle attachment to whisk for 2-3 minutes until the sugar dissolves. Scrape the bowl a few times along the way
- Add ⅓ cup of salted caramel sauce (from option 1 or 2; make sure it has cooled to room temperature) and whisk again just until combined. Do not overmix
- In a separate bowl, whisk the heavy cream to medium peaks (it should become thick and start to hold shape). Add to the remaining mixture and use a rubber spatula to slowly and gently fold it in
- You should have a silky smooth cheesecake mixture now. Divide it evenly between the dessert cups with the crust in them, and spread evenly with a knife or spatula
- Refrigerate for 4-6 hours or overnight until thoroughly chilled
Serving:
- When ready to serve, remove the cheesecake cups from the fridge. Take the remaining salted caramel sauce and microwave for ~10-15 seconds until it becomes runny (but not too hot). Drizzle ~½ tablespoon of the sauce onto each cup and spread it out evenly
- Optionally, whip up heavy cream to stiff peaks, and pipe it on top of the cheesecakes to decorate
- Serve cold & enjoy!
Video Tutorial:
- Prep Time: 30 min
- Cook Time: 15 min
- Category: Dessert
- Cuisine: American
Zoha says
I'm SO glad you like these!
Kathryn says
Hi Zoha! Can this be made into one 8” round sized cheesecake? Or would the quantities need to be modified?
Kathryn says
Sorry, Zoha, please ignore my question about whether this can be made into one 8” cake. I can see all of the post and the various options now. Take care!