
These Ultimate Red Velvet Chocolate Chip Cookies combine the beautiful flavor and vibrant color of red velvet cake with the crispy, chewy and chocolatey goodness of chocolate chip cookies. They're easy to make, look incredible, and pack a punch in flavor and texture, making them perfect for occasions like Valentine's!

Read the full blog post below for detailed notes, tips, tricks, photos and videos.
Jump to:
Why you should try this recipe
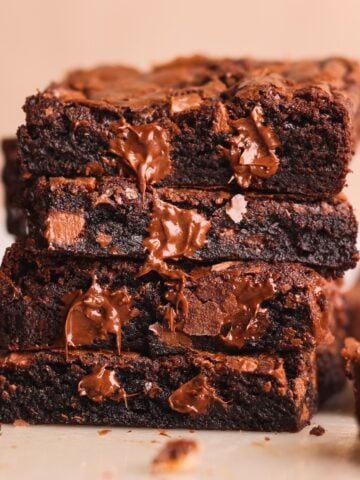
Firstly, just look at them...


If that didn't convince you, allow me to. These cookies have got it all:
- The flavor: These cookies taste absolutely heavenly! They have the nutty undertone of brown butter, notes of vanilla, a slight tang of freshness, and are loaded with dark, milk and white chocolate. They truly do taste like the combination of red velvet cake and chocolate chip cookies, and are a huge upgrade to boring, overly sweet cookies
- The texture: They have everything you want in a good cookie - the perfect thickness so you get a good bite, crispy edges, and a chewy, gooey interior with lots of melted chocolate
- The look: Not to be superficial but these are definitely the prettiest cookies I've ever seen or made! The vibrant red color beautifully contrasts the three types of chocolate, and is perfect for all special occasions
- Ease! Most importantly, they're very easy to make. They don't require any special ingredients or equipment (not even a mixer), and are very beginner friendly
And if you're looking for more Valentine's Day recipes, also check out my Perfect Red Velvet Cake and Strawberry Cheesecake Cookies!
Process with photos
The detailed recipe is provided in the recipe card at the bottom of this post, but let's go over the steps with photos to help you visualize everything.
Start by browning the butter. Whisk in the white and brown sugars on the lowest flame for just 1 minute:


Let the mixture cool down, then whisk in the egg, egg yolk, vanilla, vinegar, and red food color until the mixture is silky smooth:


Sift and mix the dry ingredients separately. Add them to the batter and gently fold until just combined:


Lastly, fold in the chopped dark, milk and white chocolates:


Scoop the dough into equal balls, top them with more chocolate, and chill overnight:


Once chilled, transfer to a large baking sheet and bake:


Tips to perfect these cookies
Let's go over my best tips on how you can perfect these cookies:
- Measure ingredients using a scale instead of measuring cups, especially the flour! It is very easy to add too much flour when using measuring cups, which can make the cookies dry and cakey
- Use high quality red food color - I strongly recommend this gel food color. It has never failed me and has a very vibrant red payoff
- Use high quality chopped chocolate. I don't recommend actually using chocolate chips because they don't melt the same as chopped chocolate bars. I love using Lindt, Ghirardelli or Valrhona chocolate
- Make sure to thoroughly chill the cookie dough! Do this after scooping into cookie balls as it is tough to scoop hardened dough. See more details on chilling below
- Use a light baking sheet like this one. Dark baking sheets cause the cookies to heat and brown too quickly on the bottom
- Bake a test cookie first. Every oven is different, and the only way to know exactly how long you should bake the cookies is by doing a test
- Do not overbake! The cookies should still feel a little soft when they come out of the oven, as they continue to cook and set as they cool down

Is chilling cookie dough really necessary?
Short answer, YES!
I have tested countless cookie recipes with and without chilling the cookie dough, and chilling the cookie dough ALWAYS makes the cookies significantly better. The same is true for these Red Velvet Chocolate Chip Cookies.
If you don't believe me, take a look at the picture below. These are the same exact batch of red velvet cookies, and the only difference is chilling time. The cookie on the left was baked immediately without chilling, while the cookie on the right was baked after chilling overnight. As you can clearly see, the no chill cookie spread too much and had a cakey, dry texture. The chilled cookie spread less and was thicker, with a crispy, chewy texture.

So yes, chilling is absolutely worth the wait. I recommend chilling the dough balls overnight, but at least for 2 hours if you're really in a rush.
Bonus tips to make the cookies look great
Here are 2 secrets to make these cookies look their best:
- Shape them right after baking. Cookies are still malleable when they come out of the oven, so you can use a round cookie cutter or a mug / glass to gently shape them into perfect circles (see video tutorial for a clip of this). This also helps make the cookies look identical
- Add more chocolate right after baking. When the cookies are hot, you can add more chopped chocolate strategically in the spots that look emptier and gently press it in a bit. The heat from the cookies will melt the chocolate in a few minutes

Frequently asked questions
Yes, sure! They will have a light brown color due to the addition of cocoa powder in the cookie dough. You can also try my favorite brown butter chocolate chip cookies!
If by "crystallize" you mean the sugars look grainy, that's totally okay - the mixture will become smooth after adding the egg and egg yolk.
However, if your sugar mixture actually crystallizes or seizes up, it is likely because you cooked the mixture on high heat or for too long. Please make sure you are only cooking on the lowest heat setting for just ~1-2 minutes. We don't want to caramelize the sugar, we are just facilitating the dissolving process. If in doubt, remove the butter from heat, and then whisk in the sugars.
These cookies already have a lower amount of sugar than normal. Reducing it further will negatively impact their texture, so I do not recommend it.
Yes, you can use any combination of chocolate you like. I love using dark, milk and white as they add a depth of flavor and make the cookies look prettier.
The cookies will feel firm and set on the edges, and somewhat soft in the middle. They will set more as they cool!
Yes. After chilling the cookie dough balls in the fridge for 2 hours, you can transfer them to the freezer and keep for up to 3 months. You can bake the cookies directly from frozen and just add a few minutes of baking time.

More cookie recipes
Cookie lovers are in the right place here! Check out some of my favorite cookie recipes:


The Ultimate Red Velvet Chocolate Chip Cookies Recipe
- Total Time: 30 min + chilling
- Yield: 10 cookies
Description
Thick, crispy and chewy red velvet cookies with milk, dark and white chocolate chunks
Ingredients
- 10 tbsp unsalted butter (140g)
- ½ cup light or dark brown sugar, packed (100g)
- ⅓ cup white sugar (65g)
- 1 large egg
- 1 egg yolk
- 1 tbsp vanilla bean paste
- ½ tsp vinegar
- ½ tbsp gel red food color
- 1 ¼ cup all purpose flour (160g)
- 2 tbsp Dutch processed cocoa powder (12g)
- ¾ tsp salt (you can reduce to ½ tsp if you don't like your cookies to be too salty)
- ½ tsp baking powder
- ¼ tsp baking soda
- 8 oz or 225g chopped chocolate - mix of white, milk and dark to your preference (I do 3 oz white, 2.5 oz dark, and 2.5 oz milk)
- Optional: flakey sea salt to sprinkle on top
Instructions
- Place the butter in a non-stick pan and melt it on medium-low heat. Keep stirring for a few minutes until the butter starts to look brown and develops a caramel-y nutty aroma
- Turn the heat all the way to the lowest setting, and add the brown and white sugars. Whisk on the lowest flame for just 1 minute, then remove from the heat. The heat facilitates the dissolving of the sugars and starts breaking them down for a deeper flavor. You are not trying to caramelize or melt the sugars. The mixture may look somewhat grainy, don't worry
- Remove from heat and cool the mixture for 5 minutes. It should be warm, but not hot anymore
- Add the egg, egg yolk, vanilla, vinegar and red food color. Quickly whisk for ~2 minutes until the mixture becomes very smooth and creamy
- Sift the flour, cocoa powder, salt, baking powder and baking soda into a separate bowl and mix together
- Make sure the wet ingredients aren't hot (they shouldn't be). Add the dry ingredients to the wet and fold gently with a rubber spatula until just combined. Do not overmix!
- Lastly, fold in the chopped chocolate until just combined
- Use a 2 tablespoon cookie scoop to divide the dough into 10 balls (if the dough feels a bit too runny to scoop, refrigerate for 10 min first). Don't apply pressure onto the balls, just gently pull them together
- Place the cookie balls onto a plate or baking sheet, and add a few chocolate chunks on top (you can add more chocolate or reserve some of the chopped chocolate from earlier)
- Refrigerate for at least 2 hours, but ideally overnight for best results
- Pre-heat oven to 375F (conventional / no fan) and prepare a large, light colored cookie sheet with parchment paper
- Transfer the balls to the sheet, keeping at least 3" between them
- Bake for 10-12 minutes depending on how soft and gooey you want the cookies to be. I always recommend baking 1 test cookie first!
- Sprinkle the cookies with some flakey sea salt (optional) and let them cool down at room temperature for 10-15 minutes
- Serve and enjoy while still warm!
Video Tutorial:
Notes
- These cookies are best eaten freshly baked for the ultimate texture, but you can also microwave them for 10-15 seconds before eating if not fresh
- You can freeze the cookie dough balls in an airtight container, and bake directly from frozen when needed! Just increase the baking time by ~2-3 minutes depending on how well done you want them
- Prep Time: 20 min
- Cook Time: 12 min
- Category: Dessert
- Cuisine: American

Nanajee Travels says
These Ultimate Red Velvet Chocolate Chip Cookies sound like a dream! 🍪❤️ The perfect blend of red velvet cake flavor with the classic chewy, chocolatey goodness of chocolate chip cookies—what’s not to love? 😍 They’re definitely going to be a hit for Valentine’s Day or any occasion that calls for a little extra sweetness and color! 💕🎉
Mk says
best cookie recipe I've ever made. about to make another batch just 2 days after trying it out. excited to try your regular chocolate chip one as well.
Zoha says
oh my gosh - you made my day!! Thank you!!!
Noor says
hey zoha, I love love lovvveeeee your recipes. my family loved every single thing that I made with your recipe. can you please tell me if I can use liquid food dye instead of gel dye??
Spurthi says
Hi Zoha. I only have red liquid food color, can you please suggest the quantity.
Tahleel says
THE BEST COOKIE RECIPE I HAVE EVER TRIED!!
Zoha says
AWWW thank you!!!
Courtney says
Hi My Name is Courtney Dean I love your red velvet chocolate chip cookies on Halloween I will. Thank you!!
Courtney says
Mmmm yummy I love Red Velvet Chocolate Chip Cookies!! On Halloween I will try I can wait until the Holidays coming again! Hi Zoha my Name is Courtney Dean I love too bake!! I love it!! Have a great day!
Courtney says
Hi My Name is Courtney Dean on Halloween I will try Red Velvet Chocolate chip cookies!! On Holidays I will!! Have a great day!!
Zoha says
Hope you like them, Courtney!
Lisa Esola says
I was asked to bring cookies for a wedding at our church. I wanted something elegant and unique and this recipe was it! I love the complex flavors that complement each other. I took the liberty of making them smaller since there was a "cookie table" and I used chips instead of chocolate bars. The flaky sea salt was the icing on the cake, pun intended! This one's a keeper!
Boutheina says
Must try!
So delicious and easy to make cookies.
Thank you for the recipe!
Hayden says
These were so delicious and soft best ones I have ever made.
Zoha says
YAY!! Thank you!
Seema Farhan says
can i skip egg yolk or is there any substitute for this
Radiyah Akobada says
Hi the first time I tried your cookies everybody loved it.. thank you...but I tried making it again the second time and I forgot to add the cocoa powder with flour mixture and I remembered after I was almost done mixing my dry ingredients but I still added the cocoa powder will that change the texture of my cookies
Zoha says
Hi Radiyah! This will likely result in more mixing, which can impact the texture, but hopefully not too much!