
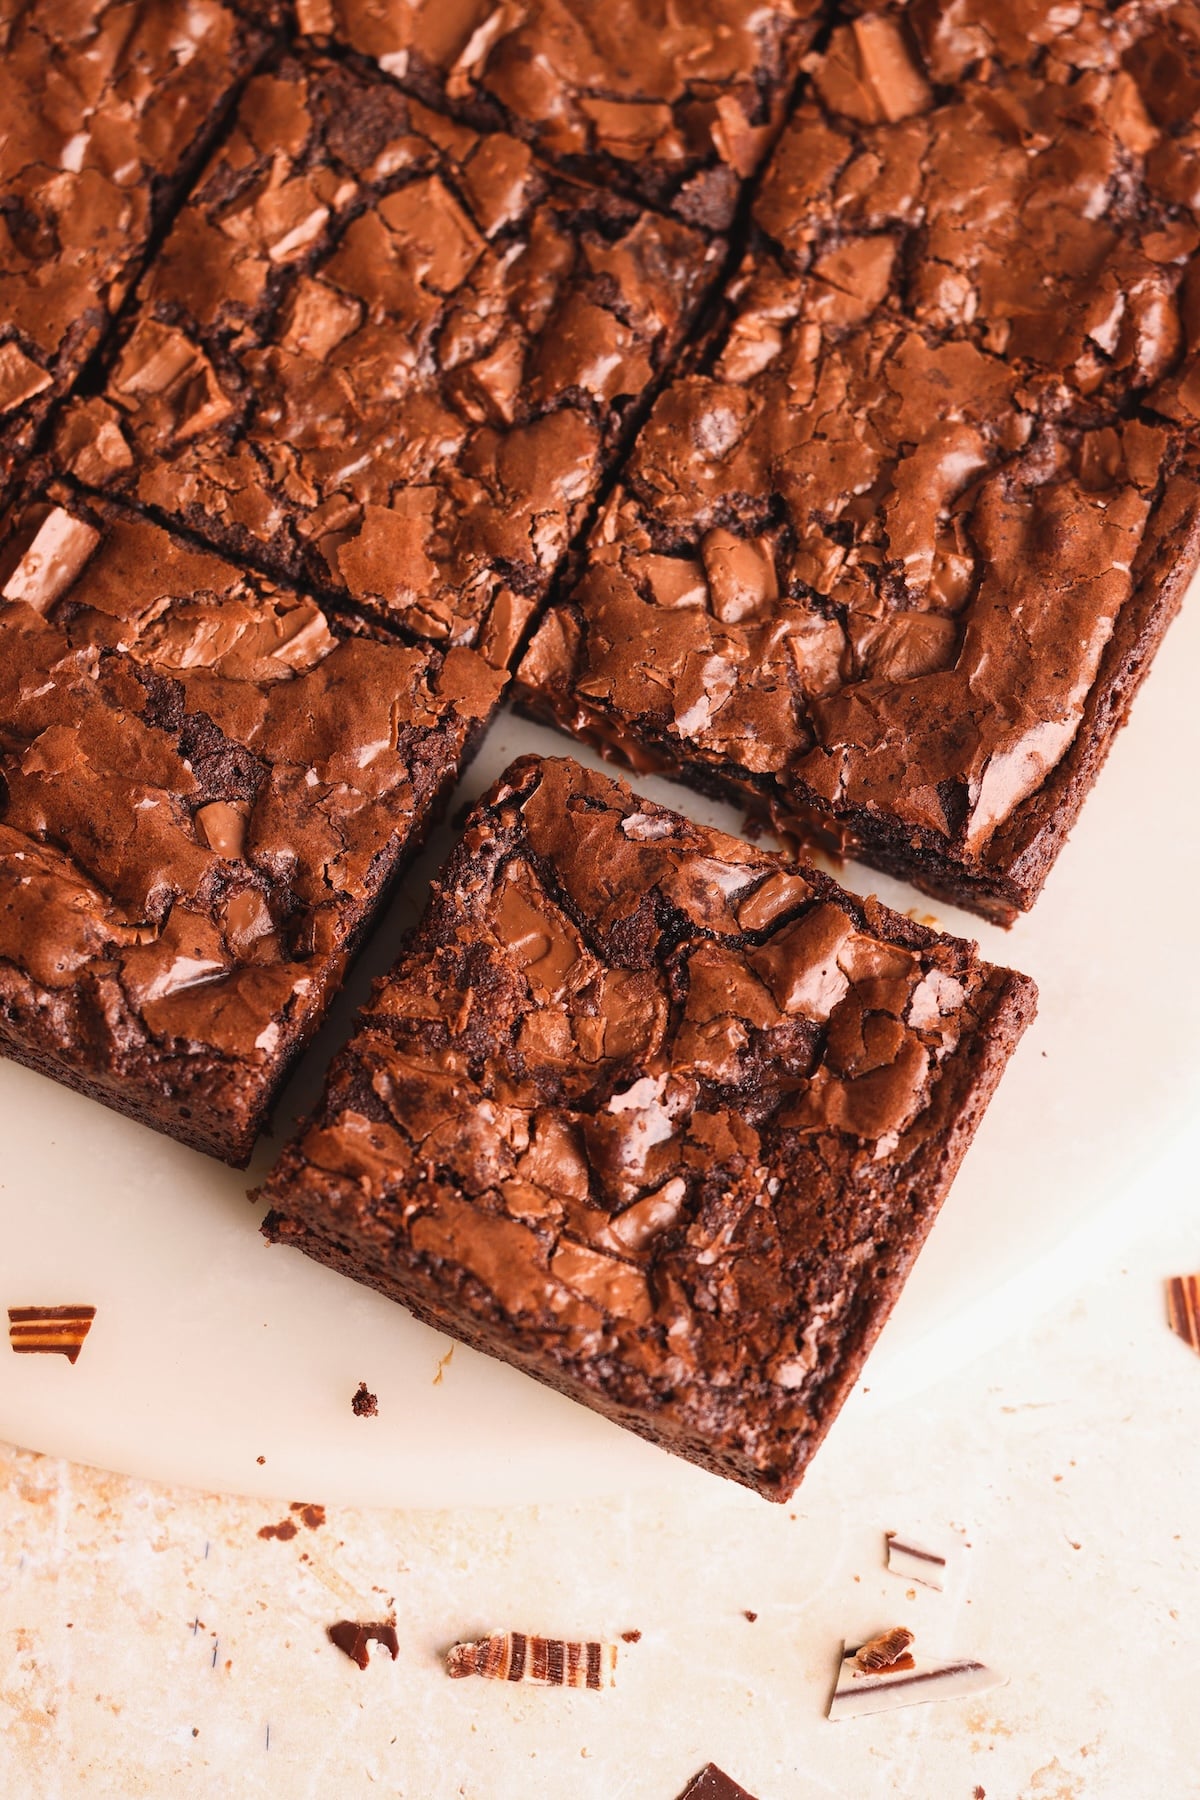
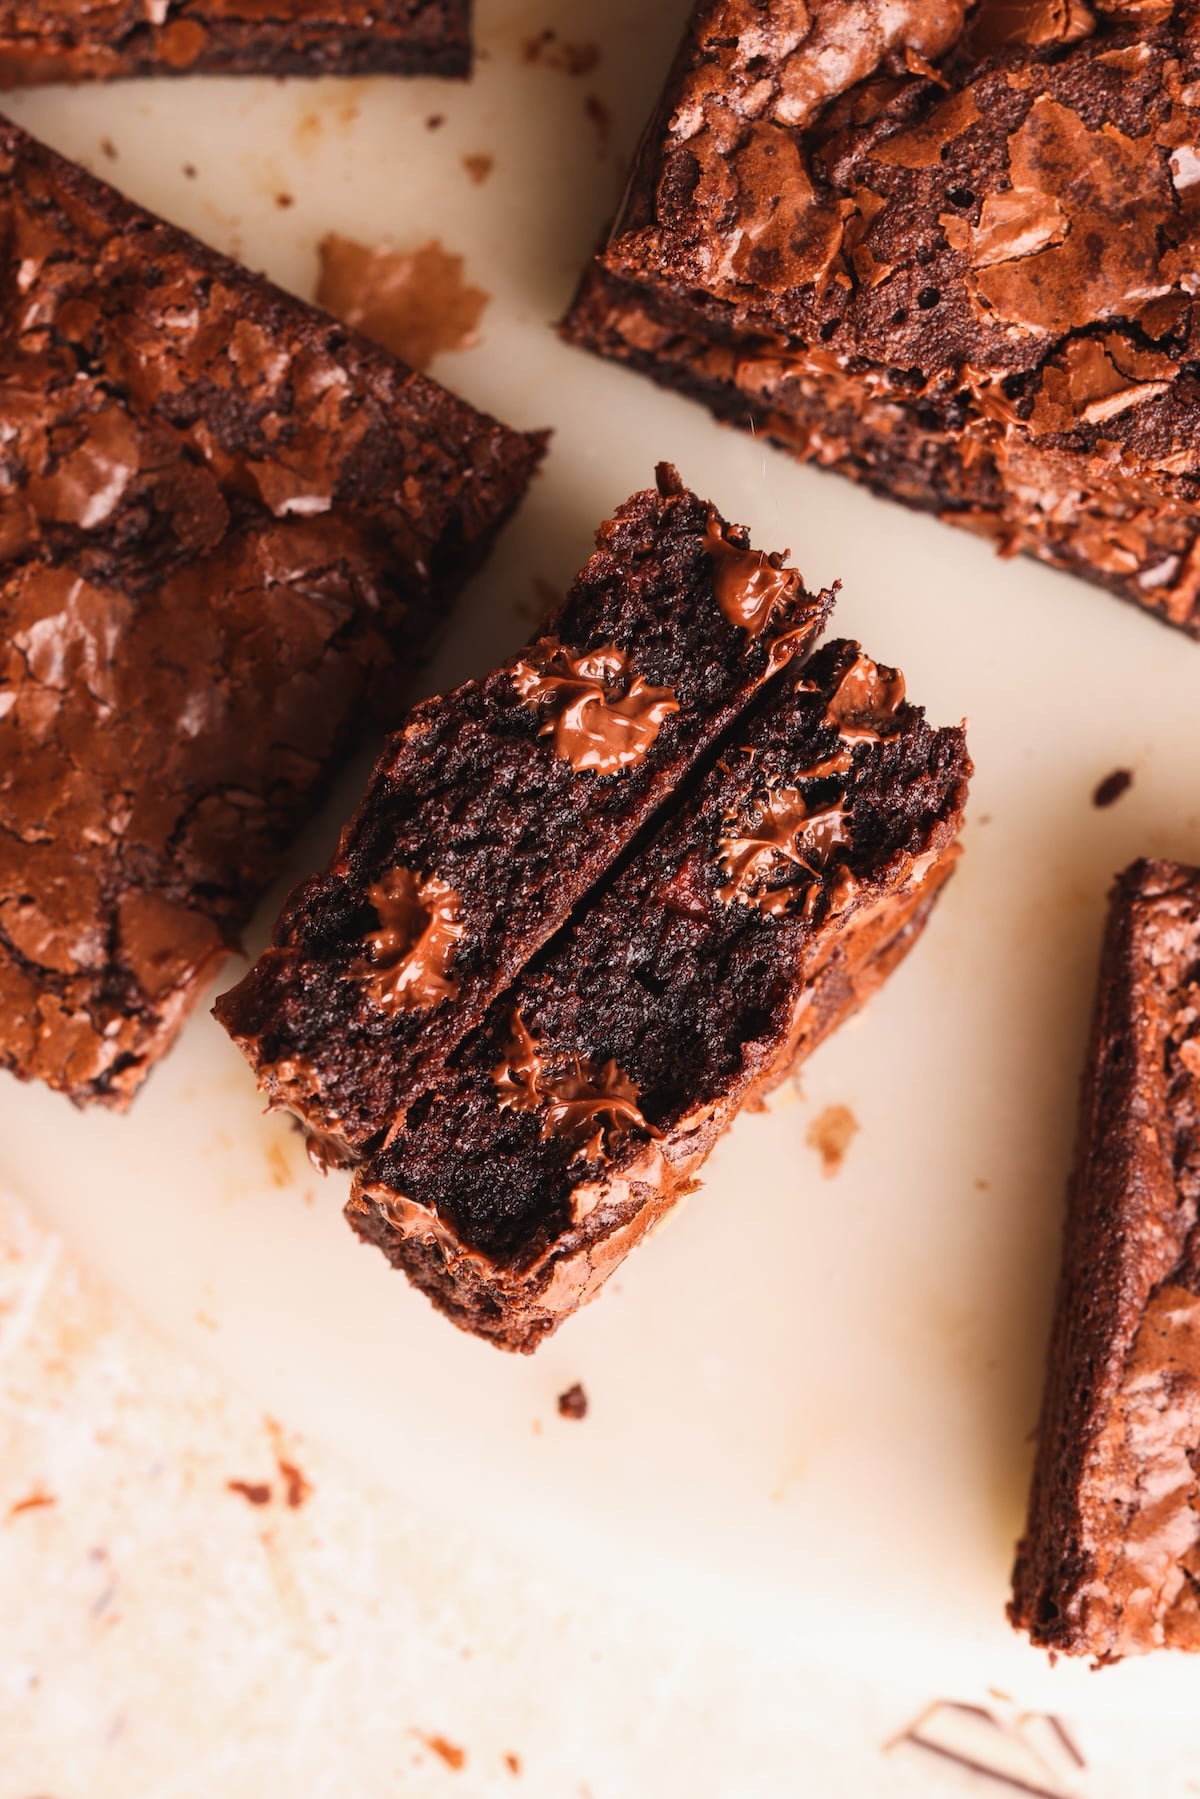
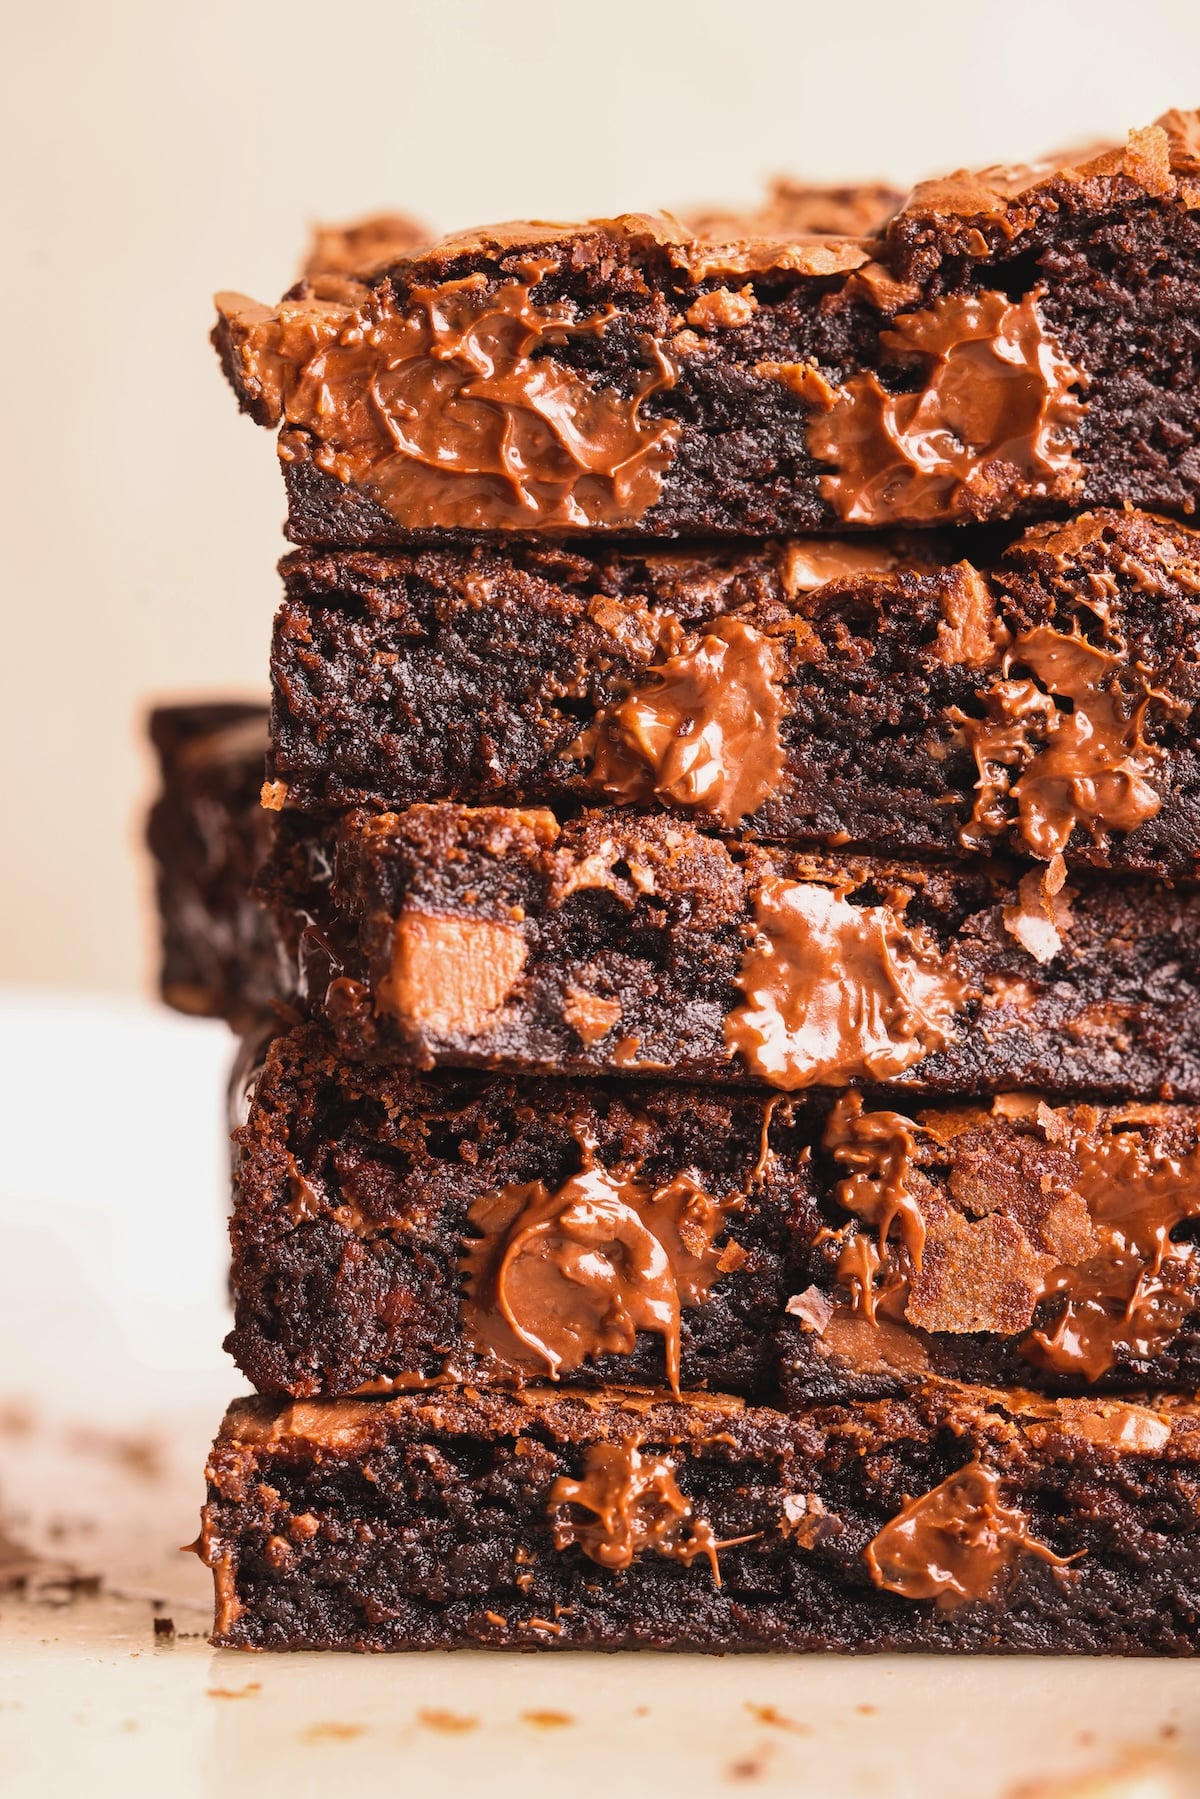
This brownie recipe is about to change your life - figuratively AND literally. They're unbelievably easy and fuss-free: just 7 basic ingredients, one bowl, no mixer and 30 minutes start to finish. Made with cocoa powder only (no melted chocolate required!), they still have a deeply rich, chocolatey, not too sweet flavor. Add a perfectly chewy texture and a beautiful shiny, crackle top, and these brownies gives box brownies a run for their money. And the secret to all of this? Simply grinding your sugar! They may sound too good to be true - but lucky for us, they aren't!
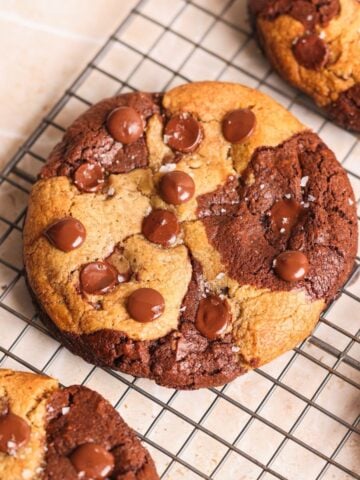
Funnily enough, these brownies are one of the very first desserts I learned to bake, - the recipe that started my love for baking and earned me the title of "brownie girl" in high school! I only recently revisited it after more than a decade, and was genuinely shocked at how good they were. A few tweaks to make them match my adult palette, and I now consider them perfect! You can even make a brownie cookie version of this recipe, which take 20 minutes start to finish.
7 basic ingredients and an optional upgrade
This recipe is at simple as it gets, but here are some helpful notes to keep in mind:
- Butter: You just melt it in the microwave, no need to soften or brown! I prefer unsalted, but you can also use salted butter and reduce the added salt if needed
- Sugar: Start with granulated or caster sugar, and grind it in a food processor (details below!). This recipe is already adjusted to use as little sugar as possible, so I don't recommend reducing it further
- Eggs: Cold or room temperature both work fine
- Flour: I highly recommend measuring with a scale and sifting it in for the best results
- Dutch Processed cocoa powder: I strongly recommend Dutch Processed cocoa powder instead of natural as it is richer and more chocolatey. Especially because we're not adding melted chocolate to the batter, the quality of cocoa powder makes a big difference
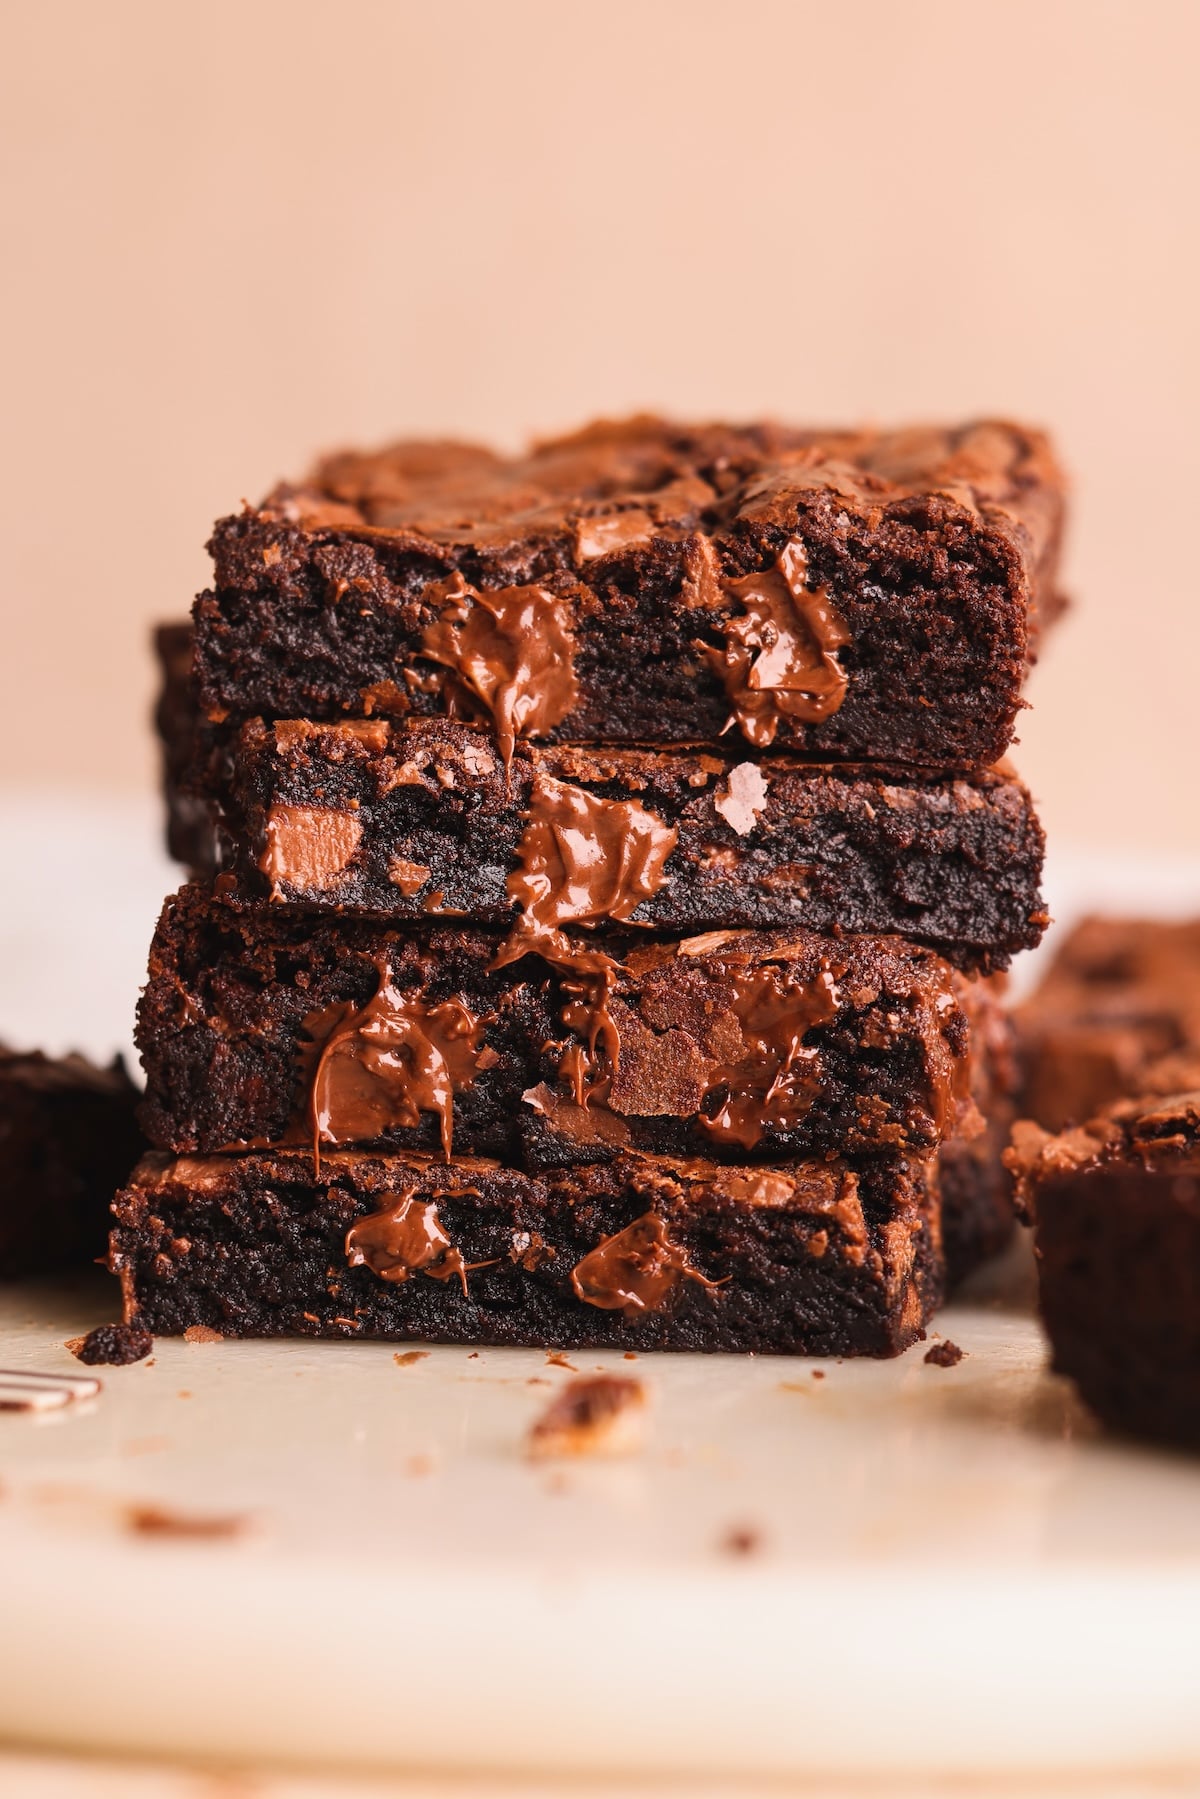
- Baking powder: The tiniest amount causes the batter to rise slightly in the oven, then deflate as it cool. This push-pull on the gluten strands gives the brownies a chewy texture!
- Salt: Last but definitely not the least - it balances the sweetness and adds flavor complexity
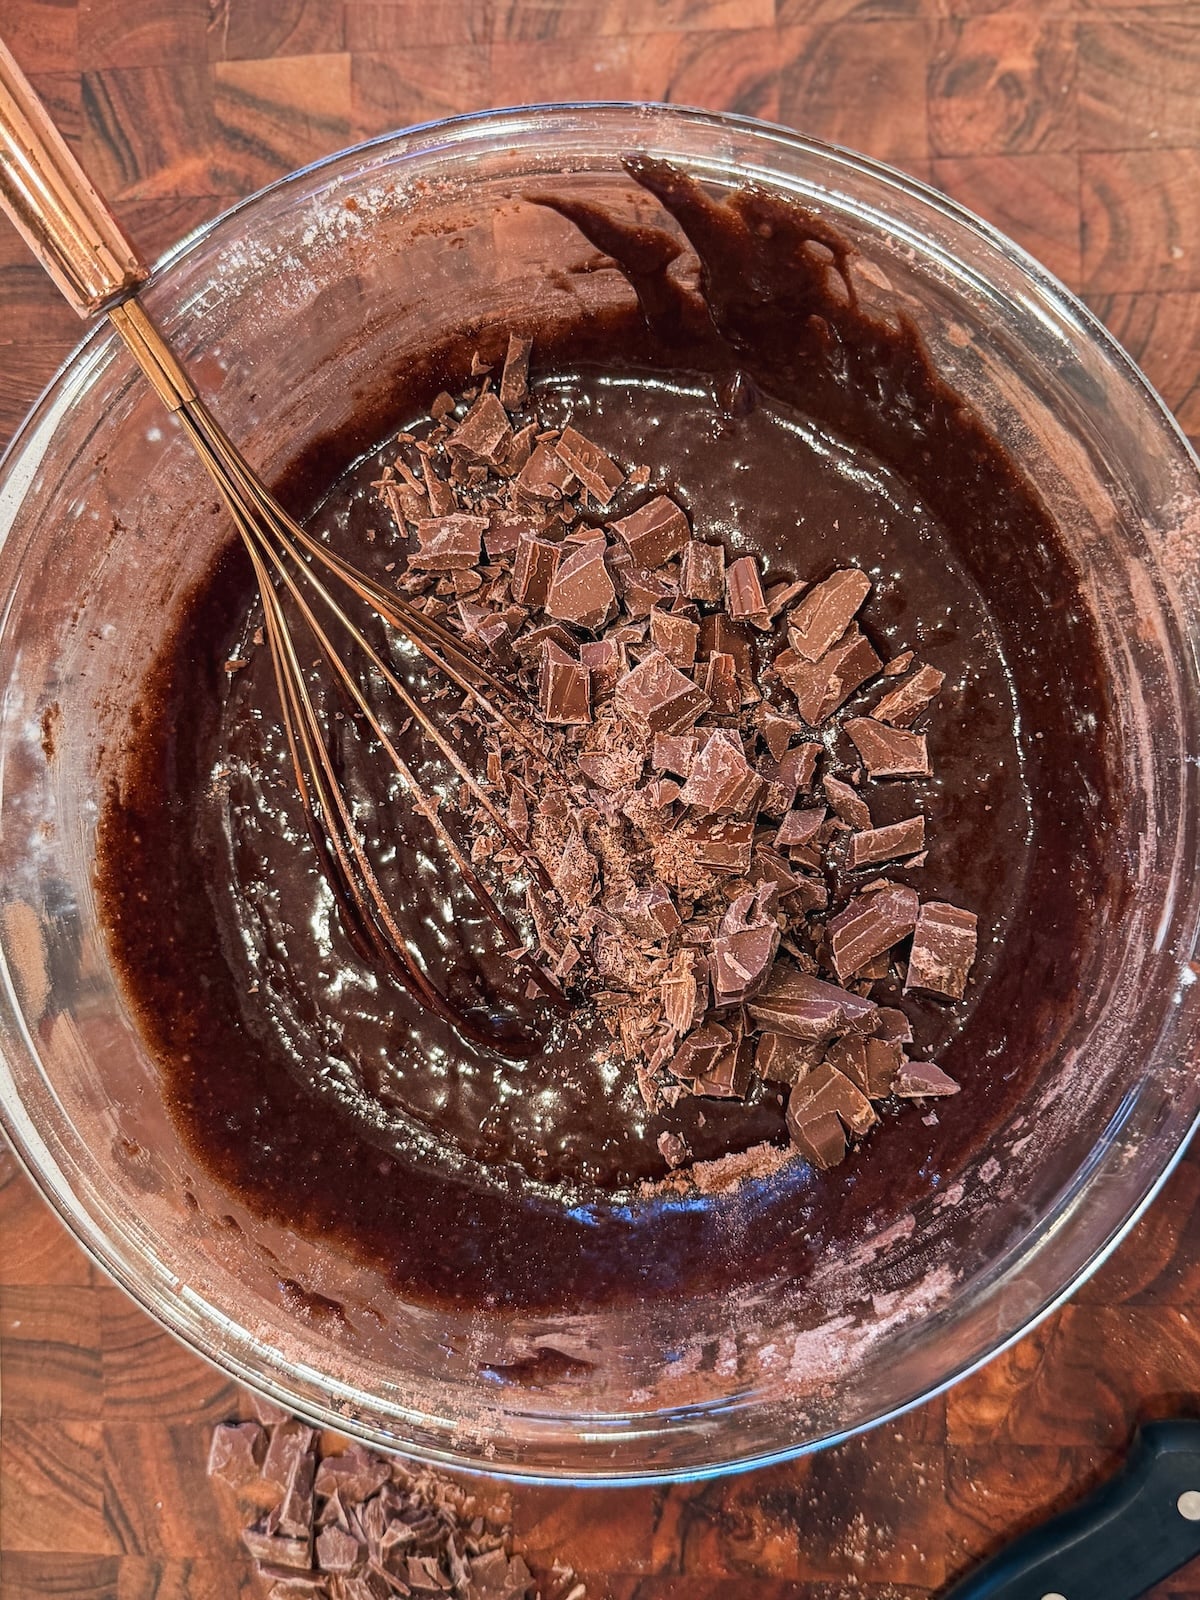
Optional, but recommended: chopped chocolate stirred in at the end. This adds flavor, texture, and makes the brownies even shinier! Have fun with it: milk, dark, white, or even chocolate candy works.
The secret is grinding the sugar!
This actually started out of necessity: back in Pakistan, sugar comes in large granules that don't dissolve easily, so I would always grind it in a food processor. But after a few tests, it turns out grinding makes a huge difference even when you're using the finer granulated sugar in the US! Grinding the sugar breaks it into smaller particles, similar to powdered sugar, helping it dissolve more easily and giving the brownies their chewy, moist texture and shiny crackle top.
And NO, you can't just use powered or icing sugar. It may seem like a shortcut, but powdered sugar contains cornstarch and gives brownies a chalky, unpleasant texture. So take the extra 2 minutes to pulse granulated sugar in your food processor. It's worth it, I promise.
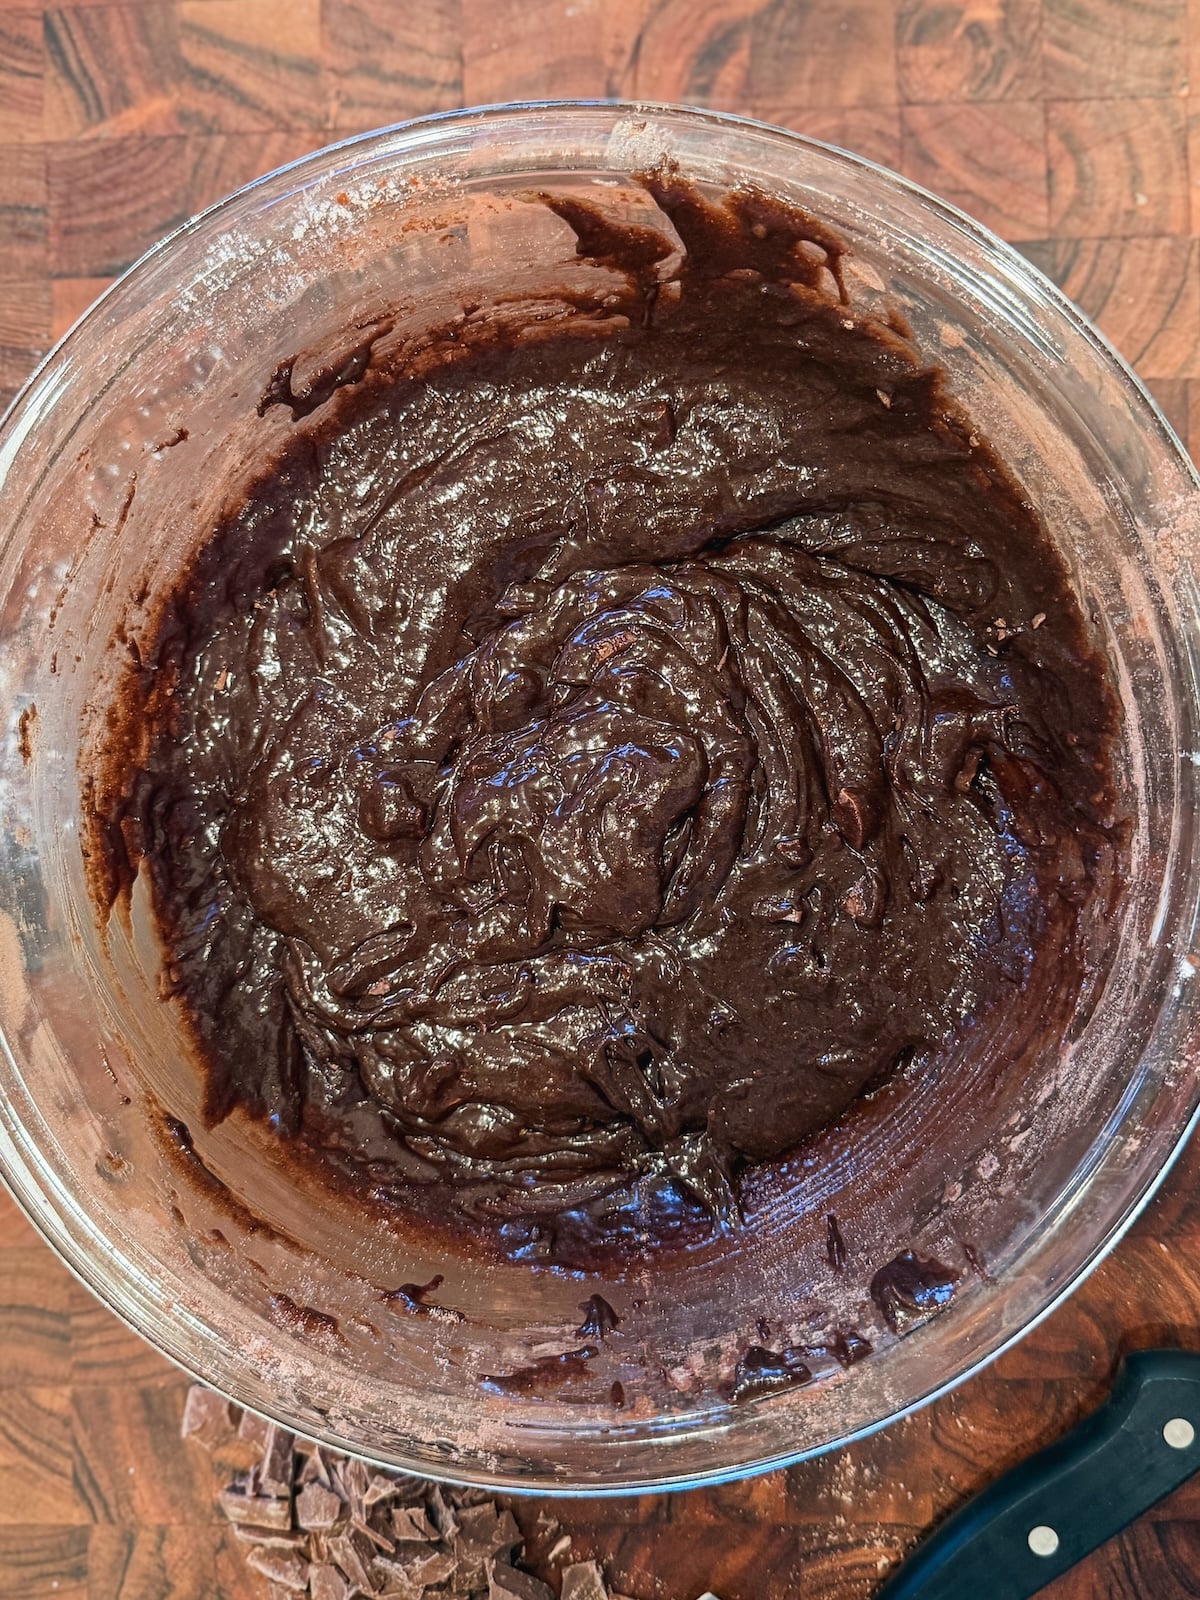
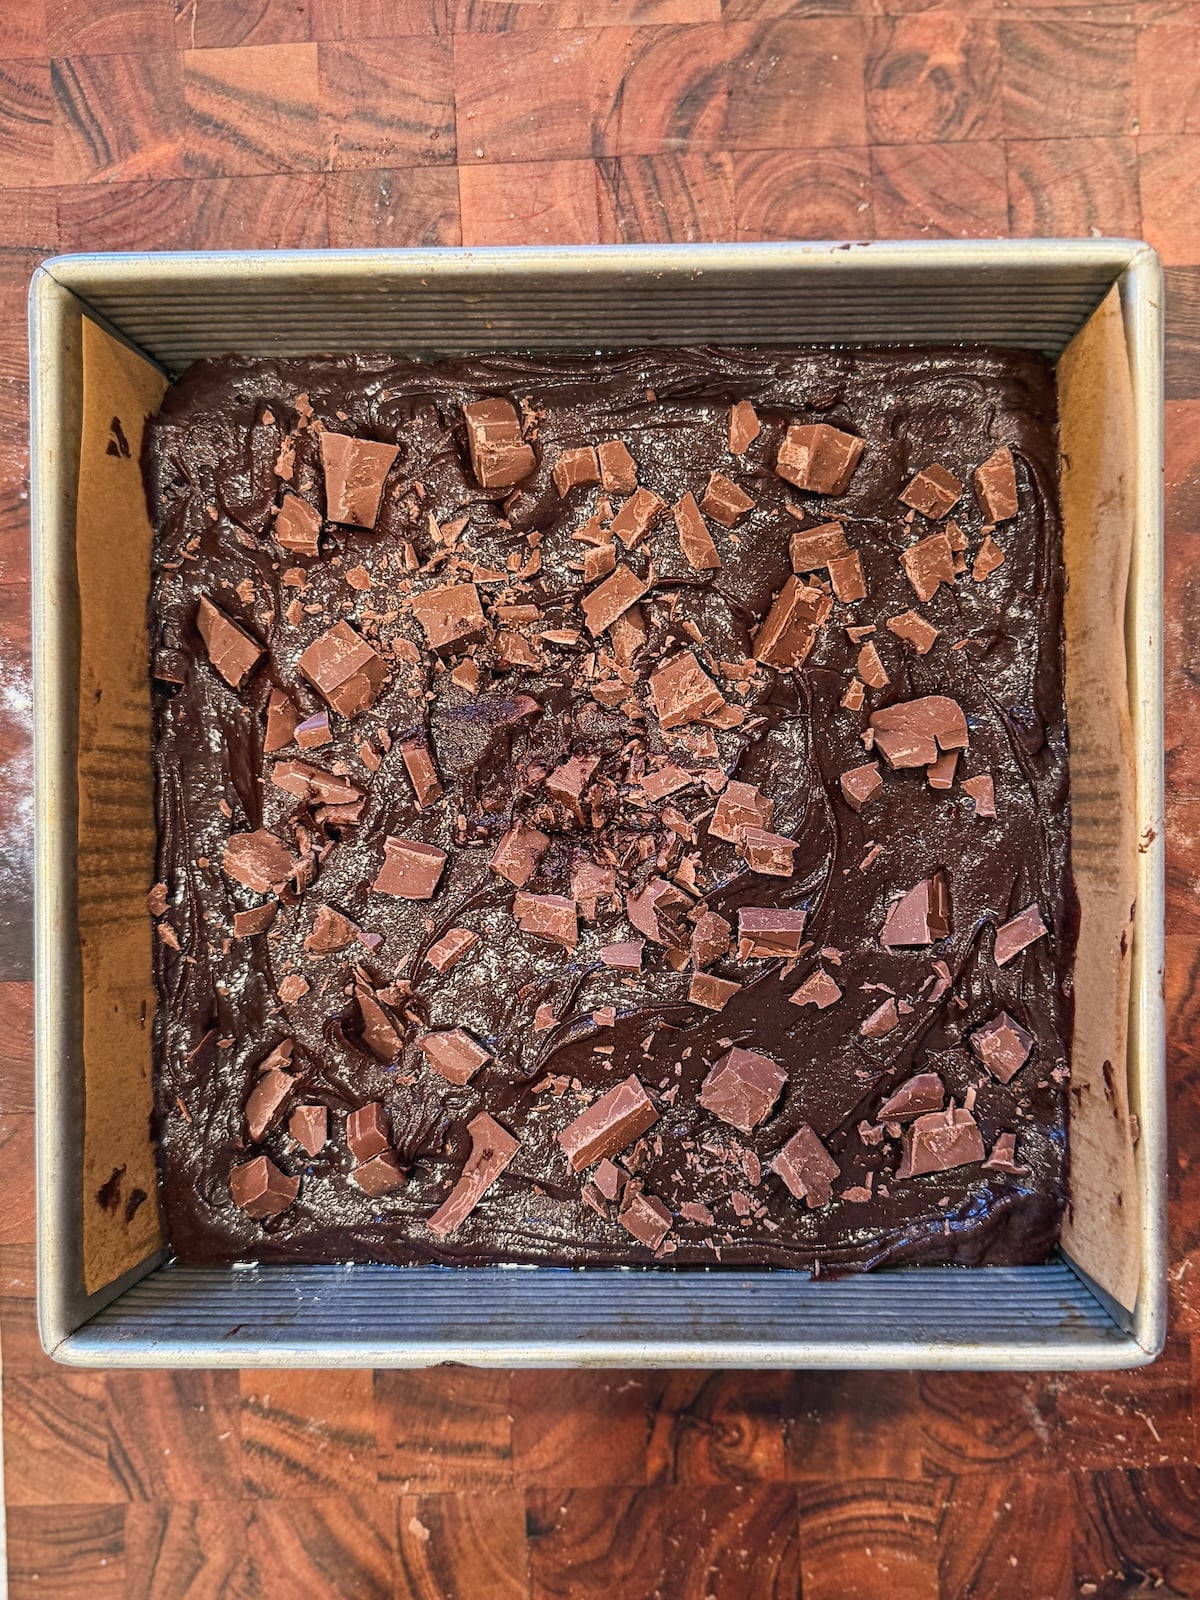
Step by step photos
Let's quickly go over the steps with photos to help you visualize this easy one-bowl recipe:

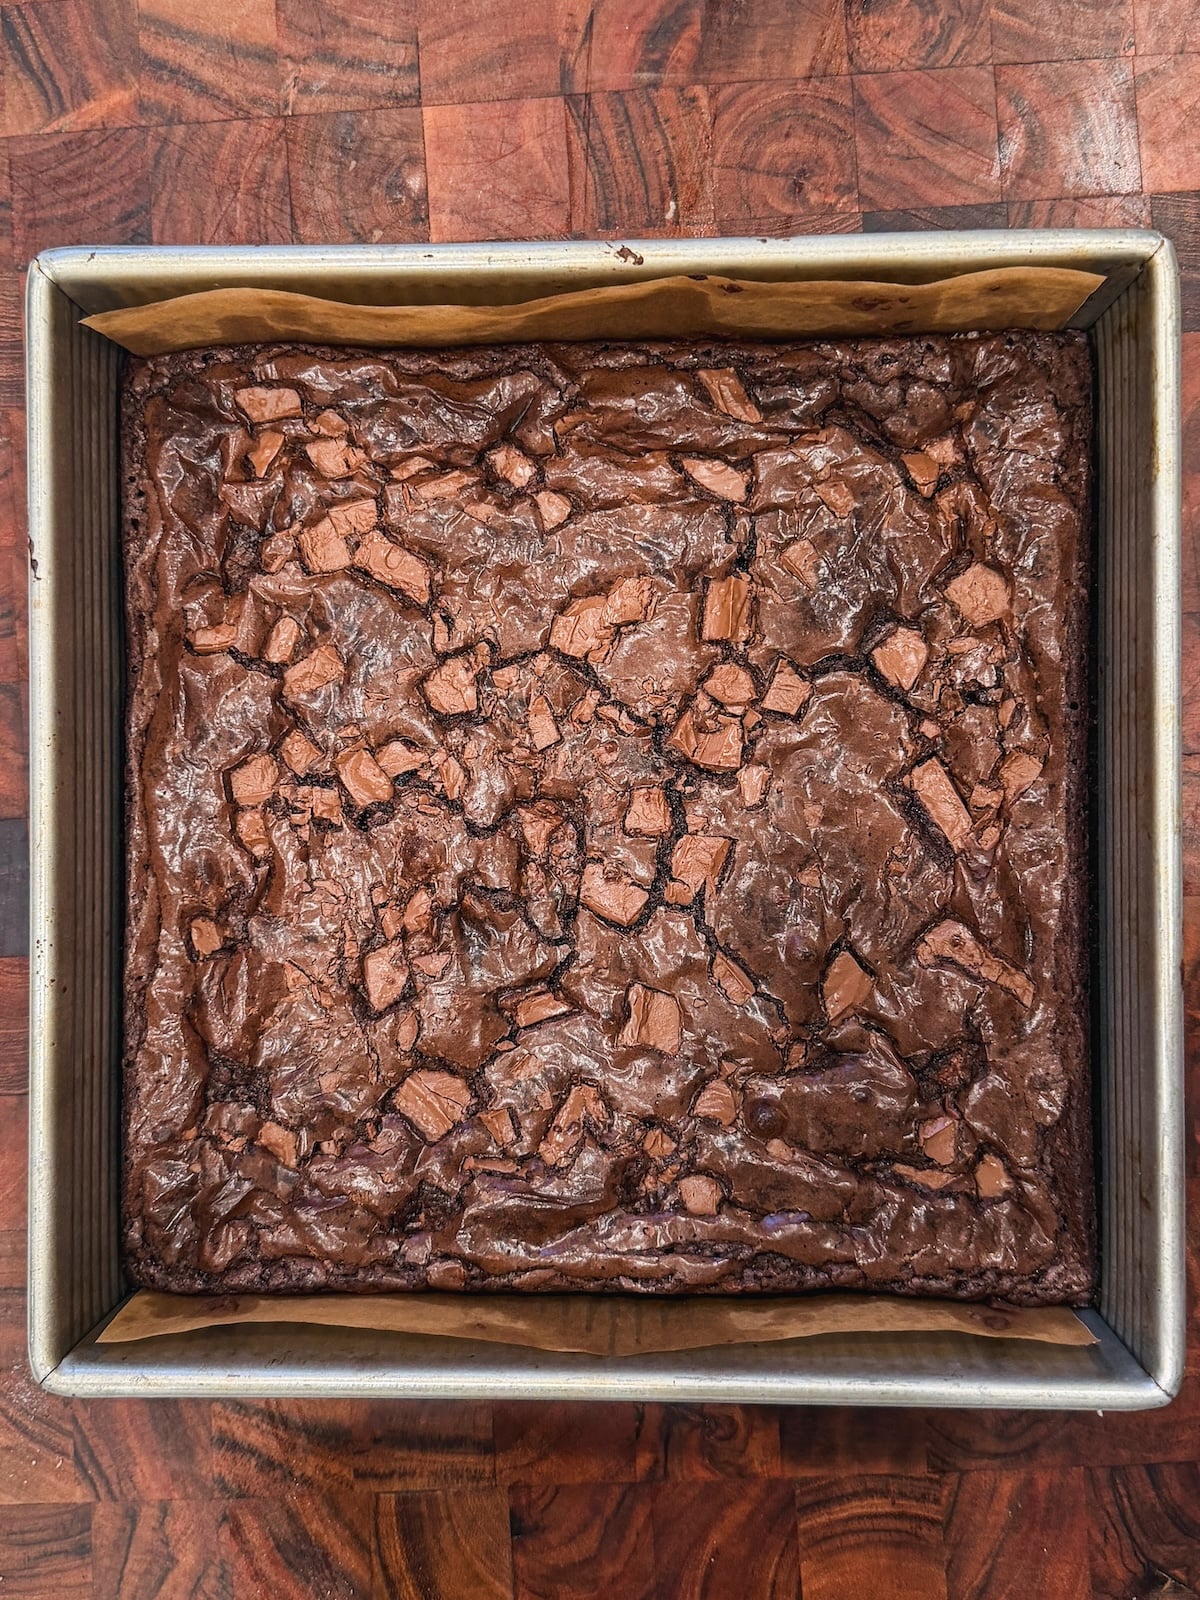
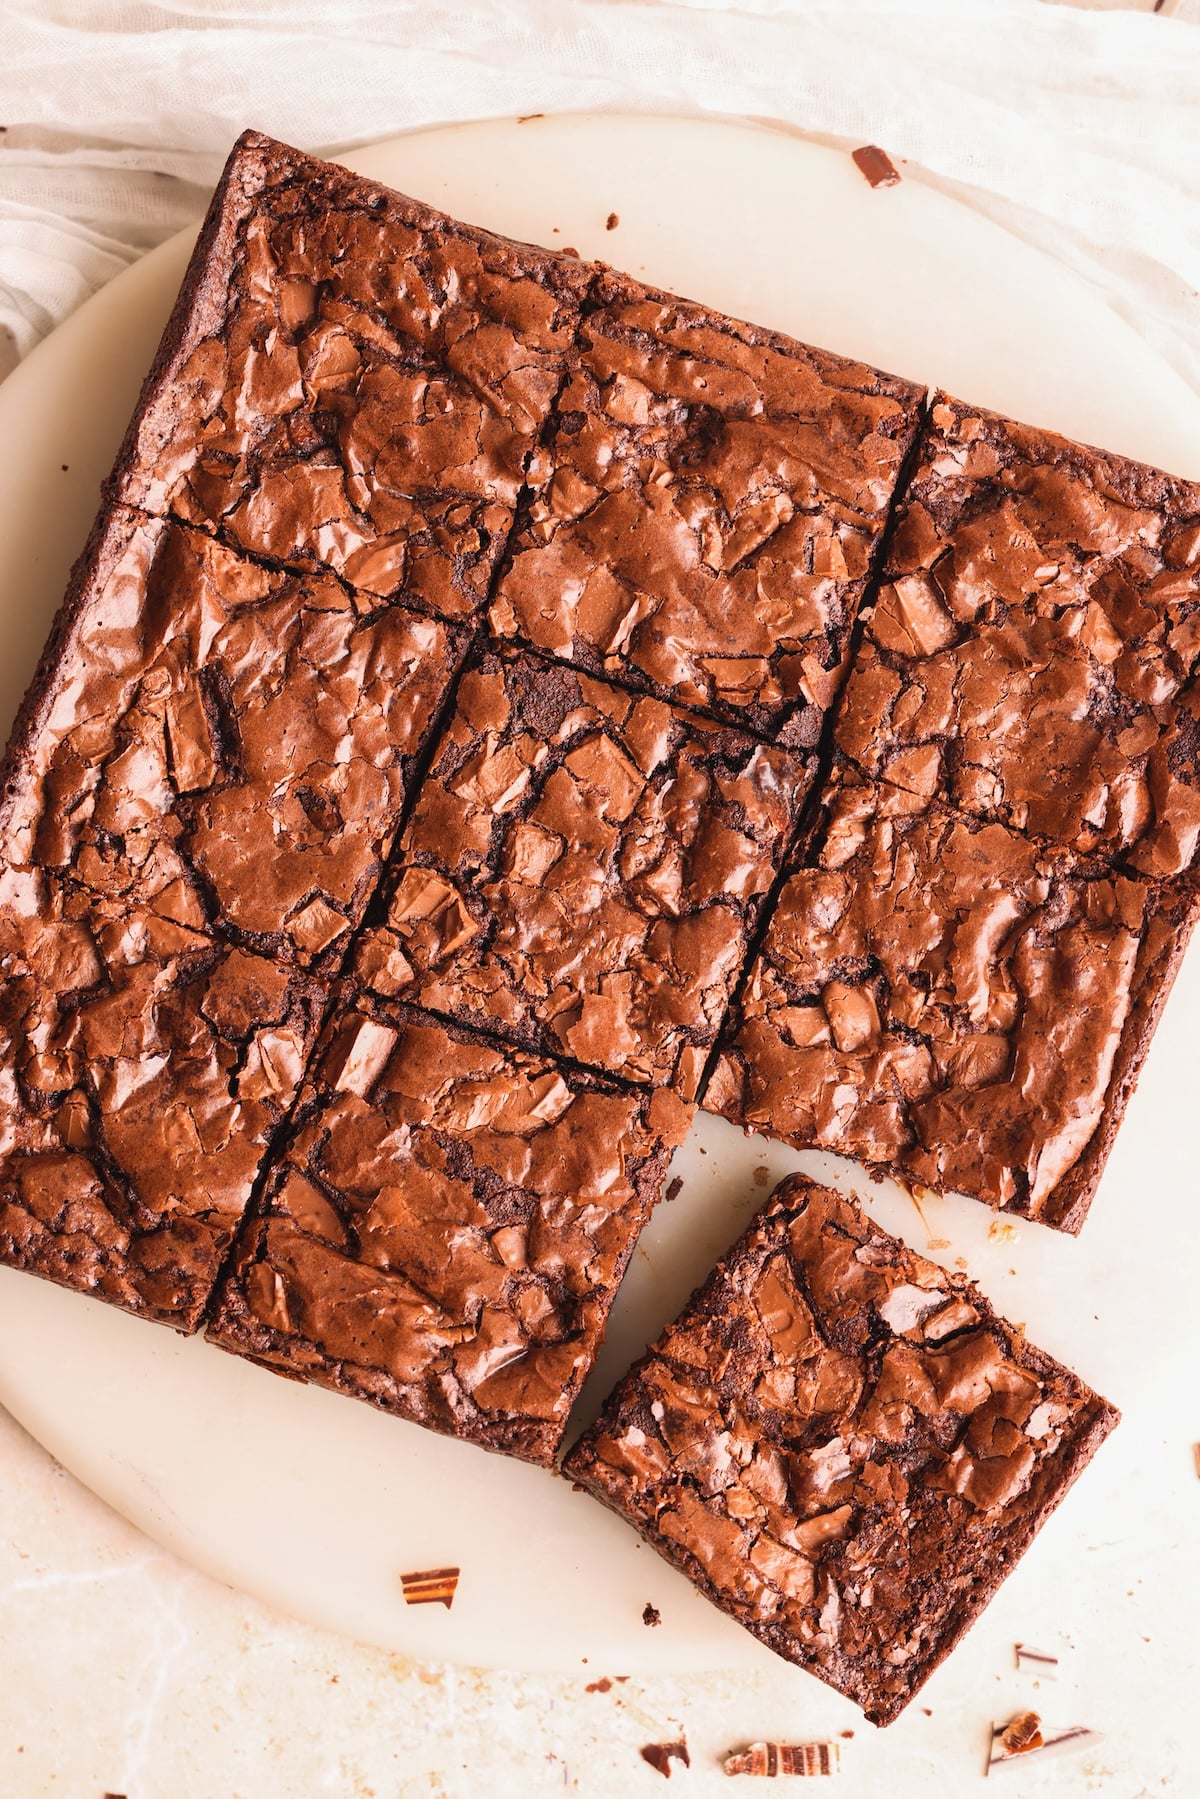
Let the brownies cool in the pan for at least 20-30 minutes, as they will be too soft when warm. Then cut with a sharp knife, serve and enjoy.
If you want to turn these brownies into more of a dessert, try topping them with a pistachio knafeh mixture like I do in my Dubai Chocolate Brownies! You could even add a pecan pie topping halfway through the bake, like I do in this gooey pecan pie brownie recipe.
Two more tips to perfect these
Here are 2 very important tips you need to remember:
- Use a light colored metal baking pan. Glass or ceramic take too long to conduct heat, and lead to an uneven bake. Dark metal pans conduct heat too fast, causing the brownies to darken too much. This USA Pan from Amazon is my favorite
- Watch the bake! Brownies should be slightly underbaked: set around the edges with a slightly soft middle. They continue to bake and set as they cool. If you insert a toothpick in the center, it should come out with moist crumbs on it. Wet batter means the brownies need more time, while a completely clean toothpick means the they are overdone.

Easy Chewy Cocoa Powder Brownies Recipe
- Total Time: 30 minutes
- Yield: 9 large or 16 medium brownies
Description
Easy one bowl, no mixer brownies made with cocoa powder only (no melted chocolate!) in just 30 minutes. Chocolatey, chewy, fudgy, and way better than box brownies
Ingredients
- 1 ⅓ cup granulated sugar (266g)
- ⅔ cup melted butter (150g or about 11 tbsp)
- 2 large eggs
- ⅔ cup all purpose flour (86g)
- ½ cup Dutch processed cocoa powder (50g)
- ½ tsp baking powder
- ¾ tsp salt
- Optional: 100-150g chopped chocolate or chocolate chips of choice; I like a mixture of milk and dark
Instructions
- Pre-heat your oven to 350F (conventional / no fan)
- Line a 9x9 light colored metal baking pan with butter / baking spray and parchment paper. The parchment paper should rise to the top of the pan to create "flaps" that can be used to lift the brownies out of the pan after baking and cooling. The butter or baking spray will help the parchment stick to the pan so it doesn't fold into the brownie batter
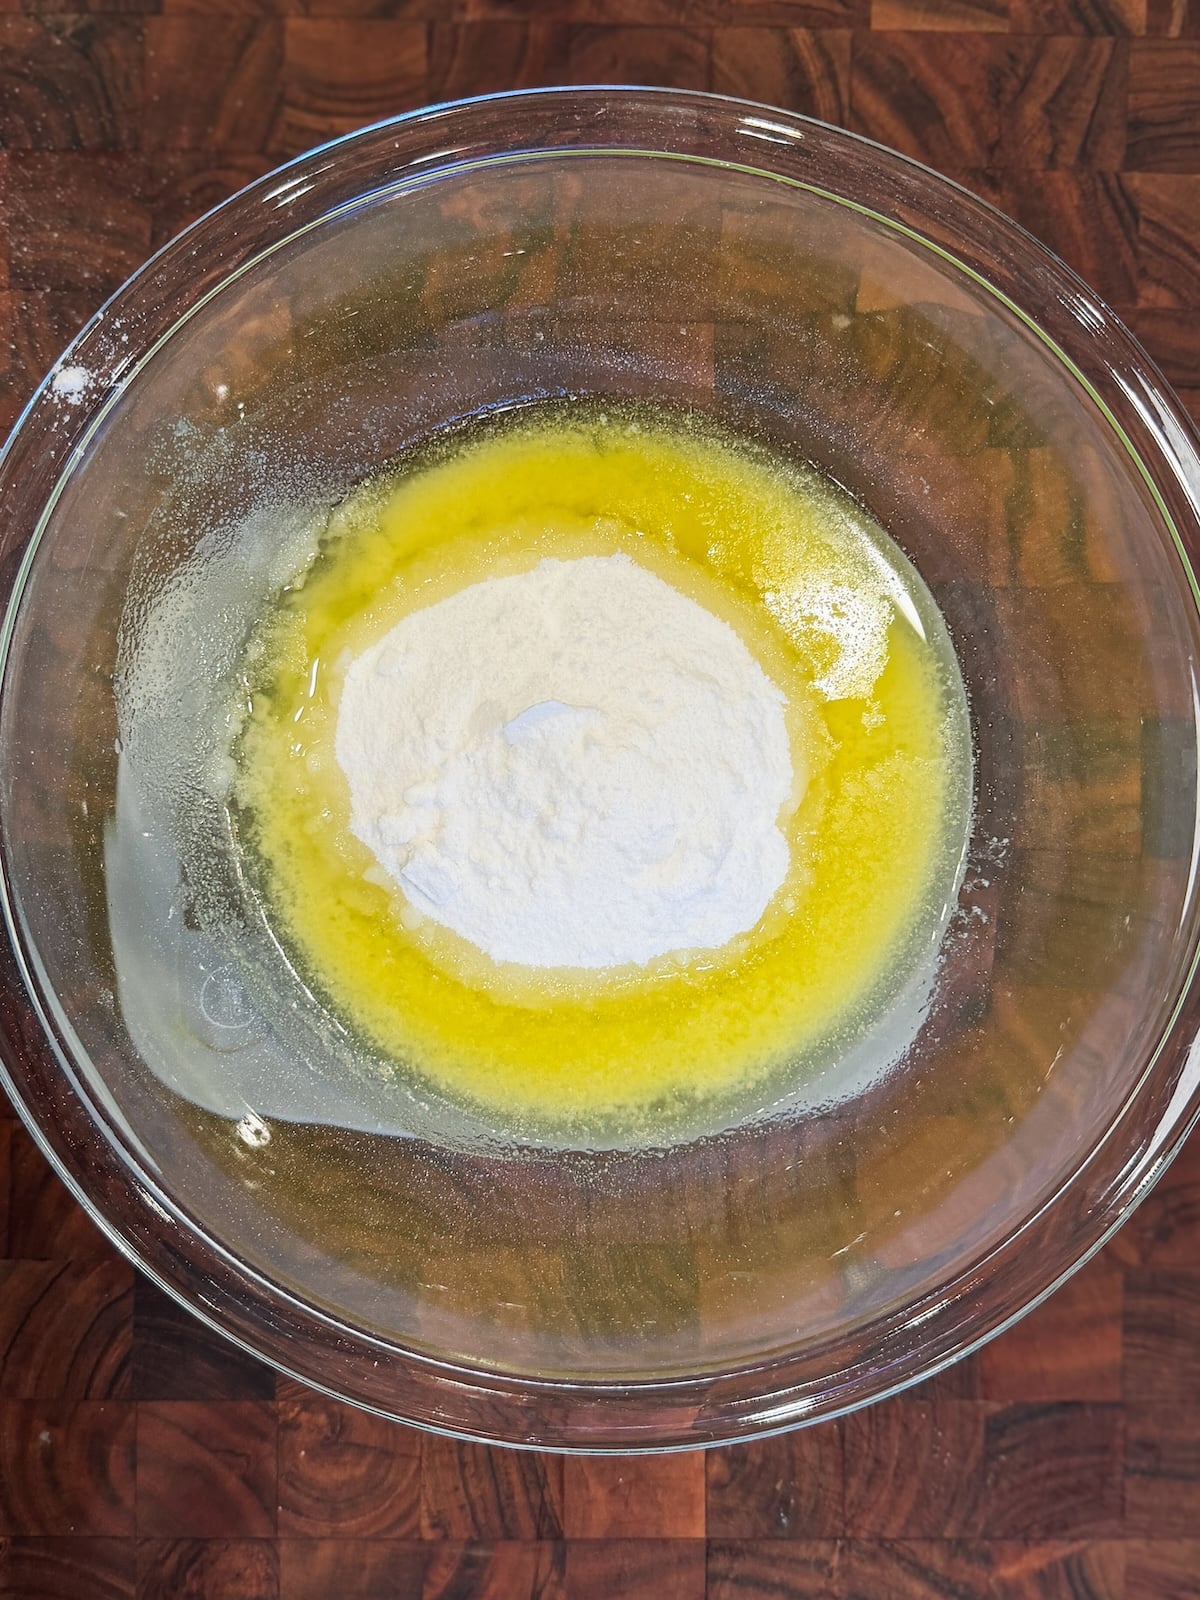
- Measure the granulated sugar first, then add it to a food processor. Blitz for 30-60 seconds or until the sugar turns powdery. You may need to shake the bowl/jug along the way
- Melt the butter in the microwave in 15 second increments
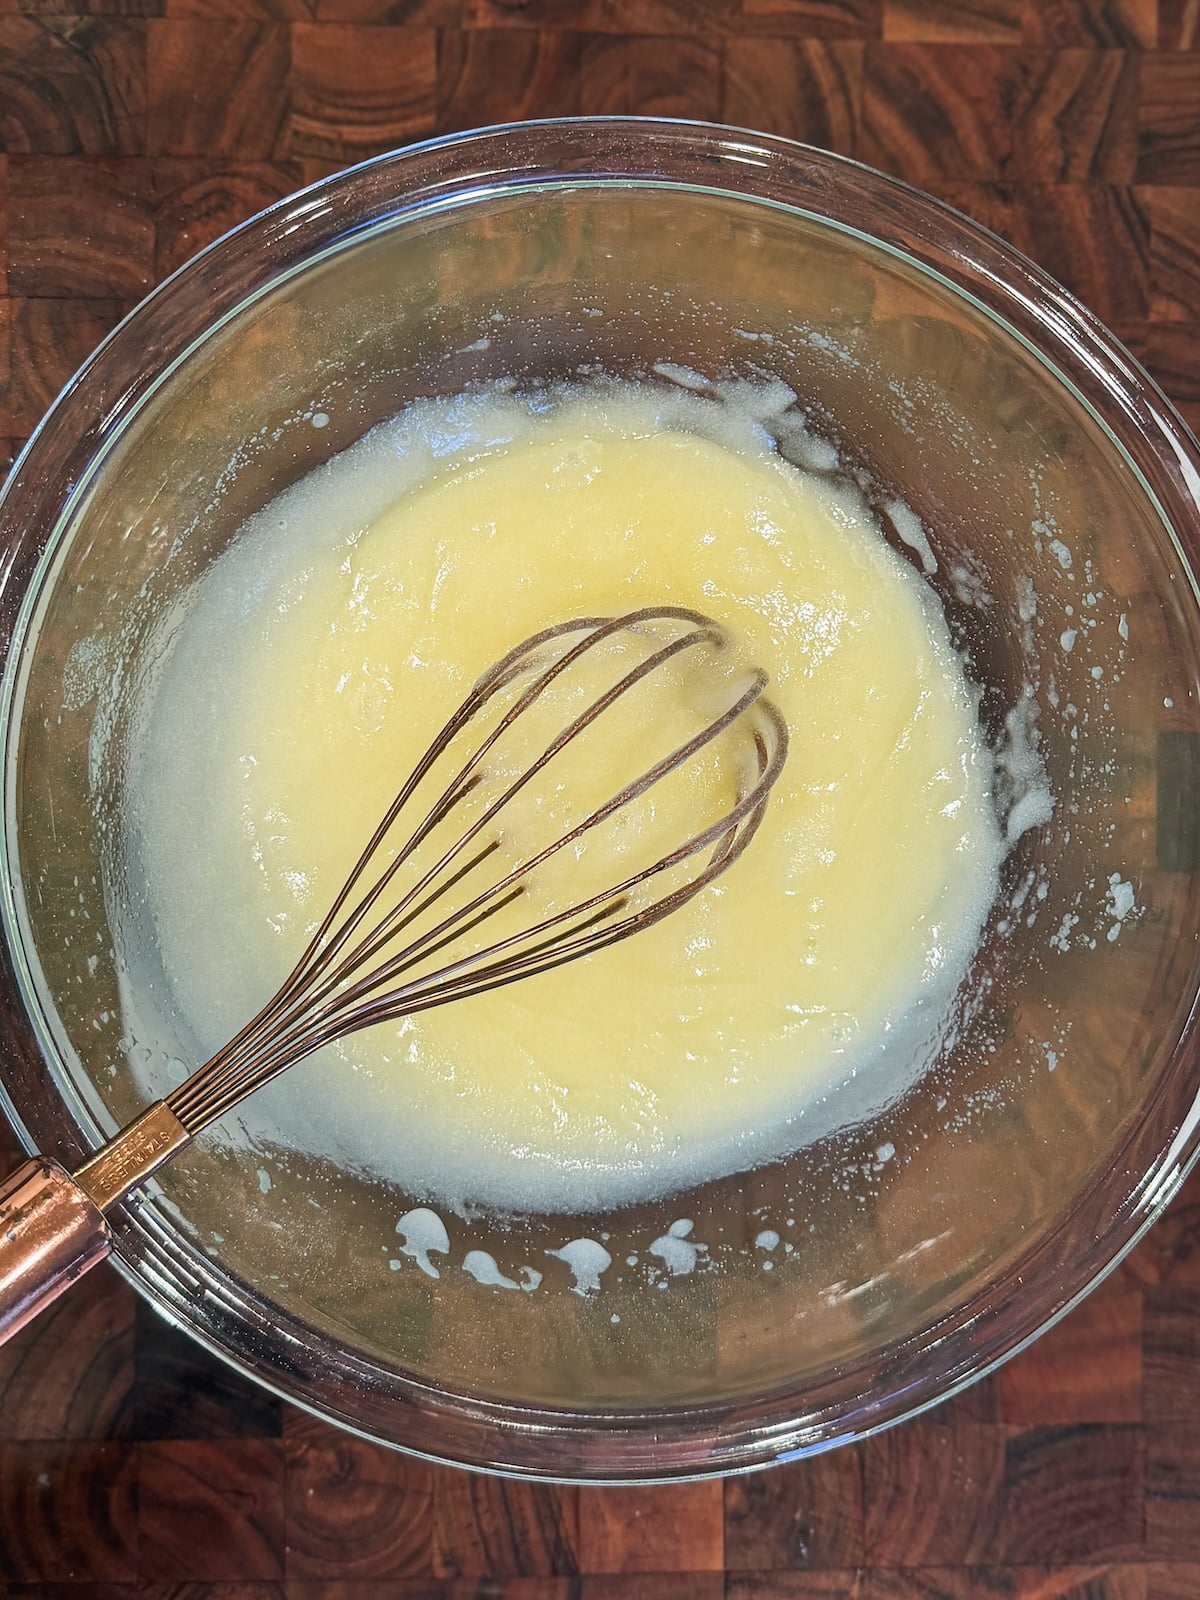
- Add the melted butter and ground sugar to a bowl. Whisk with a hand whisk for about 60 seconds or until the mixture looks smooth
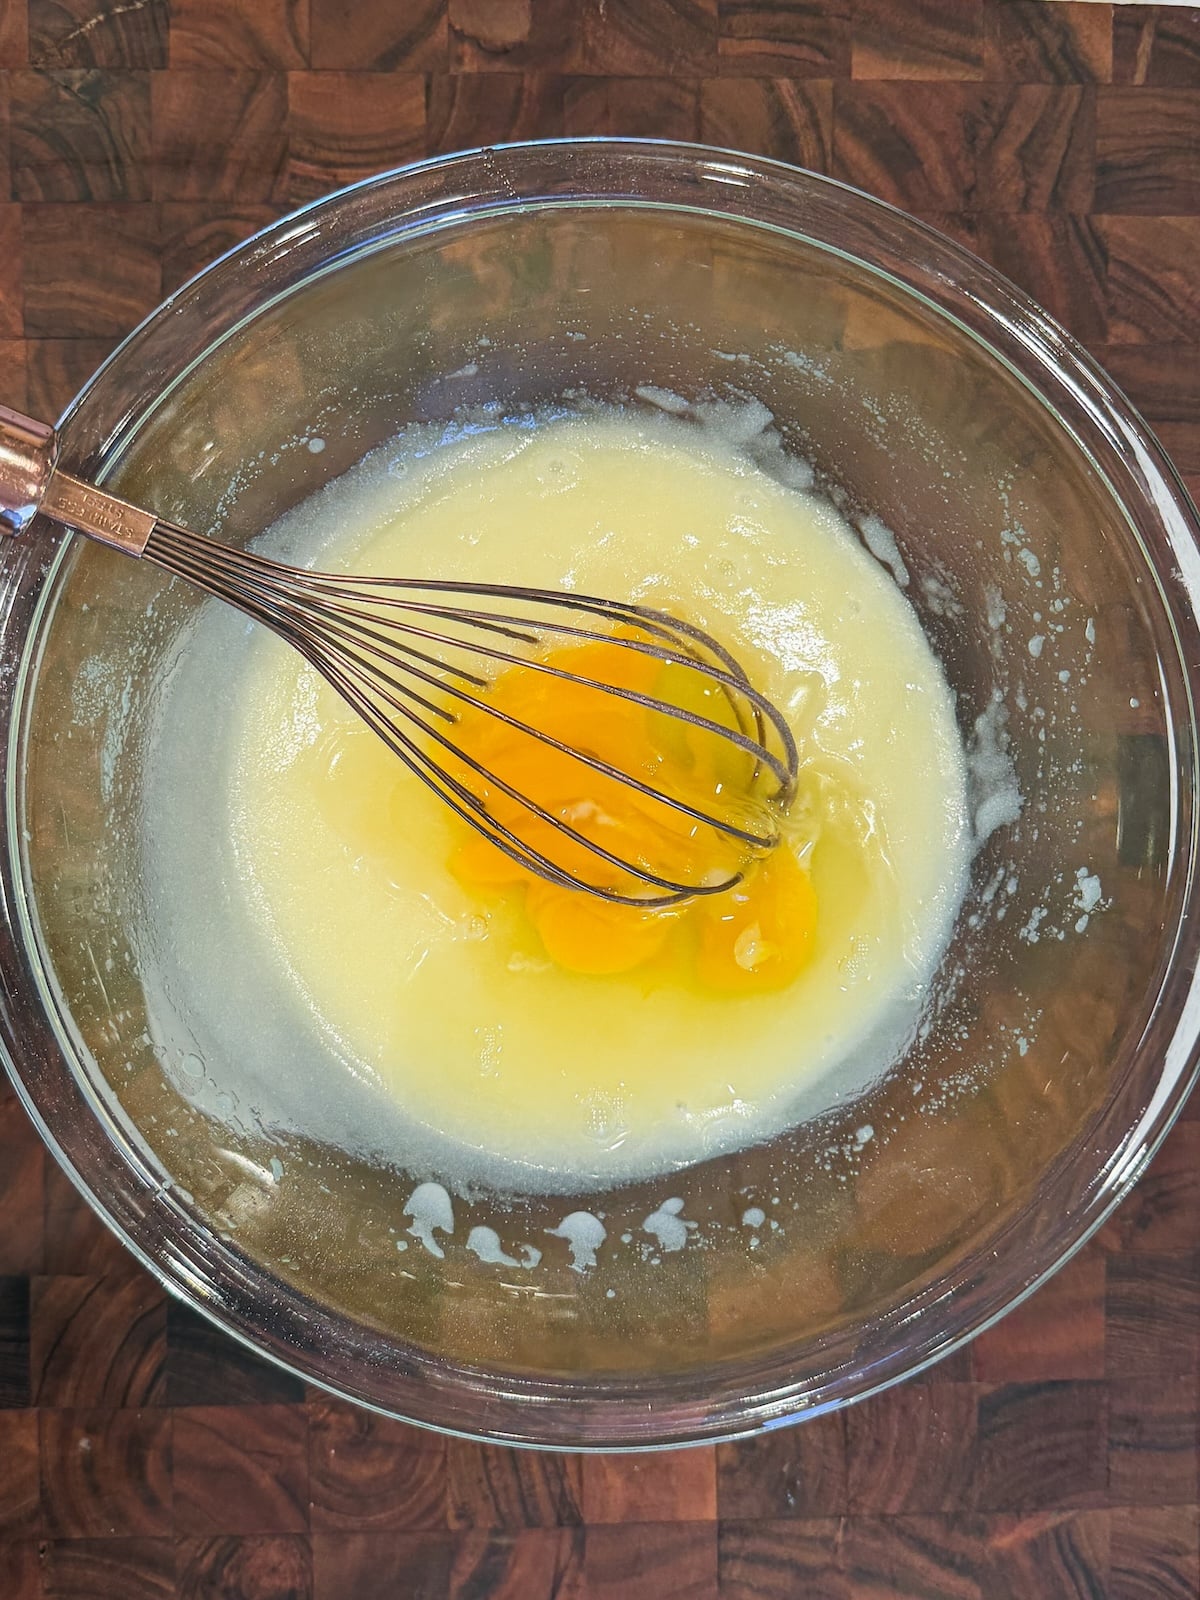
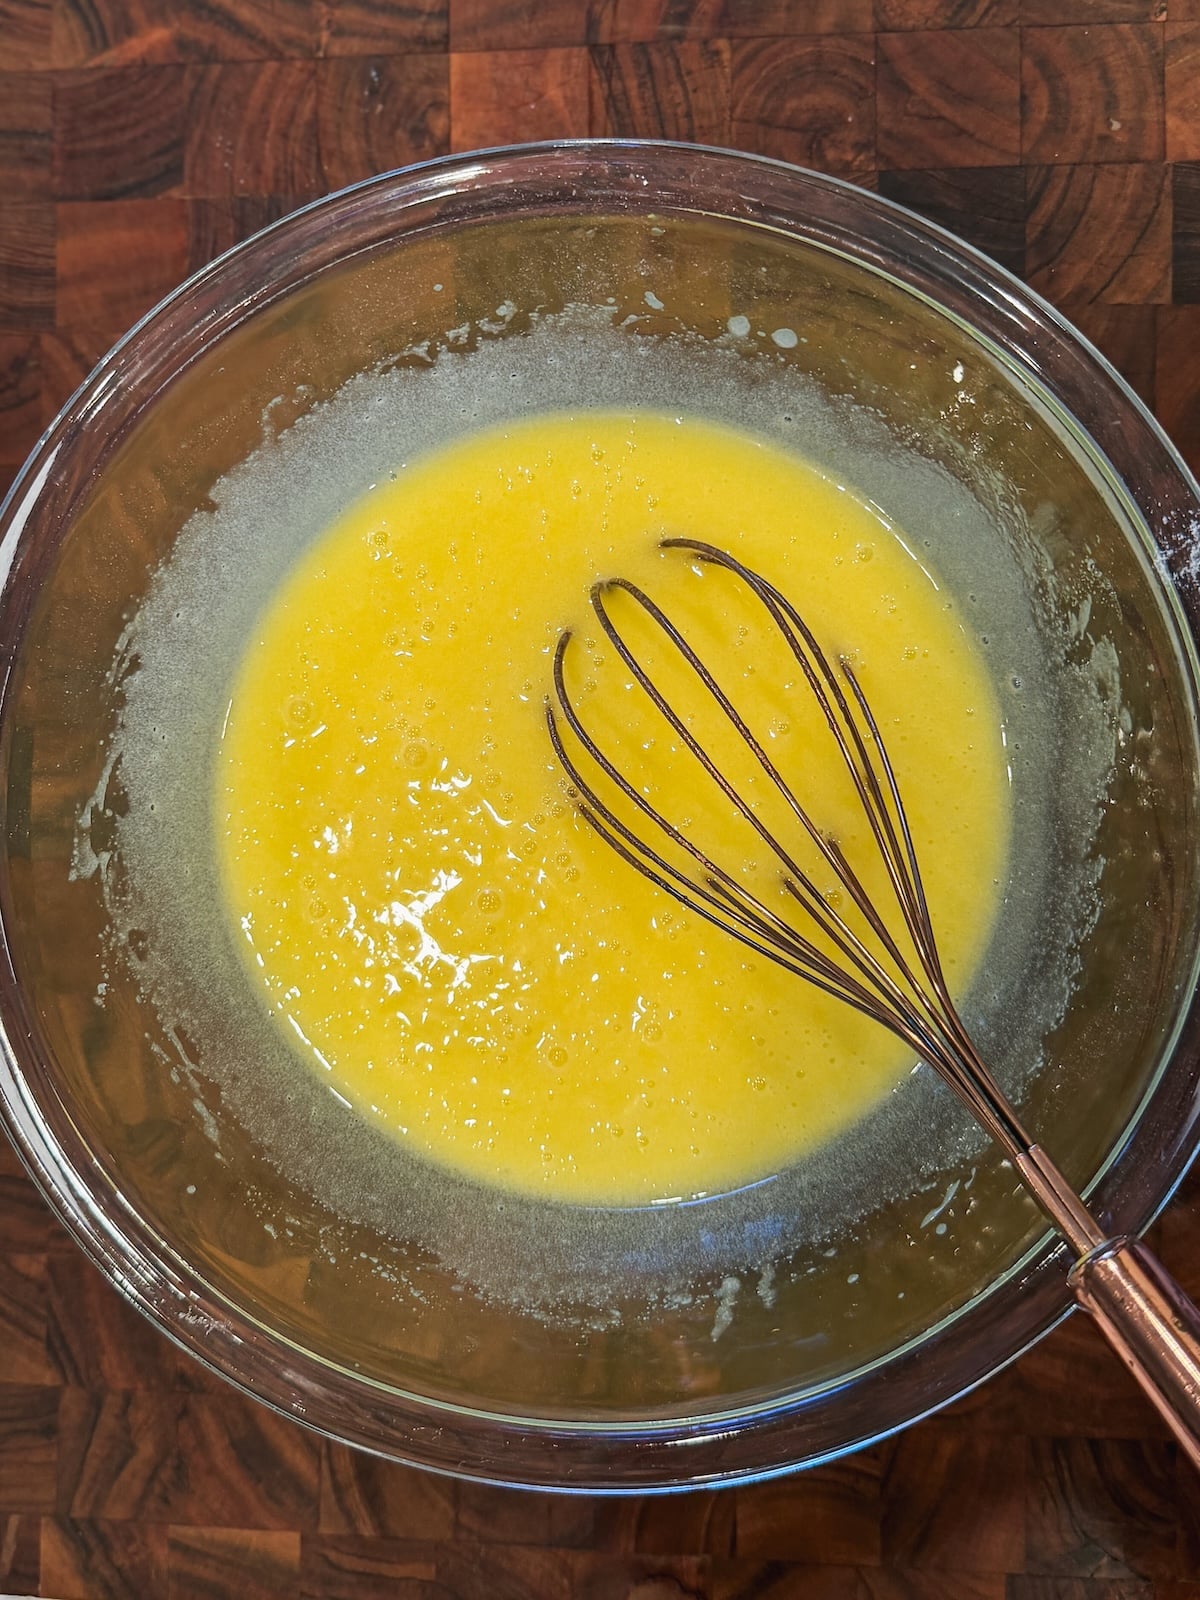
- Add the eggs and whisk again until the eggs are fully combined and the mixture looks smooth
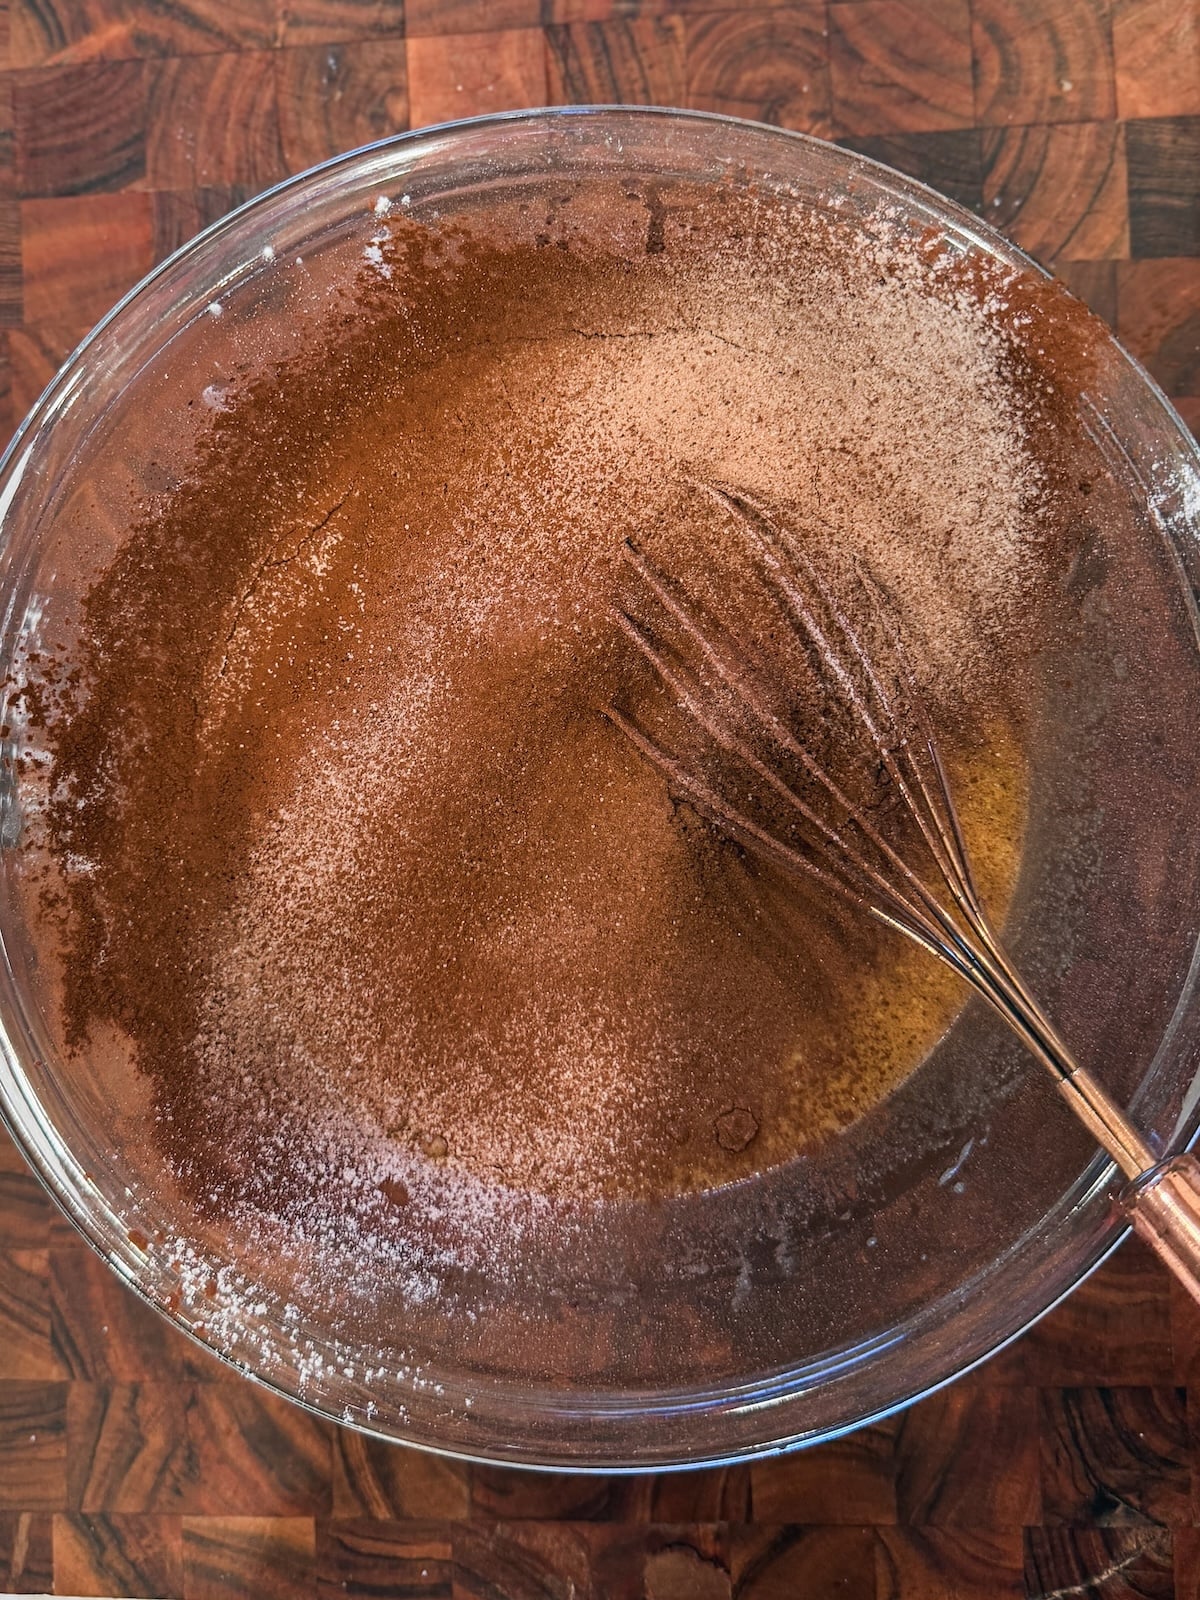
- Now sift in the flour, cocoa powder, baking powder and salt directly into the bowl
- Gently mix in the dry ingredients using slow folding motions until just combined. Do not over-mix to prevent gluten formation. I like using a rubber spatula for this step
- Lastly, add in the optional 100-150g chopped chocolate / chocolate chips and fold until evenly dispersed. Do not overmix. I like to reserve some chocolate to press on top of the brownies
- Spread the brownie batter into the prepared pan. It will become thicker with time so you may need to use a spatula to spread it evenly. If you have any reserved chocolate, spread that on and gently press it in now
- Bake the brownies in the pre-heated oven for 20-25 minutes, until the edges are set but the middle is still a little soft to touch. A toothpick inserted in the center should come out with moist crumbs on it.
- Remove from the oven and let the brownies rest for 20-30 minutes in the pan. Then carefully remove, slice with a sharp knife, serve and enjoy!
Video Tutorial:
Notes
- Make ahead and storage: These brownies are best consumed fresh, or within a day, for optimal texture and flavor, so I don't recommend making them ahead of time. I like keeping them at room temperature in an airtight container for up to 2 days, but you can also refrigerate for up to 5 days. You can eat them cold or microwave for ~10 seconds to enjoy them warm.
- Upgrading into dessert: If you want to turn these brownies into more of a dessert, try adding a pistachio knafeh topping like in these Dubai Chocolate Brownies, or add a layer of pecan pie filling halfway through baking like in these Gooey Pecan Pie Brownies. You could even cool them down and top them with a layer of mascarpone cream, just like the one in this Tiramisu Chocolate Cake, to turn them into Tiramisu Brownies!
- Prep Time: 10
- minutes: minutes
- Cook Time: 20
- Category: Dessert
- Method: Baking
- Cuisine: American

Asma Amer says
This is the perfect recipe. The shiny top and gooey interior are spot on. Highly recommended.
Zoha says
Thank you so much! I am so happy that you tried and liked them as much as I do!
Gulnaz says
Can I not use powdered sugar directly?
Zoha says
No, Gulnaz, that won't work! Powdered sugar has other ingredients like cornstarch which will make the brownies chalky. Please get granualted sugar and grind it x
Fatima says
It's really an easy recipe and looks great, but what to calculate to preheat the oven in Celsius degrees? it's 350F in your recipe, but what Celsius should I consider?
Zoha Malik says
It should be 180 C 🙂
warda saqib says
it says 2/3cup butter and 2/3 cup flour.. but both are in diff grams.. is that correct?
Zoha Malik says
Yes - different ingredients have different densities, so grams are different.
Mai says
hello dear
can I reduce the amount of sugar ?cause I prefer my dessert no too sweet
Zoha Malik says
hi Mai! You can but the brownies won't have the shine and might feel drier in texture.
Zaineb says
This is literally the best brownie recipe I’ve ever tried. It was super soft from inside and the outer shiny crust was perfection. Definitely going to be my go to recipe for brownies, loved it
Zoha says
You made my day - thank you so much!
Raissa says
The best no fuss recipe
Brownies came out absolutely divine I couldn't stop going back for more!
Zoha Malik says
SAME!
Dr Tayyaba says
Absolutely delicious!! That crunchy top and fudgy moist texture as i chew on it is absolute perfection .. After trying sooo many recipies this one is straight away going to be my top favourite..
highly recommended for everyone to try while I'm eating mine 🙂
Thanks Zoha !!!
Zoha says
Awh, you made my day! Thank you so much, I am glad this recipe worked for you and you liked the brownies!
lubna khan says
Hi zoha can i use salted butter? Does it matter? Thank you
Zoha Malik says
Hi there! you can but reduce the added salt
Lutfiyya says
Salaams hi
Can I not use normal hulet sugar
Zoha Malik says
use granulated sugar and grind it, the way it's recommended in the recipe 🙂
zahra says
BEST RECIPE EVER!!!!!!
Zoha Malik says
Love u!
Gi says
Such a good brownie recipe! Everyone loved it. Soft and yummy!
Zoha Malik says
Glad to hear this!
Saqlain umrea says
Must try
Padmapriya N says
sooper recipe mam
can we use whole wheat flour instead of all purpose flour in the above recipe mam
Zoha says
Thank you! No, I do not recommend making this recipe with whole wheat flour as the texture and flavor will not be the same.
Zainab says
my brownie batter is very thick what to do
Zoha Malik says
that's fine, just spread it in the pan! brownie batter gets thick quickly, it's normal
SG says
I tried yout recipe and brownies turned out super yum. I kept checking with the skewer which kept coming out wet and ultimately ended up over baking it bit. no regrets though. the taste is to die for. its a keeper recipe. thank you for sharing
Zoha says
Thank you, SG! Every oven is different and it's possible you used a glass/ceramic pan which will take longer to bake.
Amina says
Zoha, these look incredible and such a good quick sweet fix as a mamma of a toddler! 🤩 Can’t wait to give these a go this weekend!
Zoha says
you're going to love them! Best of luck x
Ayesha says
Another mind blasting recipe!!!!♥️♥️♥️♥️♥️♥️
Zoha says
YAY thank you!
Mrs. Irfan Alizai says
its super easy and well explained .. gonna try it today
Zoha says
Yay, hope you love them!
Oneeza Anwar says
hey I tried this brownie recipe, it's such a quick, easy and fudgy brownies with the perfect crackly top.
Zoha says
Yay, I am so glad this recipe worked for you!
Tooba says
easiest yummiest brownies Love you Zoha ❤️❤️❤️❤️
Zoha says
Easiest and yummiest is definitely the way to describe these!
Bella says
Such a delicious recipe! Super easy and just incredible. Will make this again for sure.
Zoha says
WOO thank you for trying it!
Aiman says
Oooof this recipe was fireee. I made it today with a litttle addition of 1tsp coffee straight into the batter and loved how it turned out. Your recipes 🔥🔥🔥🔥
Zoha says
Love the addition of coffee! Sounds delicious and so happy you loved these brownies!
Anonymous says
These brownies were delicious, rich chocolatey flavour, chewy, and exactly what you’d hope for in a brownie. However, my family and I felt that they were a bit too sweet for our taste. That said, this will definitely be my go-to recipe next time; I’ll just reduce the sugar slightly.
Zoha says
Hi there! You can reduce the sugar but just be aware they will lose the shine and won't be as moist. Sugar is more than just flavor in brownies! Usually I recommend adding more salt, or dark chocolate chunks etc to balance the flavor.
warda saqib says
okokokokok I DO NOT KNOW WHAT MAGIC ZOHA WAS ON BUT OMG. I have tried 50 different brownie recipes and literally this is the firstt time i got that crinkle top. Im not lying people THE FIRST TIME. my only note tho.. is that i dont know what moist crumbs look like?? so i took it out 5 minutes early and had to add it back in. But honestly speaking.. lovvveee how easy the recipe was!! and the tasteee omggggggg, im gonna take this to class tomorrow and give it out to my students! ugh i wish i could add a picture of how delish this looksss
Zoha says
OH MY GOD I am crying happy tears! I really do think this recipe is magical because the crinkle top also amazes me everytime! Like, how it is to easy and that good!?
haaniya says
hi zoha!!! as a girly from pakistan i love ur recipes and i related so hard to the bit about grinding the sugars lol thats me every time i bake ! quick question, tho, since butter is a bit on the expensive side, i wanted to ask if i could sub butter for oil? or do half and half butter and oil? usually, i use oil in brownies and it doesn't affect the outcome too much, but since this is only cocoa with no fats from the chocolate, i think it'd be better to ask. please let me know. love u girl!!
Zoha Malik says
Hi Haaniya! unfortunately butter and oil are completely different when it comes to brownies. I am sure you could do it and they'd still be good, but the texture and look will be totally different and they may be too fatty. So I can't recommend it. If you try let us know <3
Anaya says
These are so easy and delicious!! The shiny top was so gorgeous and everyone loved them.
Thank you Zoha!
Zoha says
WUHUUU I AM SO GLAD!
Celeste Peters says
Im planning on making this tonight. Can I add some chopped walnuts?
Zoha says
Hi Celeste, that's definitely doable! I recommend toasting the walnuts beforehand so they are crunchy and fragrant 🙂
Wamqa Aamir says
I made it and it was such a hit. Everybody loved it so much!
Zoha says
YAY so happy to hear that!!
SA says
Hi! I absolutely love your recipes. I was wondering if I could add walnuts to this brownie recipe. Would it be okay to blend them into a powder and mix them in, or would you not recommend that? If it is possible, I would really appreciate it if you could share the suggested measurement. Thank you so much!
Zoha Malik says
Hi there! I don't recommend powdering walnuts and mixing them as that will impact the brownie batter itself. With mix ins you always want them to be chunky so they stay separate from the batter. So chopped walnuts would be better, and I suggest toasting them first so they become crunchy!
Nini says
Your cakes and desserts are ALWAYS A HIT!! thank you ❤️
Zoha Malik says
HUGS
Racheal Olivia says
I tried this recipe and it was amazing... for the chocolate topping, I added chopped dark chocolate to help balance the sweetness. I love how quick and easy it is. Wish I could post a picture of it here!
Zoha Malik says
Aw, thank you so much Rachael! And totally, dark chocolate is great for anyone who wants less sweetness 🙂
S says
Hi Zoha, you hit it out of the park on this one! I’ve tried so many brownie recipes in my life time- it has always has been a struggle to get that shiny top without using boxed mixes. This was amazing! thank you for sharing with the world 🙂
Zoha Malik says
:') Crying. Thank you!
larki S says
asalamoalaikum zoha, I would love to try your recipe.. I need ur help for 2 things:
1) if I want to make half of this recipe what pan size should I choose
2) how to cut down recipe according to pan size, if I want to make recipe in 7inch pan.
thanks
i am planning to make this recipe within 24hr, would be grateful if u can reply soon
Zoha Malik says
Hi Larki! Half the batch can be made in a 9x4" loaf pan. 7" pan will be about 2/3 of the recipe quantities. Good luck!
Rangeela Rajasekaran says
Absolutely loved these brownies! Came out brilliant and my entire family loved it❤️
Zoha Malik says
Aw, thank you so much, Rangeela!
Hamna Khan says
Tried making brownies for the first time and followed this recipe! I loved how well everything was explained, it truly was a foolproof guide. They turned out so outrageously good, everyone loved them and I can safely say my family and I will never have to go out in order to eat good brownies ever again so thank you Zoha! ❤️
Zoha Malik says
AHHH this makes me so happy! Thank you Hamna!
Naureen Lalani says
I have tried this recipe; amazing
Asma @ Bake with Zoha says
So glad Naureen that you tried and liked this time tested recipe of brownies. Mean the world. 😊
Mehreen says
Made it yesterday for my 8 year old school end of term party.they turned out soooo yummmmyy..i made two batches and all were gone..hats off girl..
Zoha Malik says
WOO WOO so glad to read this!
Areeba says
amazing brownies honestly, everybody kept telling me they were so good
Asma @ Bake with Zoha says
So glad Areeba that you liked this recipe and shared the brownies. Thanks a lot. 🙂
Lili S says
These brownies were absolutely decadent and delicious. Wow, what a crowd pleaser! Gifted a few to friends and family and they were blown away by the chocolatey goodness. The grinding of the sugar was such a game changer for flavour and texture. Thank you. What a treat!
Zoha Malik says
AHHH thank you, Lili!!! I am so happy the trick worked for you!
Saniya Ashraf says
best recipe so far ❤️
Asma @ Bake with Zoha says
Totally agree with you Saniya. Best since the childhood in fact. 🙂
Ayesha says
Just tried this recipe and it turned out sooo good Alhamdullilah
Never tried making brownies before but always wanted to make it. When I came across your recipe I found it soo easy and decided to give it a try.
Jazakallah khair
Will try more recipes from your page In sha Allah
Zoha Malik says
I am so so so happy you gave these a shot 🙂 <3
Samman says
I TRIED THISSSS AND OMG IT WAS MUCH BETTER THAN I EXPECTED
Mind you, I had never baked a brownie before in my life so this was the first brownie I made using Zoha’s recipe exact as it is and aaaaa everyone around me who tried it, loved it.
Zoha Malik says
HEHEHE I KNOW RIGHT!! This recipe is surprising!!
NA says
Absolutely obsessed with this recipe!!!! they turned out way too good! they were gone in seconds
Zoha Malik says
Exactly how it should be 😉
Ayman Saleem says
My daughter is only 7, and she lovessss seeing your videos and trying your recipes! She just made these brownies and they turned out so so good! We shared with our friends and they were gone in minutes .
Zoha Malik says
Give her a big hug from me, please :')
Abigail says
l made this recipe and it was soooooo good!
l halved the recipe and l was a bit worried because the mixture was really hard to mix so l put more melted butter and after l finished baking l was itching to try it so l only waited 10 minutes and it was still sooooo delicious.
best brownie l ever made. 👍
Zoha Malik says
Awh, thank you Abigail! Glad it worked out for you! The batter does tend to be thick and gets thicker with time - ideally you shouldn't add more butter next time x
Romanas Šinkūnas says
Tiesiog tirpsta burnoje, superinis
Zoha Malik says
<3
Nadia Hansrot says
Zoha, wow!! I've been struggling to find a brownie recipe that is both fudgy and crispy, this achieves both and is SO DIVINE! So incredibly simple as well, there is no reaaon not to make it.
Zoha Malik says
YAY thank you, glad you loved these!
Surhan says
Oh my God! These brownies are to die for! Like all your other recipes!
Just one quick question, can I reduce the sugar if my family doesn’t want the brownies too sweet? Will that impact the recipe?
Asma @ Bake with Zoha says
Thanks Surhan for liking our all time favorite recipe. Though the amount of sugar has been adjusted after trials, but reducing that subtly to suit your liking should not affect the outcome much. Remember the crackly top also comes due to the sugar.
Tahreem says
Thankyou sm! This recipe turned out so good! The top was super crinkly and it tastes awesome! I also added a pinch of cinnamon and one tsp of brewed coffee to amplify the chocolate flavour.
Asma @ Bake with Zoha says
Wow Tahreem, you are a true chef. That's great that you could enhance and enjoy the flavors.❤️
Zahra says
Delicious! Quick and easy bake
Zoha Malik says
Thank you Zahra!
Sameen says
Amazing recipe. It turned out exactly like the picture. I truly learned a lot from you when it comes to baking.
Zoha Malik says
Thank you Sameen! Glad you got the same result <3
Areej says
Hey zoha! For baking it, do i turn the oven off after preheating or i keep it running at the same temperature while tossing the cookies in?
Zoha Malik says
Keep it running at the same temp!
R.K says
These turned out amazing! Thank u so much for the recipe!
Zoha Malik says
YAY I am so happy to hear that!
Hafsa Noorien says
Does the butter need to be unsalted or salted is fine?
Zoha Malik says
You can use salted too, just be sure to reduce the added salt
Samal T says
soooo goood and sooo simple!
Zoha Malik says
YAY!
Shiza says
TRIED THESE LAST NIGHT and they were better than any brownies I have ever had omg. SO FUDGY AND RICH.
Zoha Malik says
WOOP WOOP
Salem says
This is such an easy and yummy recipe at the same time. Thank you
Zoha Malik says
It's my pleasure!
Quratulain Malik says
Amazing recipe of brownies one of best my whole really loved it .
Zoha Malik says
WOO thank you!
Maheen says
straight up and easy recipe which turns out perfect. this is my fav brownie recipe because its not too wet ...just right balance between, fudgy and chewy and right chocolate taste. and so fast!
Zoha Malik says
AW YAYYY thank you Maheen!
Célina says
Such a simple yet amazing recipe! I did not even add chocolate chunks and it was still rich and chewy. My kids are already asking for more 🤗
Zoha Malik says
How sweet! Thank you Celina!
Ishika says
Hey i am trying these today but please tell which mode of oven should i use is it (upper+lower) both with no fan?
Zoha Malik says
Lower and no fan!
Zubiyah says
Can we normal cocoa powder instead of Dutch processed cocoa powder
Zoha Malik says
Hi! You can but dutch will give you the best results.
Zubiyah says
can we use normal cocoa powder instead of Dutch processed cocoa powder
Zoha Malik says
You can! It's just better with Dutch
Gi says
Made these for the second time. This time using the cocoa Zoha recommended. 10/10!! So delicious.
Zoha Malik says
YAYY
Maryam says
Hey, I tried your recipe and it turns out so good, and I m really excited to try your other recipes as well. I really want to appreciate you for creating this website and sharing all of your amazing recipes as it helps alot for the beginners.
Zoha Malik says
Aw, thank you so much Maryam, you just made me smile so big 🙂
Andrea says
I've made these a few times already, they're great! Especially with the added chocolate chips. On my third batch, I added caramel syrup to the top before I put them in the oven, DELICIOUS!
Zoha Malik says
AWW thank you!! Love the idea of caramel in them - yum