
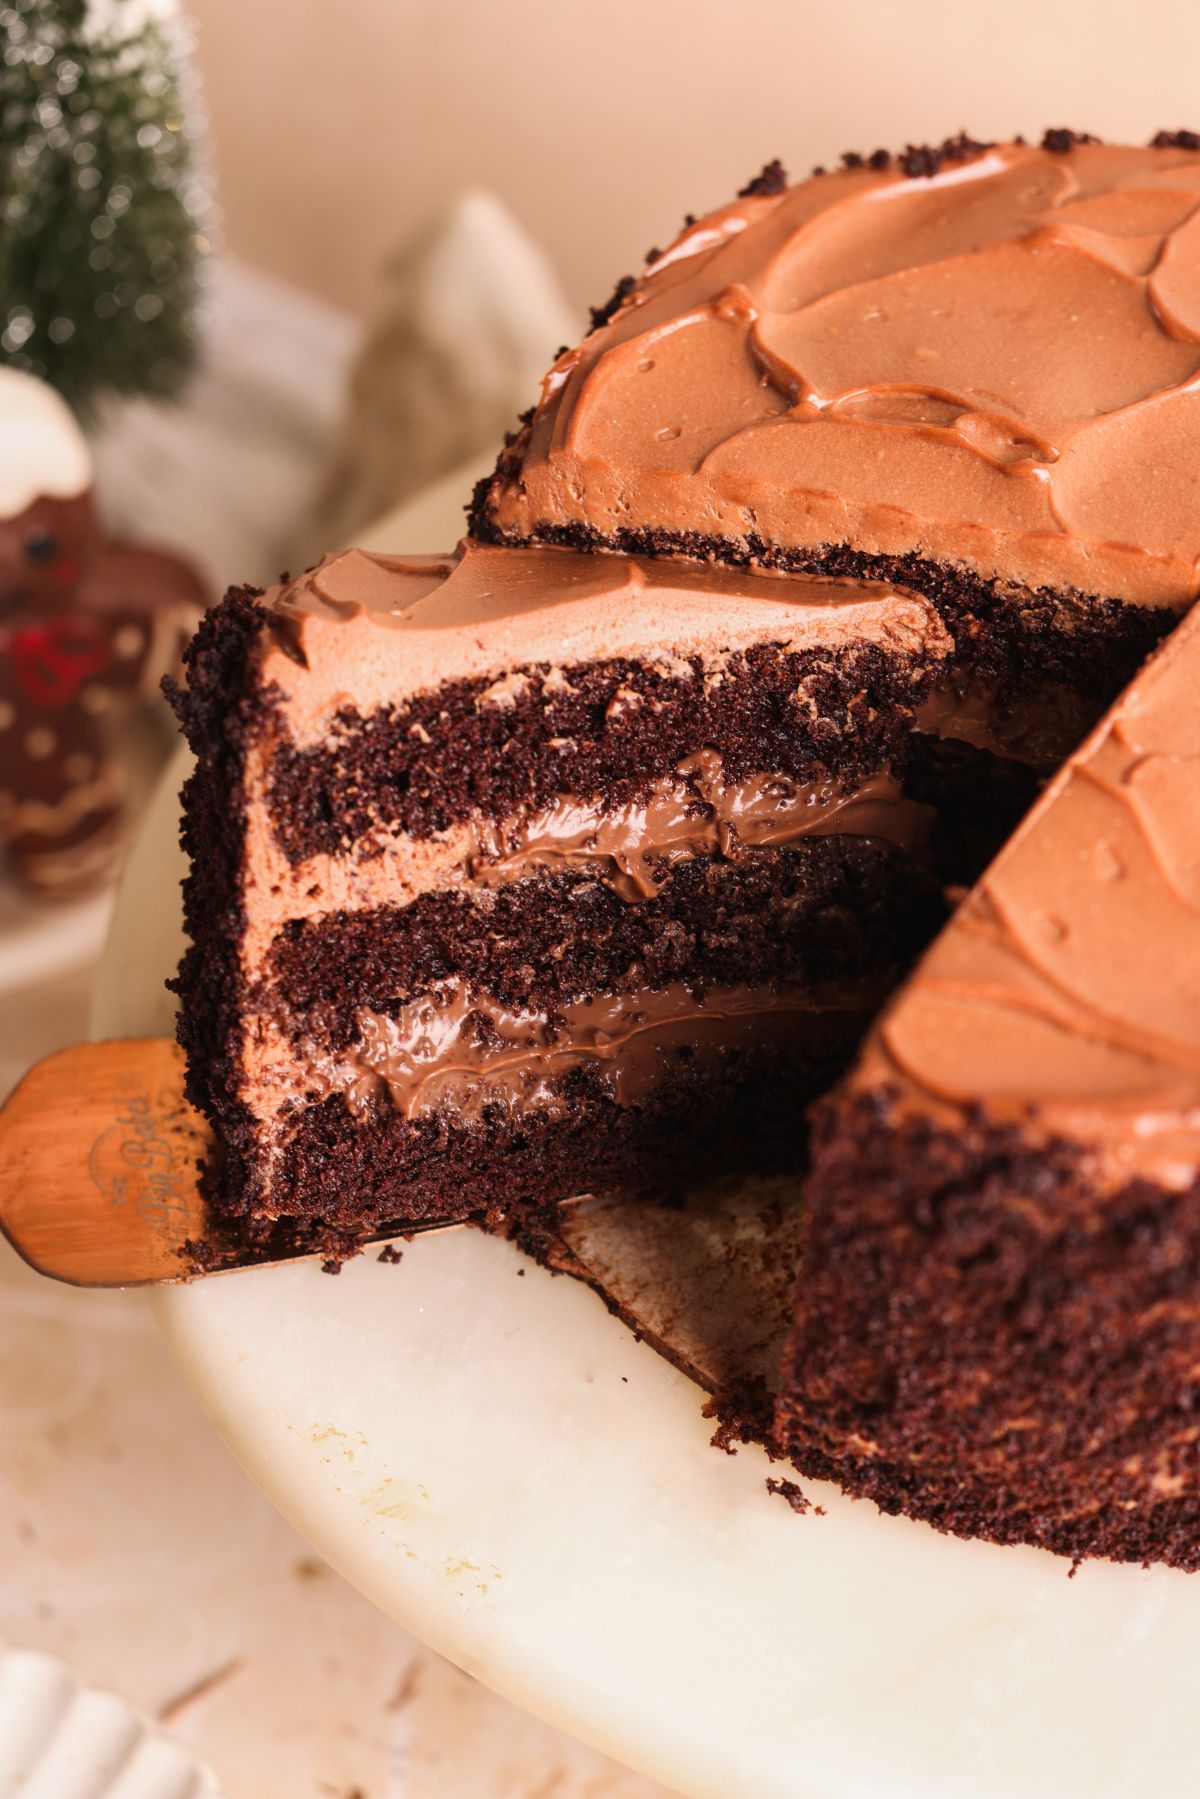
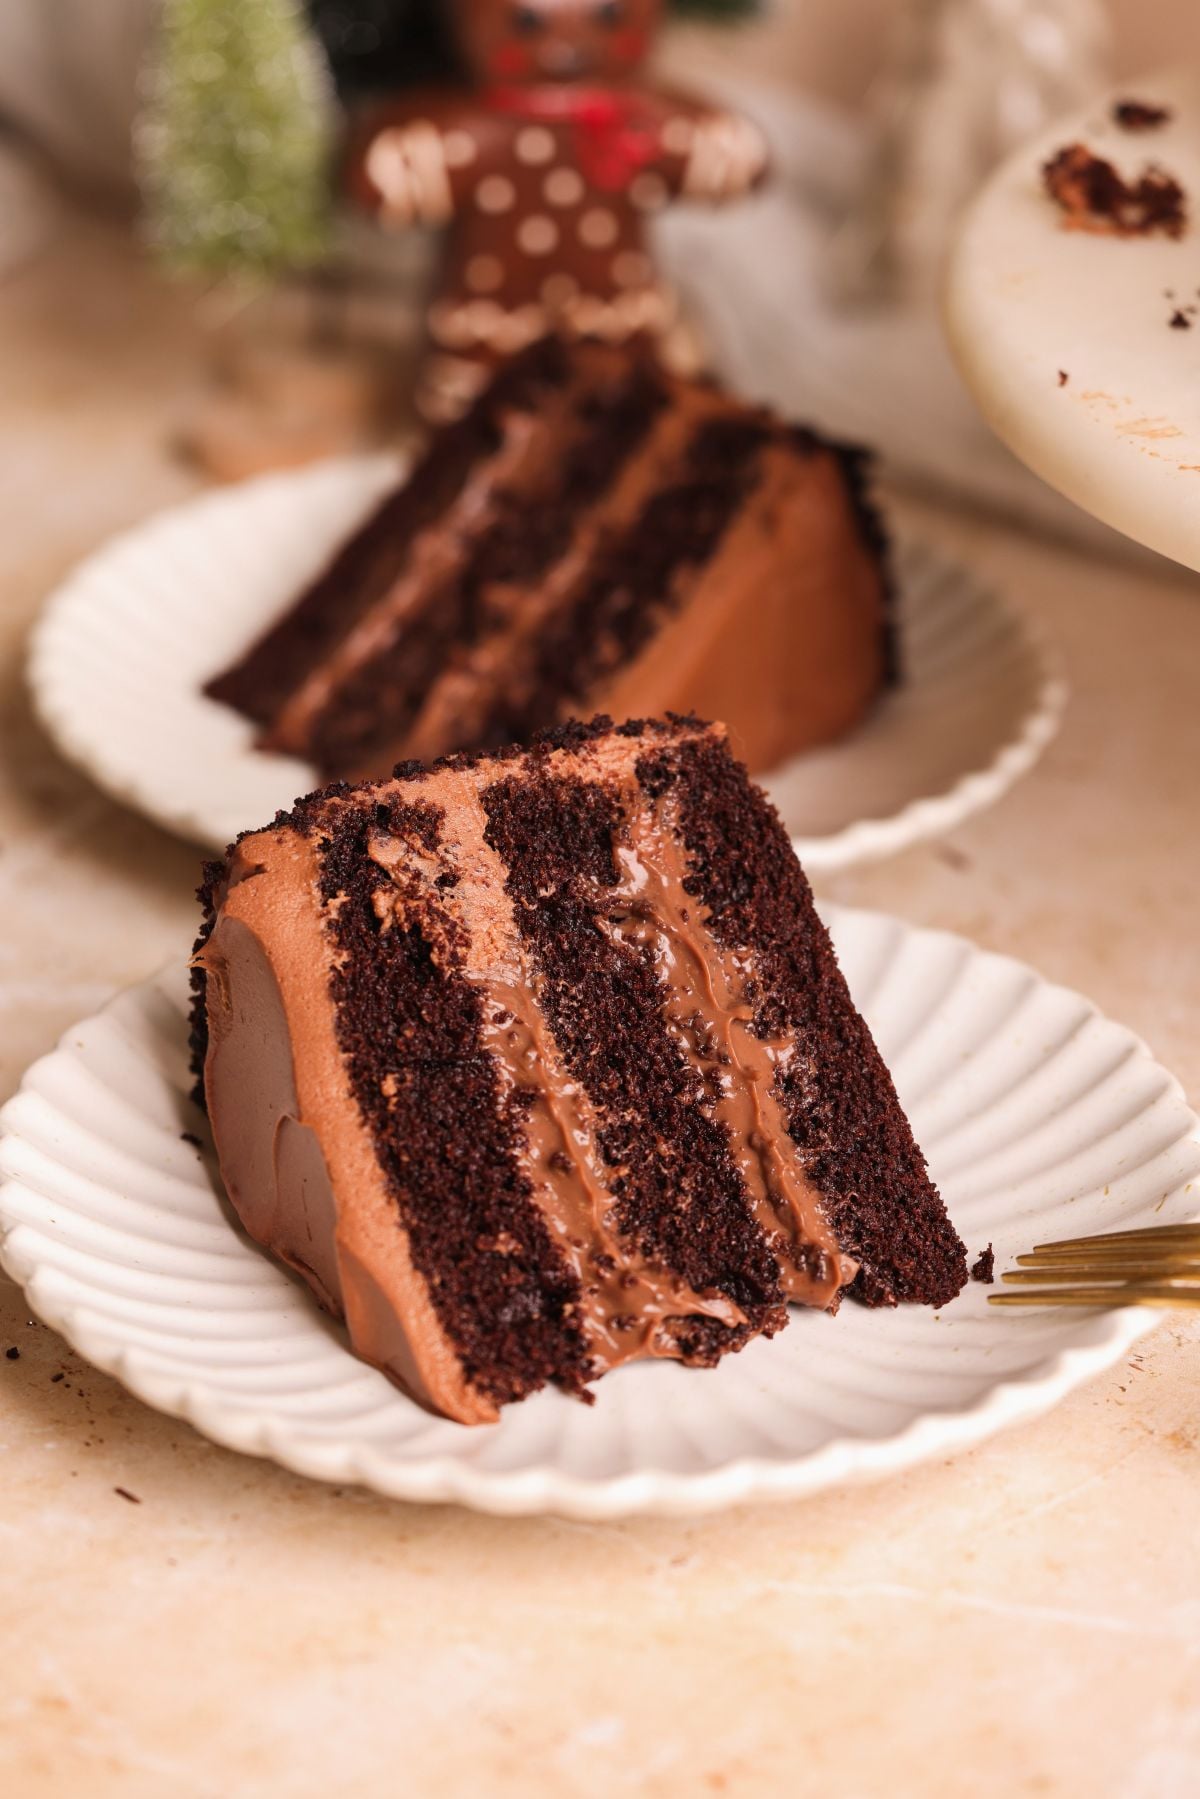
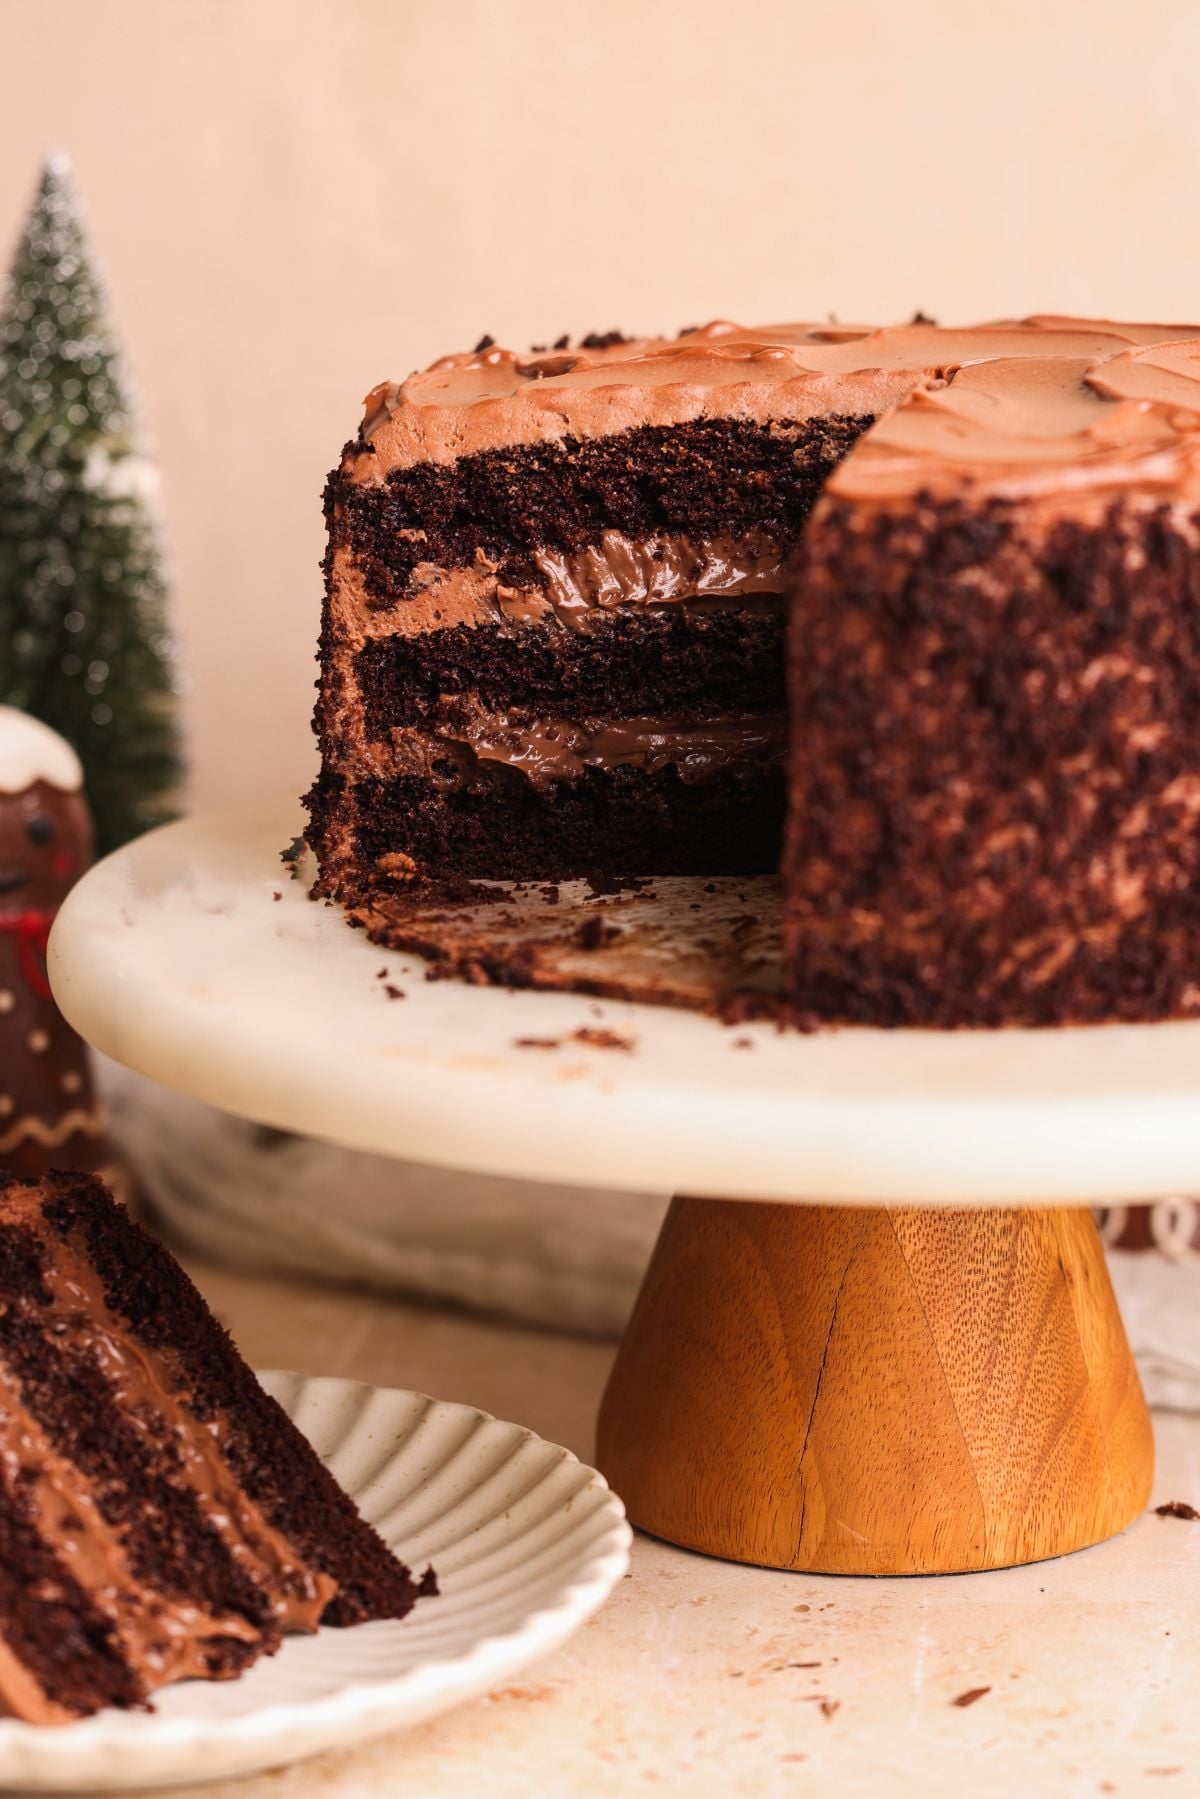
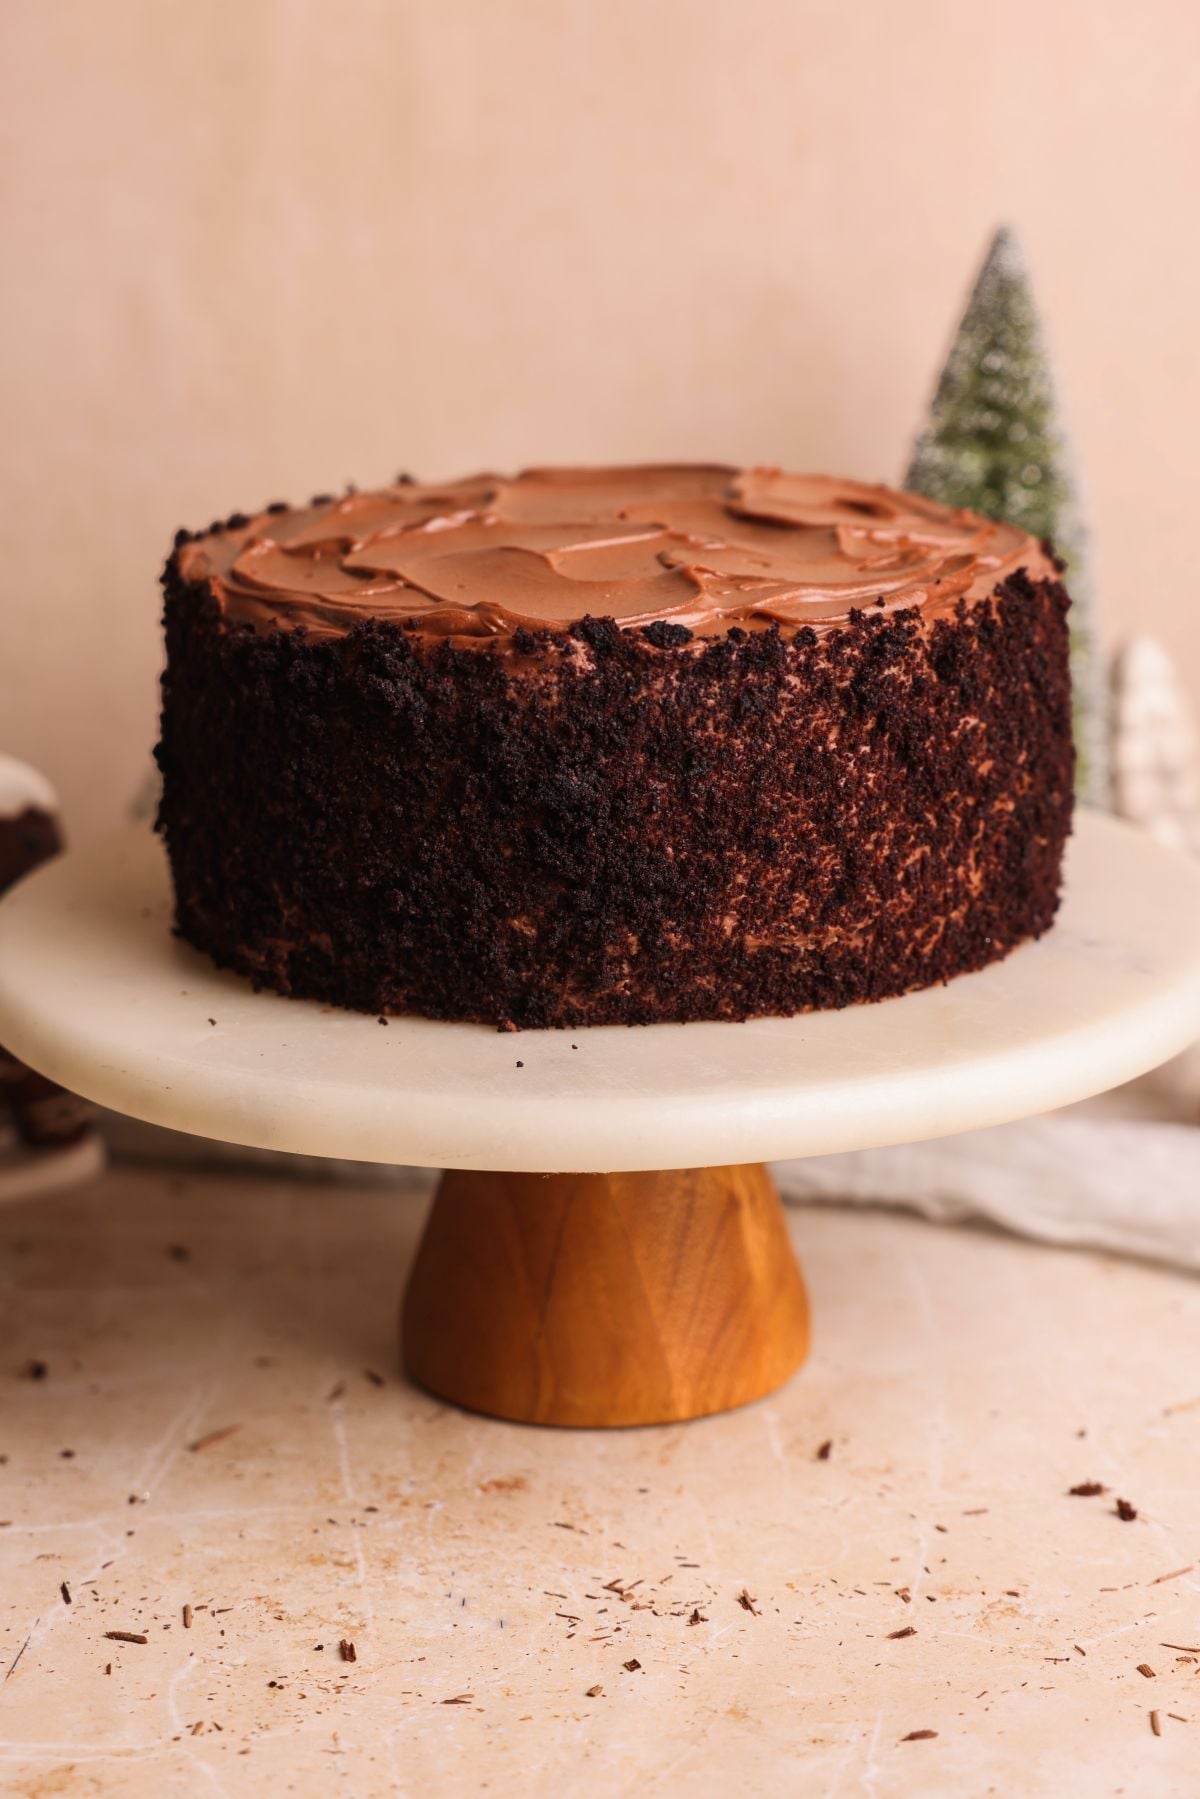
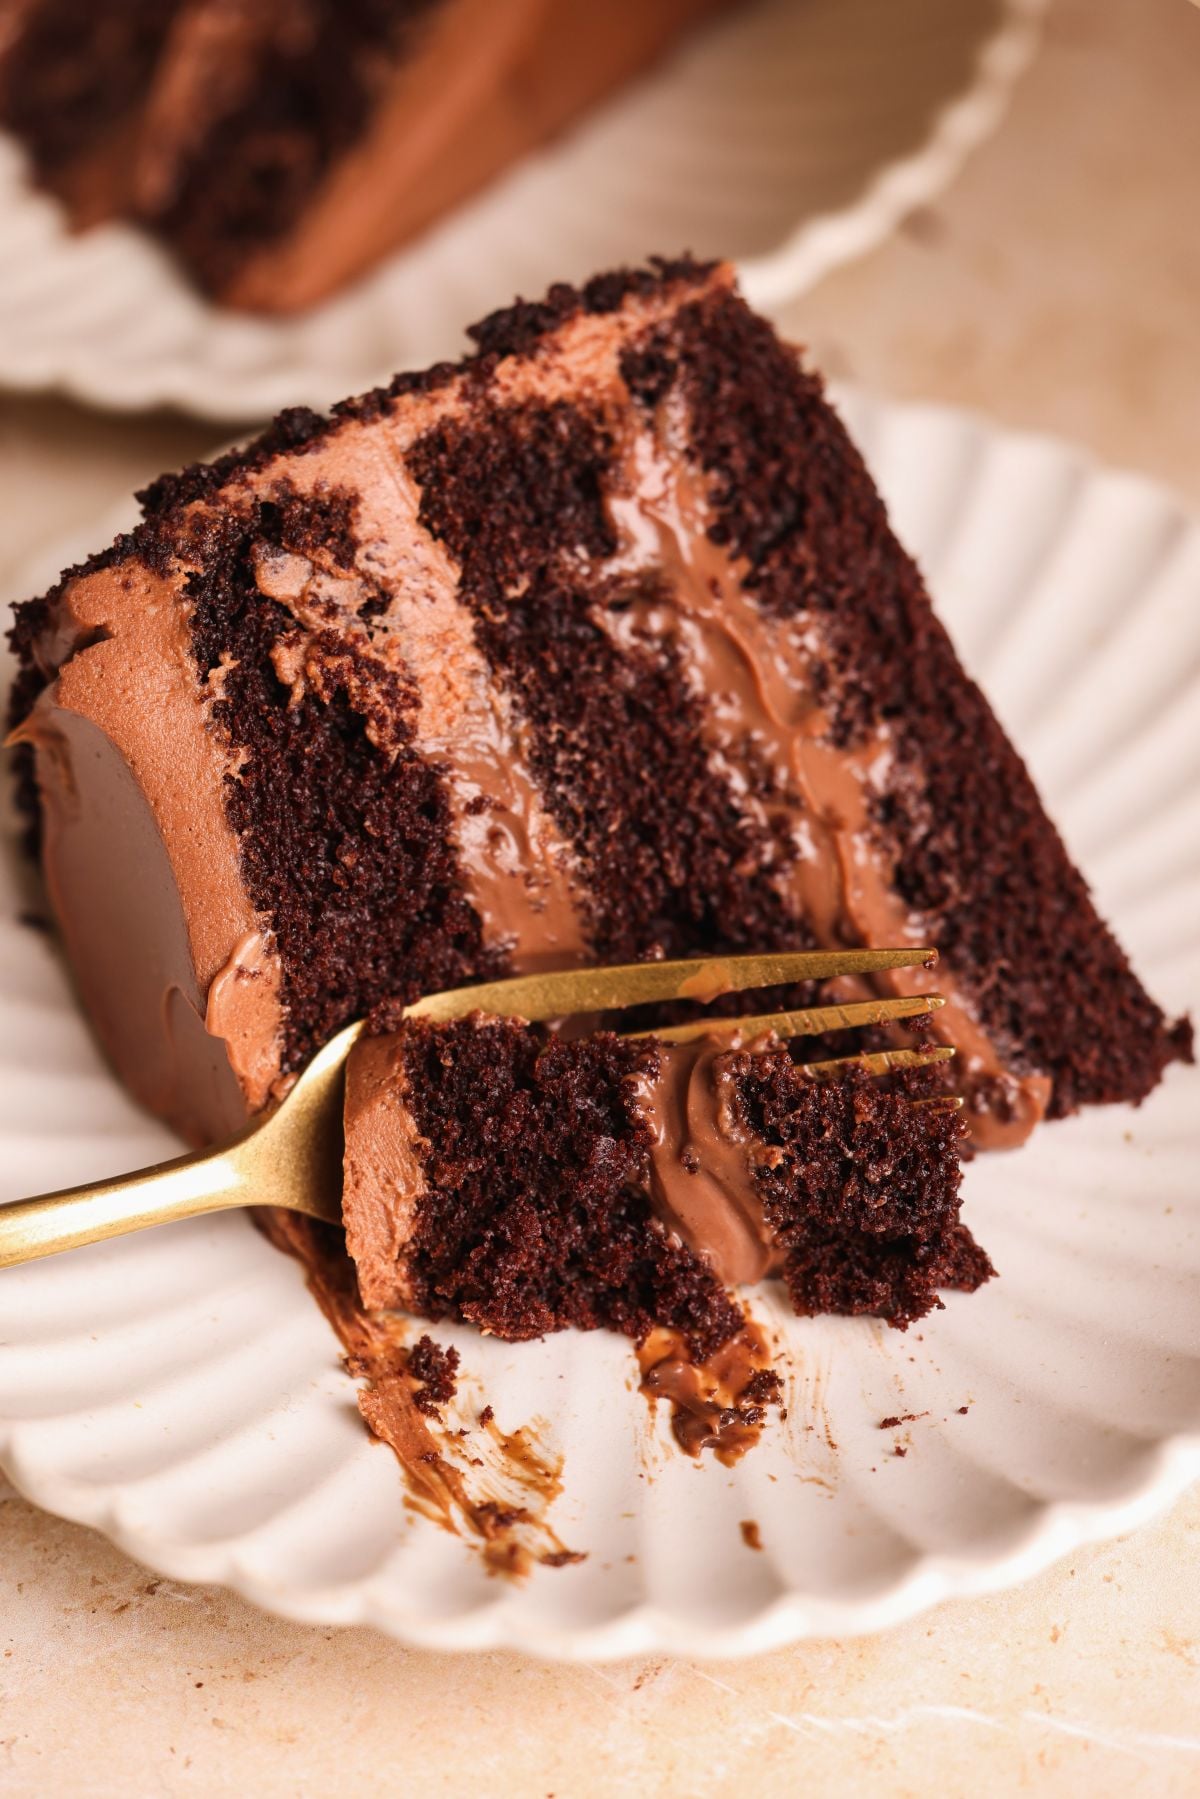
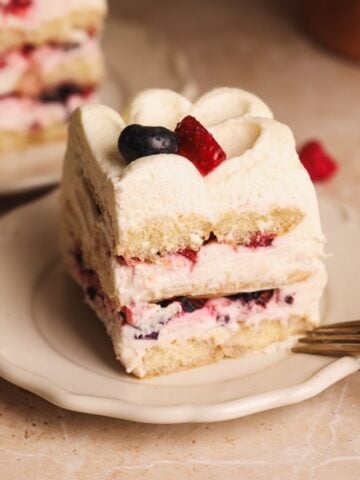
This Brooklyn Blackout Cake is the single best chocolate cake I've ever made or eaten, and the reason is simple. Instead of a traditional frosting between the layers, it is filled with a delectable, silky milk chocolate pudding. The cake gets its signature deep, dark color from Dutch processed cocoa powder, and is coated in a chocolate fudge frosting and finished with cake crumbs. It is rich, fudgy, ultra-chocolatey, and moist. And somehow, it's still very easy to make: a simple dry/wet ingredient method, a 10 minute chocolate pudding, and a no-fuss frosting. It is the kind of cake people remember for life.
I recently did a chocolate cake series, in which I tested some of the most popular chocolate cakes in the world, and this Brooklyn Blackout Cake easily rose to the top. As someone who's made and eaten countless chocolate cakes, I was surprised by how much this cake stood out to me. It is a mix of my popular fudgy Matilda Chocolate Cake and Easy 10 Minute Chocolate Pudding, and the cake-pudding combination is truly to die for.
3 easy components of this cake
This cake is made with 3 components:
- The chocolate cake: This is the exact same recipe as my Matilda Chocolate Cake. A simple, no-fuss cake made by combining the dry ingredients, mixing in the wet ingredients, separately blooming the cocoa powder and mixing it in. The cake gets is extra moist texture from the combination of buttermilk and sour cream. You can find the step-by-step photos in my Matilda Chocolate Cake recipe!
- The chocolate pudding. This is a really easy 10 minute chocolate pudding made by mixing together all the ingredients and cooking them into a thick custard like sauce. It contains both cocoa powder and real chocolate, making it extra chocolatey (truly, it is finger licking good!)
- The chocolate fudge frosting. The frosting is a unique combination of a chocolate ganache and cream cheese frosting. It is chocolatey, shiny, luscious and very easy to work with
Perfecting the frosting
Here is how you can make this easy chocolate fudge frosting:
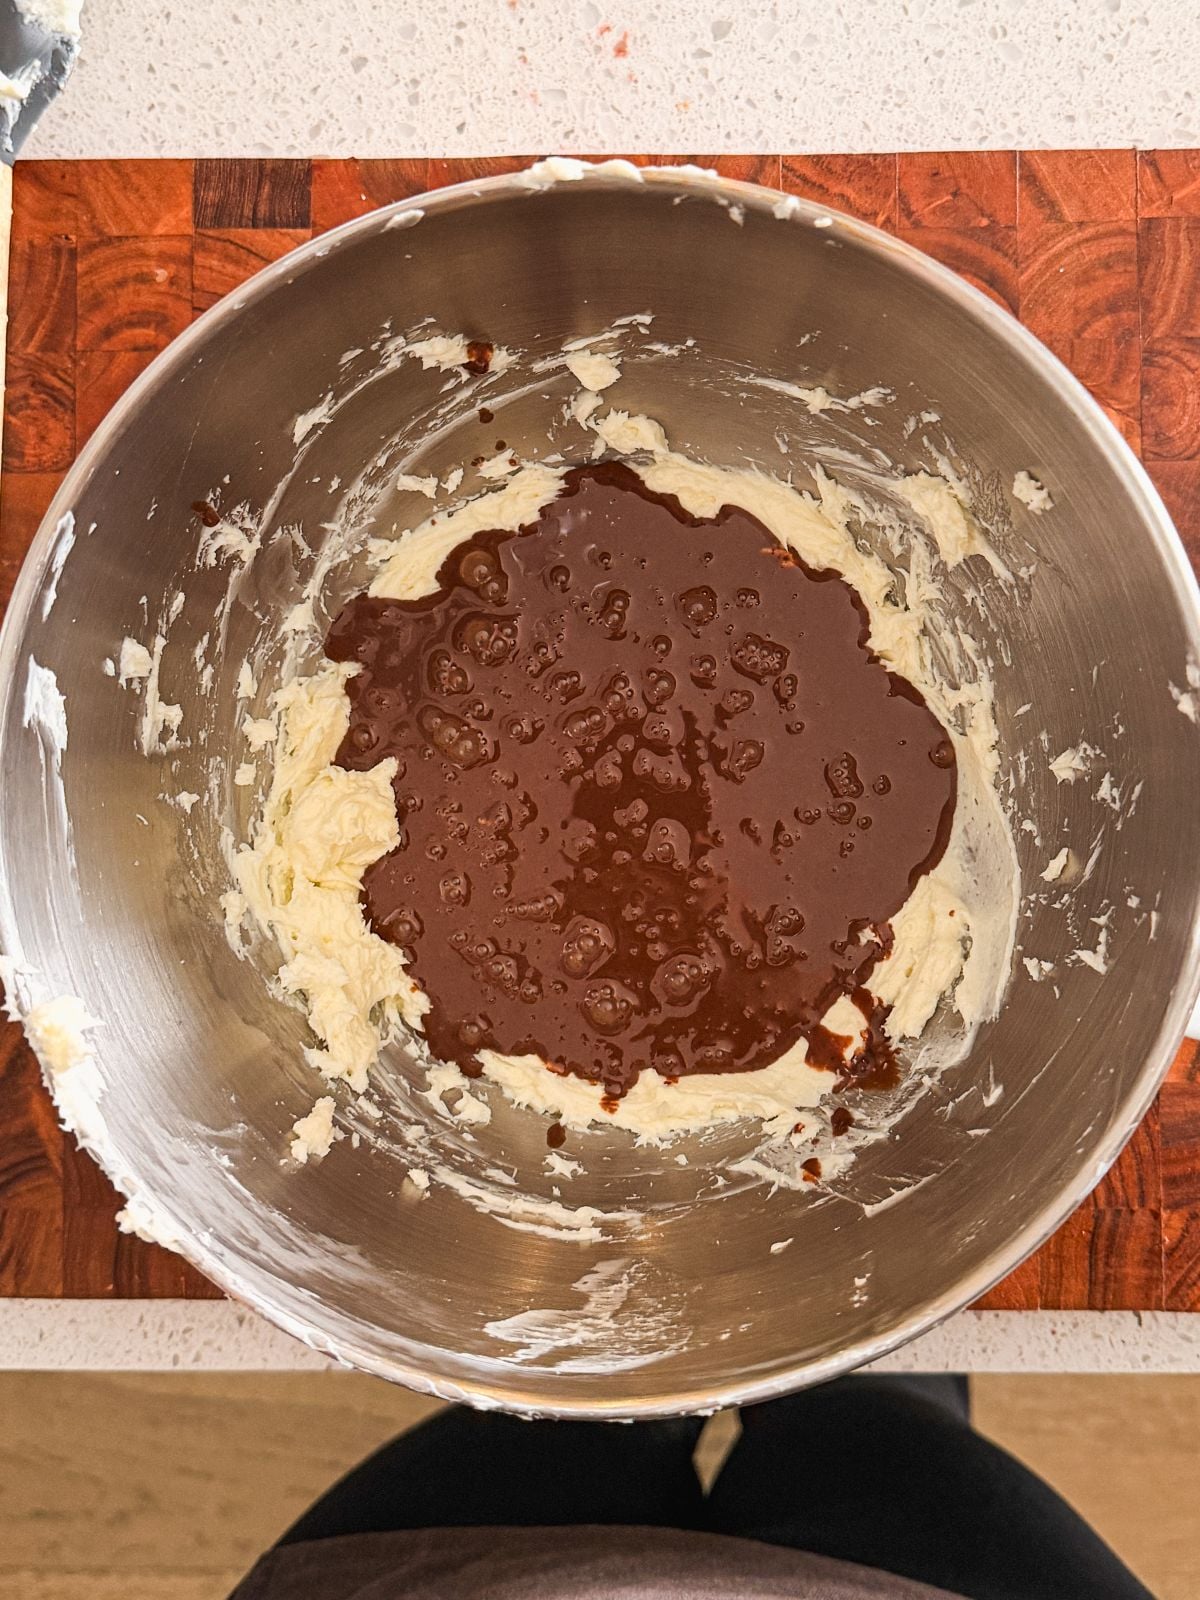
- First, make the ganache with heavy cream and chocolate. Set it aside
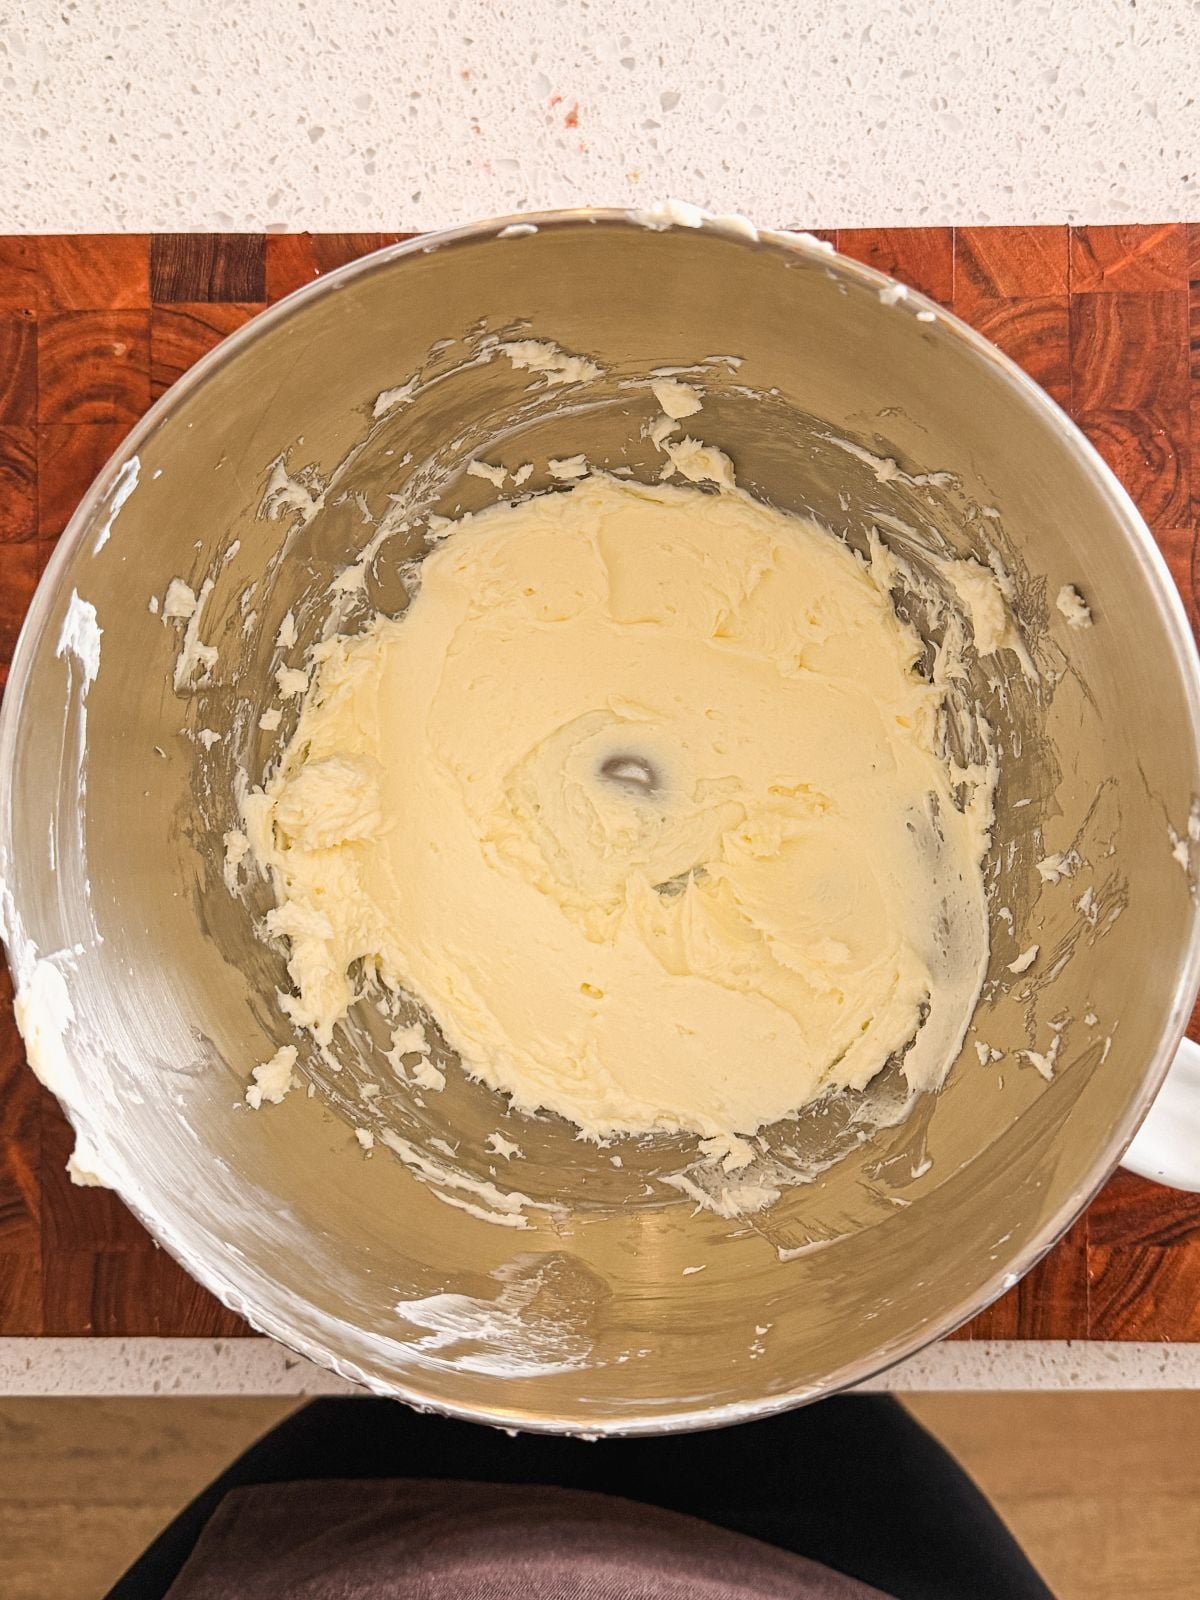
- Whisk the room temperature cream cheese and sugar for 2-3 minutes on medium speed with a paddle attachment. Scrape the bowl and paddle a few times to ensure the cream cheese is properly incorporated
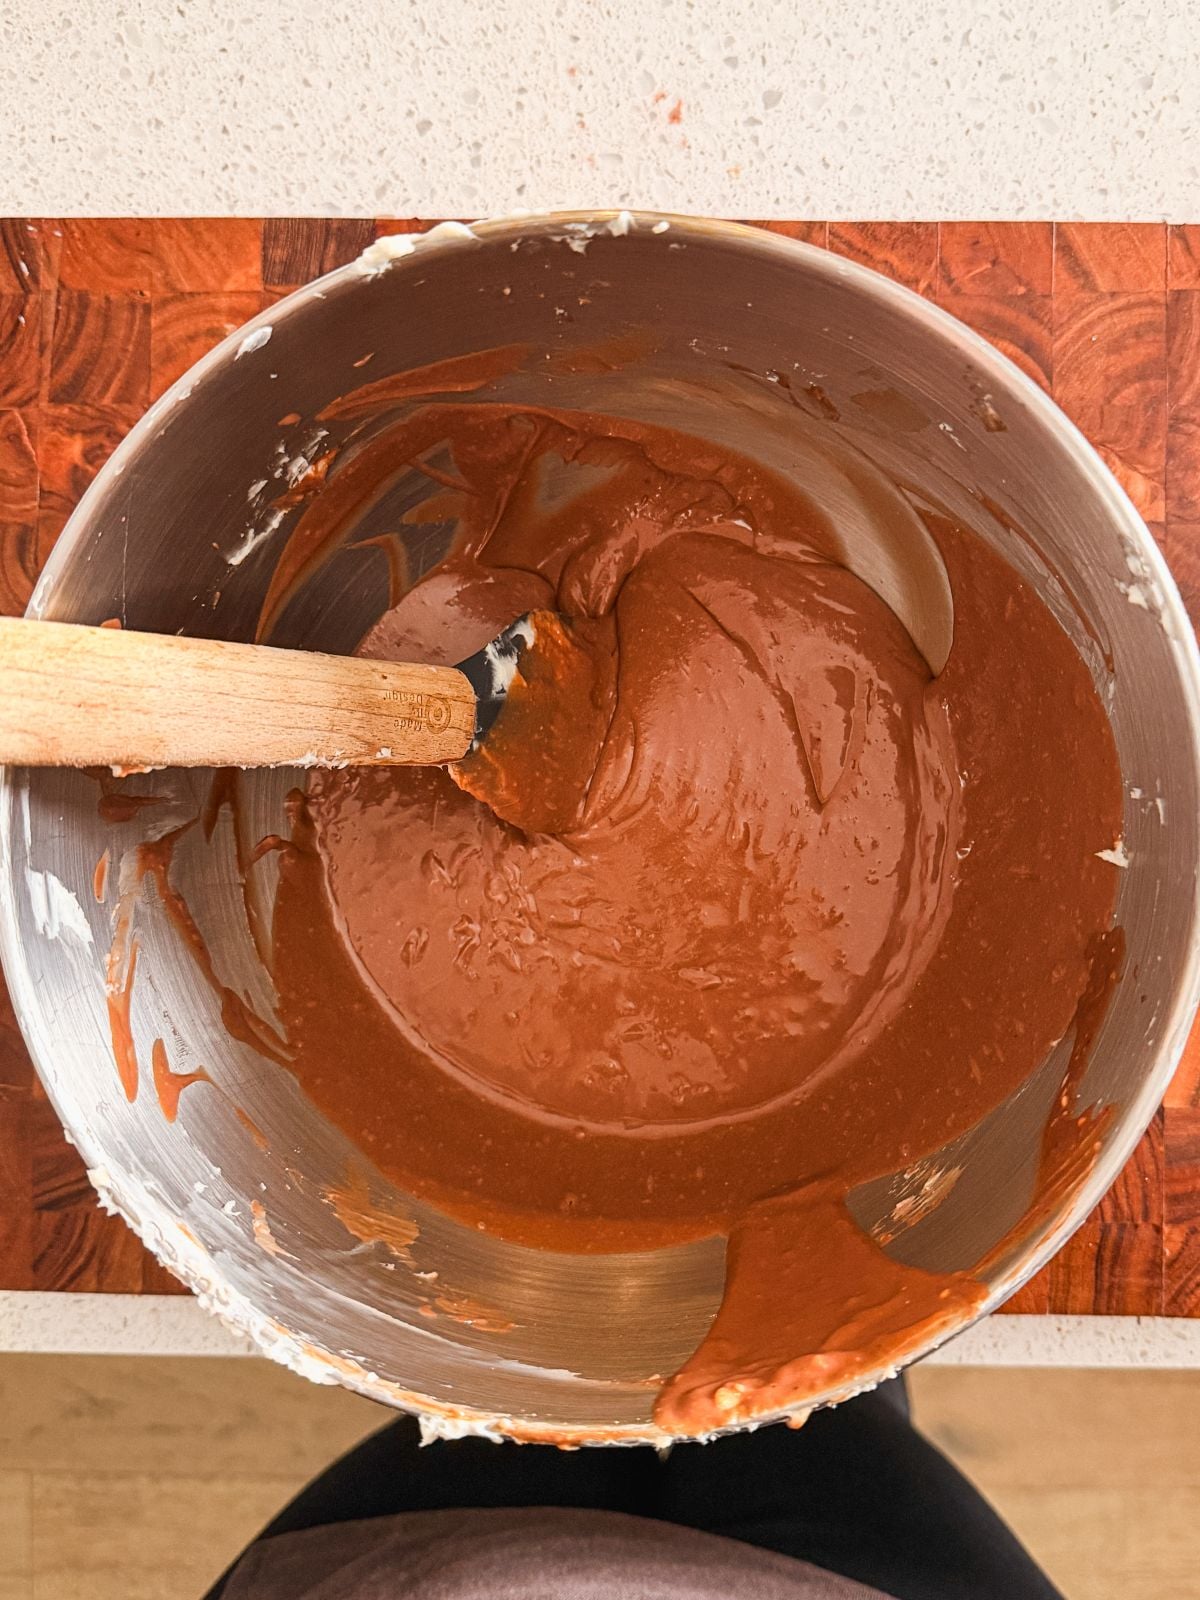
- Add the warm ganache to the cream cheese mixture. Scrape the bowl, and mix on medium speed for 1-2 minutes until the ingredients are combined and the frosting starts to look a little fluffy. The frosting will be runny at this stage, but don't worry. If there are any lumps in it, pass it through a strainer
- Refrigerate the frosting for ~20 minutes or until it reaches a thicker, spreadable consistency. You can also let it set at room temperature but that will take longer (~1.5-2 hours). Now you should have a smooth, luscious and easy to work with frosting!

Assembling the cake
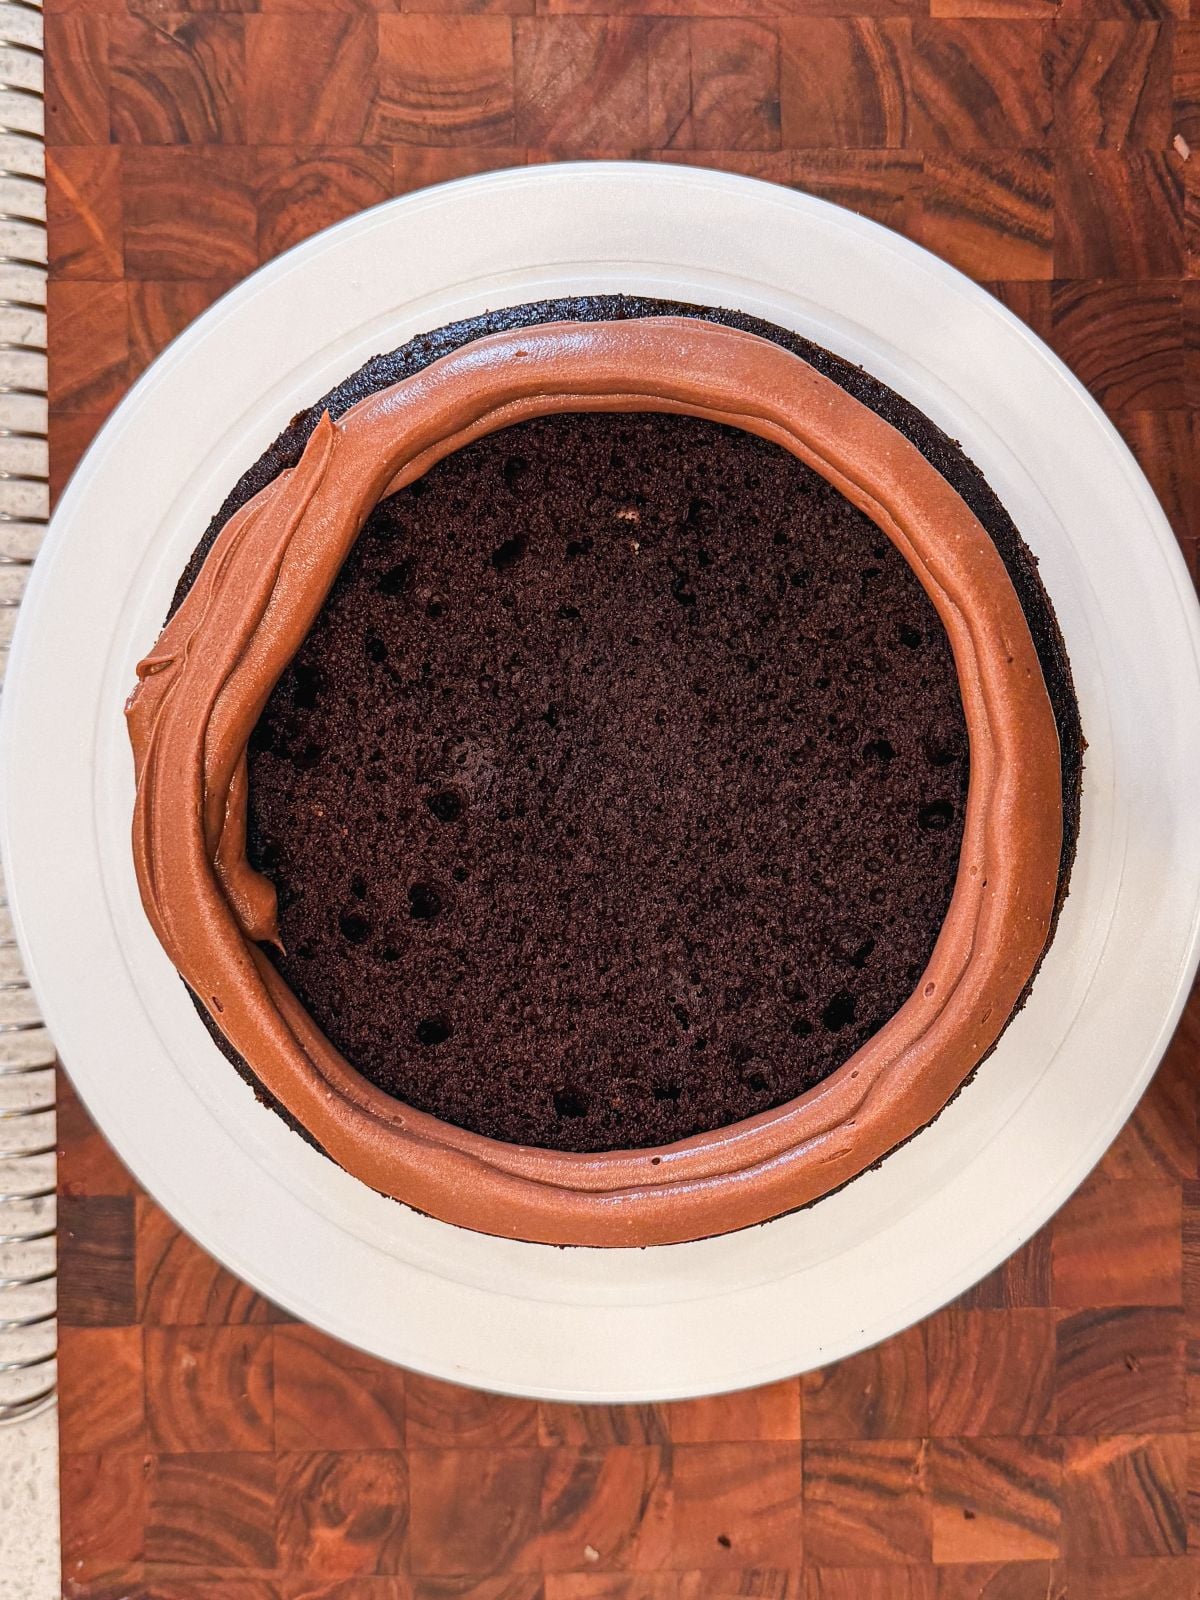
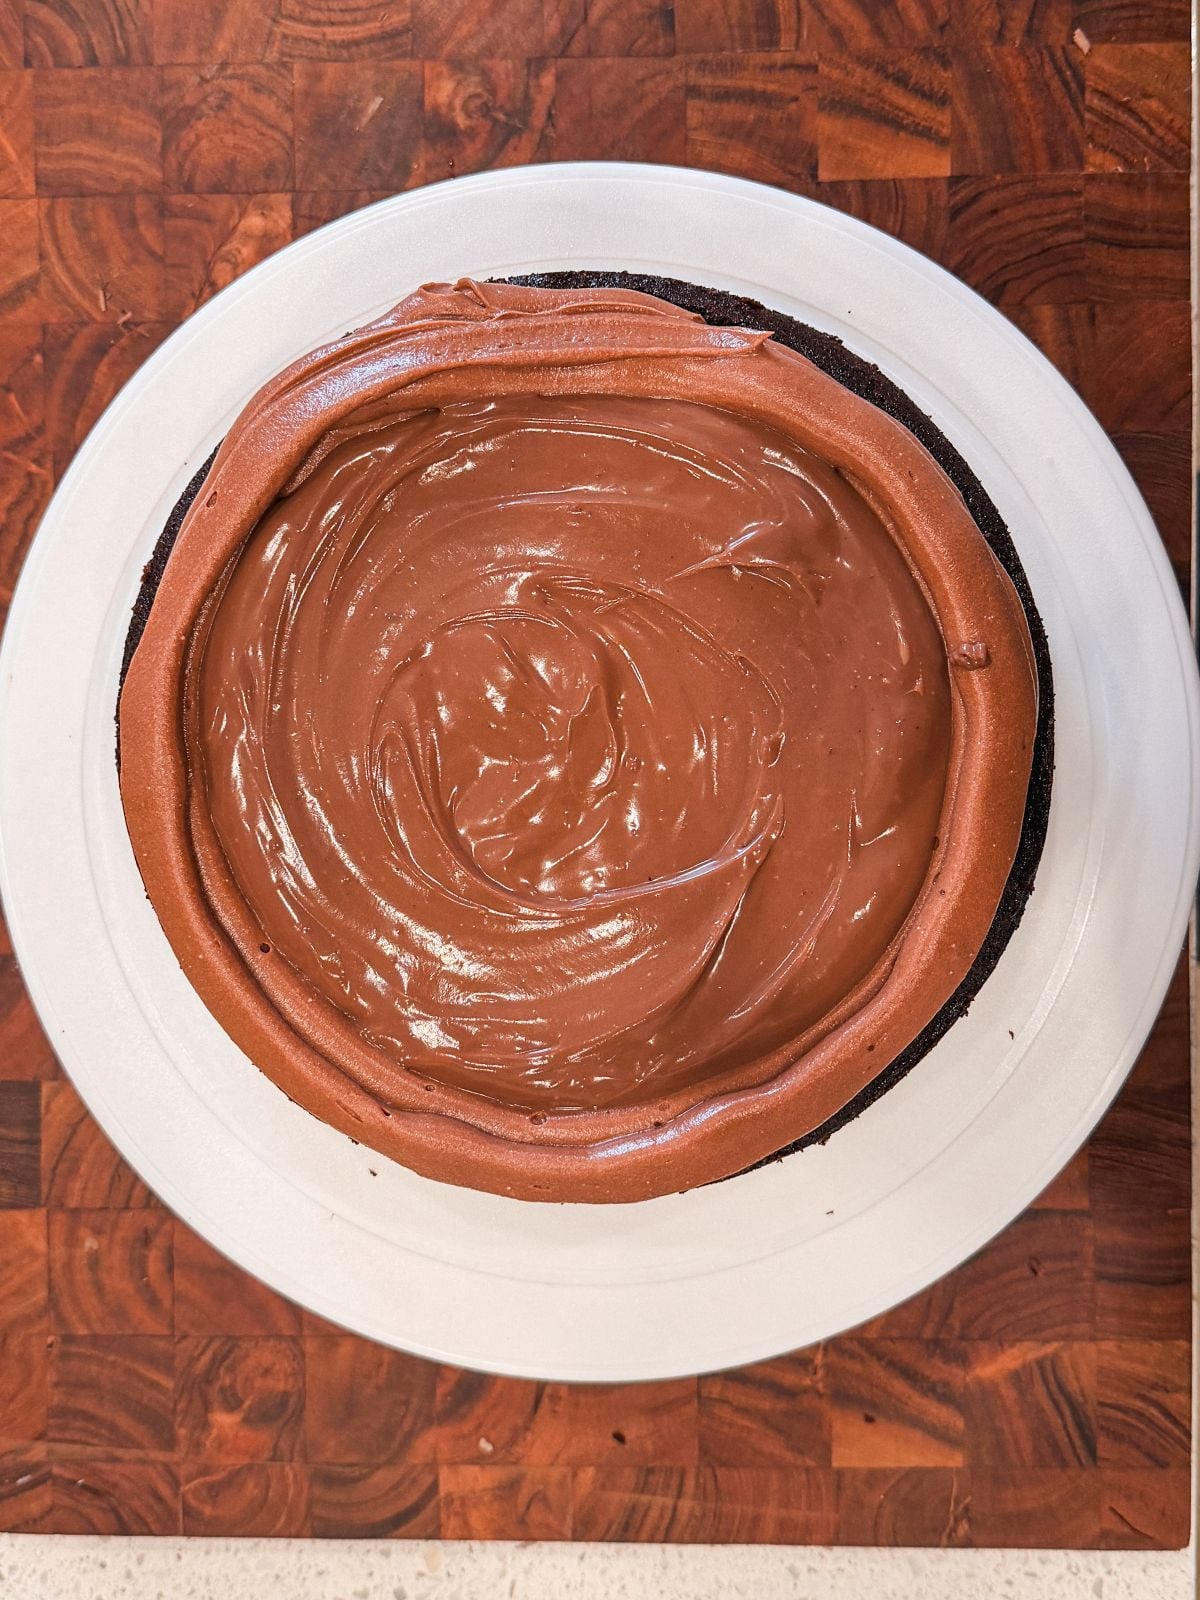
Since we're putting quite a bit of pudding between the cake layers, which is softer than a typical chocolate frosting, we have to be careful so it doesn't start to leak out and make a mess. There are 3 important watchouts when it comes to assembling this cake:
- The chocolate pudding should be thick so it doesn't ooze out. Cook it until it is thick enough to hold shape (i.e., if you run a spoon through it, it should leave behind a ridge that doesn't dissolve back quickly). Then chill it fully so it is a semi-set consistency (i.e., not solid / fully set but also not runny)
- Trim the cake layers so they've perfectly even. If they're domed or sloping, it is more likely that the pudding will start to seep out
- Pipe a thick ring of frosting around the edge of each cake layer to hold in the pudding. Since the frosting is thicker and more stable, it should stay in place and serve as a "wall" for the pudding
Once assembled, cool the cake for at least 1-2 hours so the pudding has time to set between the cake layers. The cake should then slice beautifully and hold up at room temperature!
Decorating with cake crumbs
A Brooklyn Blackout Cake is typically covered in cake crumbs to give the cake a dark look on the outside, too. In order to do this easily, I recommend trimming the domes off the cake layers and freezing them until they're solid. Then use a grater or zester to crumb the cake. Hold a generous amount of crumbs in your hand and press against the frosting around the cake so they stick (you should do this before you refrigerate the cake so the frosting is still sticky / not firm).
A few last tips to remember
- Weigh the dry ingredients, especially the flour, for the best results. I love this inexpensive scale from Amazon
- Use Dutch Processed cocoa powder! It makes a big difference to the flavor and look of this cake
- Don't overbake the cakes. Check with a toothpick around the 18 minute mark, you want it to have light, moist crumbs on it. Overbaking will cause the cake to become dry and crumbly
- Let the cakes fully cool down before you handle and frost them. They are quite soft and delicate. I like to keep them in the fridge for 1 hour before I work with them
- Strain the pudding and / or the frosting before chilling them to remove any lumps, if needed
- Use high quality chocolate for the pudding and frosting. I love Callebaut milk and dark chocolate these days!

Lifechanging Brooklyn Blackout Cake Recipe
- Total Time: 1 hour + cooling
- Yield: 12 servings
Description
The Brooklyn Blackout Cake to change your life: rich, fudgy and ultra-chocolatey with a silky milk chocolate pudding filling
Ingredients
Chocolate cake
- 2 cups all purpose flour (260g), sifted
- 1.5 tsp baking powder
- 1.5 tsp baking soda
- 1 cup granulated sugar (200g)
- ⅔ cup light brown sugar (135g)
- 1 tsp salt
- 3 large eggs, ideally room temp
- ⅔ cup vegetable oil (133g)
- ⅓ cup buttermilk (80g)- mix ⅓ cup whole milk (80g) + 1 teaspoon vinegar
- 1 cup sour cream (240g), ideally room temp
- ¾ cup cocoa powder, Dutch Processed preferred (75g)
- 2 tsp instant coffee
- ¾ cup boiling water (180g)
Chocolate pudding
- 240g milk (1 cup)
- 160g heavy cream (⅔ cup)
- 1 tbsp butter
- 3 tbsp cornstarch (27g)
- 2 tbsp cocoa powder (12g)
- ½ tsp vanilla
- ¼ tsp salt
- ⅓ cup sugar
- 180g milk chocolate
Chocolate fudge frosting
- 200g semi-sweet chocolate or mix dark + milk
- 240g heavy cream
- 8 oz cream cheese, room temperature (226g)
- ¼ cup sugar 50g
Instructions
Chocolate cake
- Preheat oven to 325F (no fan) and prepare 3 9" pans with parchment paper and butter
- In a bowl, combine the flour, baking powder, baking soda, granulated sugar, light brown sugar and salt. Whisk together until no lumps remain
- In a separate bowl, whisk together the eggs, vegetable oil, buttermilk and sour cream until smooth
- Add the dry ingredients to the wet in 2 additions, and gently whisk and fold until they are just combined and no big lumps remain. Do not overmix
- In a separate small bowl, add the cocoa powder and instant coffee. Pour over the boiling water and whisk until a smooth shiny mixture forms
- Pour the cocoa mixture onto the remaining batter, and gently fold until a chocolate cake batter forms
- Divide the batter evenly between the 3 prepared cake pans
- Bake for ~18-20 minutes until a toothpick inserted in the center comes out with light moist crumbs attached
- Let the cakes cool in the pans for 20 minutes, then carefully remove them and place on a wire rack. Let cool completely (I recommend refrigerating for 1 hour)
Chocolate pudding
- Add all ingredients for the pudding to a large nonstick saucepan
- Place on the stove on low heat, and use a whisk to gently stir and cook the pudding until the butter and chocolate melt and all ingredients combine. It will look strange and lumpy in the beginning but will come together as it cooks
- Keep cooking and stirring on low heat until the pudding comes to a boil. After this point, it will start to thicken up quickly. Keep an eye on it, and cook until the pudding feels reaches a thick, custard like consistency and starts to hold shape (if you run a spoon through it, it should leave a mark that doesn't dissolve). Remove from the heat. The total cooking time should be around 10 minutes
- Strain the pudding to remove any lumps. Pour it into a wide plate, cover with cling wrap, and refrigerate for at least an hour until cool and thick
Chocolate fudge frosting
- Add the chocolate and cream to a microwave safe bowl. Microwave in 20 second increments, stirring in between, until the chocolate has melted and a smooth ganache forms. Set it aside
- Add the cream cheese and sugar to a bowl. Whisk for 2-3 minutes, scraping the bowl along the way, until smooth.
- Pour in the warm ganache, and whisk for 1-2 minutes until combined and the mixture starts to look fluffy. The frosting will be runny
- Place the frosting in the fridge for ~20 minutes, or until it thickens up into a spreadable consistency. Remove from the fridge at this point so it doesn't become too firm
Assembly and decoration
- Once all components are cool, it's time to assemble. To start, use a sharp serrated knife to trim off the domes from the cake layers so they become completely straight. Place the cake trimmings into the freezer so you can grate them for decoration later
- Transfer the piping to a piping bag. Place a cake layer onto a turntable or cake stand, and pipe a thick ring of frosting around the edges (see images above). Make sure there aren't any gaps in this ring. Then spoon half of the chocolate pudding onto the cake and spread it evenly, such that the ring of frosting holds the pudding inside and doesn't let it leak out
- Cover with the next cake layer and repeat. Then cover with the last cake layer, and frost the cake with the frosting all over (you don't need to do a crumb coat for this cake as it gets covered in crumbs anyway). If at any point it feels like the cake layers are sliding around or the pudding is leaking out, quickly wrap the cake tightly in cling wrap and place in the fridge to firm up
- Remove the cake trims from the freezer and use a zester or fine grated to turn it into fine crumbs. Fill your hand with cake crumbs and press it against the side of the cake so the crumbs can stick to the frosting. Repeat until the cake is coated in crumbs on the sides
- Place in the fridge for at least 1 hours so the cake and pudding can properly set. Then slice, serve and enjoy!
Video Tutorial:
Notes
- Make ahead: You can make this cake ahead of time and keep it in the fridge for up to 2 days. In order to ensure it doesn't dry out, first refrigerate the finished cake for 20 minutes so the frosting firms up, then cover it in cling wrap
- Storage: Store any leftover cake in the fridge in an airtight container for up to 1 week
- Prep Time: 30 minutes
- Cook Time: 30 minutes
- Category: Dessert
- Cuisine: American
Claudia Lee says
Zoha - I'm guessing there is a typo in this recipe. As written it says:
⅓ cup sour cream (80g)- mix ⅓ cup whole milk (80g) + 1 teaspoon vinegar
1 cup sour cream (240g), ideally room temp
My guess is that the 1/3 cup (80g) ingredient should say Buttermilk.
This recipe looks absolutely delicious! Thanks for sharing!
Zoha says
Hi thank you so much for the catch! It’s fixed now z
Amy says
amazing cake, I would make it again, however I would half the amount of fudge frosting because I had an incredible amount left over.
Zoha says
Hi Amy! Do you mean the frosting or the pudding filling?
Aamina Unia says
Might be a silly question but if I don't have instant coffee, can I use a double shot of espresso instead? Would I need to reduce the amount of boiling water if I do this?
Zoha says
Hi Aamina! You can replace the boiling water with hot coffee! Mix water and espresso for that 🙂
ZW says
Hi Zoha, thanks for sharing the recipe. Is there a substitute for sour cream? It's hard to find sour cream where I live
Mimi says
You can use any plain-flavored yogurt! The point of the sour cream is to make the cake moist, and yogurt should do the job.
Zoha says
Hi Mimi! You're right that yogurt will work as a good substitute. Normally, though, I recommend sour cream as it has a slightly different flavor and more acidity, which helps the cake rise well 🙂
Zoha says
I have a recipe for it: https://bakewithzoha.com/homemade-sour-cream/
fikriya ansari says
please make a dubai choclate cake
Zoha says
I have a recipe! https://bakewithzoha.com/dubai-chocolate-strawberry-cake/
Sruthi says
hi..how to make eggless chocolate sponge
Zoha Malik says
Hi Sruthi - I'd recommend following a vegan recipe which will naturally be eggless
Tooba says
Hi Zoha, for the frosting do we use icing sugar with the cream cheese or granulated?
Zoha says
granualted!
parinita says
Hi zoha
wont using granulated sugar will give grany feeling bcz it wont dissolve ?
Zoha Malik says
Hi there! No, it should dissolve just fine. I am talking about american granulagted sugar which is in small grains
Uzma says
Hi - if I were to make this into a 2 layer cake, how can I adjust the batter and pudding ingredient quantities? Thanks!
Kari Strand Moldestad says
Hi, this looks delicious! I do not have three baking tins of equal size, will it still be successful baking it in one tin, with detachable ring around? I have a layer-cutter to aid me as well.
Zoha says
Hi Kari! one pan will have way too much batter, take too long to bake, and not bake evenly. So I recommend either reducing hte quantities to make a smaller 1 layer cake, or just getting more pans 🙂
Nida Nazneen says
can you tell me what is the shelf life of this cake though 😅
Aasiya says
Recipe says 1 week in the fridge, in an airtight container. Hope that helps!
Zoha says
Should be good up to a week in the fridge!
Bridget says
Can you freeze the cake with pudding if made a week ahead?
Zoha says
Yes, that should be ok!
Ms Hassan says
wow wow wow! like literally Wow! I can't believe my hands made this cake. It is by far the best chocolate cake I made and ate. I had such good feedback from my guests too. it was the star show of the night. I did use mix dark and milk callebaut chocolate just the way you've advised. This has definitely made me what to try your other desserts too. thank you so much for sharing such an incredible dessert!
Zoha says
Aww, thank you so so much for the kind review! So glad you loved this cake as much as I do 🙂
Tayyaba Zahra says
hey zoha, tried brooklyn blackout cake recipe today on my daughter's 10th birthday and oh my god it was amazing..the cake sponge itself was amazing in taste and texture and the pudding and frosting were amazing too..keep it up zoha and thank you so much for sharing such amazing recipes with us..you are truly inspiring..
Zoha says
Thank you, Tayyaba, and happy birthday to her!
Amreen says
Hi dear in my country we don’t have all purpose flour only cake flour so can I use cake flour if any recipe have all purpose flour is there any substitute?
Aasiya says
Do you have plain flour? That would be the same thing as all-purpose flour. Hope that helps!
Zoha says
Cake flour or plain flour both will be ok 🙂
Noura says
The cake was super soft fluffy and turned amazing .. specially the chocolate pudding .. I made the cake for the first time using grams for Eid celebration. everyone like it .. thank you soo much for the recipe.
Zoha says
You made my day, thank you so much!
UmmA says
hi. i want to bake this cake tomorrow, but what sized tins would I need? and which piping bag and turntable cake stand do you recommend? thankyoj
Zoha says
I use 8 or 9" cake pans for this recipe! My favorite piping bags are weetie from Amazon, and any turntable you have should do
Anne says
This was soooo yummy! Absolutely one of my favorite chocolate cakes I've had. I made it a day ahead of time, stored in the fridge, and then let get back to room temp the next day--perfection! Someone commented they would half the frosting, but I don't see how! I had some left over but not nearly enough to reduce by half. I do think I overcooked the pudding, but when I make a second time (which I will!) I will know how to fix that in the future.
Aasiya says
Hi Anne, I hope to make this tomorrow. How did you know you had overcooked the pudding? I want to make sure it’ll be thick and stable so was planning on thoroughly cooking it lol. Thanks in advance!
Zoha says
Hi Aasiya, how did it go? Any questions I can still help with?
sahar says
Hi,
Is it possible to make the pudding mixture a day in advance and use the next day? or would that end up becoming too thick?
Zoha says
Hi Sahar, that should be ok! Keep covered with cling wrap in the fridge, give it a stir to loosen it and then use it 🙂
Zoha says
So happy you loved it Anne!! For the pudding, it can definitely take some practice, but one trick is to run a spoon through the pan - it should take a few seconds for the pudding to spread back out. That means it's done and will thicken more as it cools.
Tahseen says
Hi zoha! i made this cake yesterday and it turned out absolutely delicious. the only query i have is it feels a bit heavy in taste, like you would feel full after a few bites while you don’t feel the same when you eat cakes usually in cafes. is it the heavy cream or what? I want to know how can we make it lighter without altering the taste.
Zoha says
Hi Tahseen! Brooklyn Blackout is definitely an indulgent cake by nature — the pudding frosting is what makes it so rich. To lighten it up, try using slightly less frosting between the layers. That said, small slices go a long way with this one! 😄 It's also possible the cake itself wasn't baked right if it felt dense. So happy you loved the flavour!
Anita Narshi says
Delicious! Made this twice in one week, for my sons birthday (on the day) and then the weekend for his friends and family.
Zoha Malik says
That made my day - thank you Anita!
Amee says
My 16 year old son and 12 year old daughter made this cake for my husbands birthday. The review from two lifetime chocolate cake lovers was “it’s the best cake I’ve ever had.”
I love your recipes. Easy to follow, and I always get compliments and requests to take any left overs home due to the overwhelming deliciousness.
Mehandi Mittal says
hi Zoha , i want to make 3 layer 6inch cake plz tell me how much pudding and cream cheese frosting i should make for thse same what will be the measurments of the ingridients?
and wanted to request if you could give egg replacments for your recipes thank you
Zoha Malik says
HI Mehandi, a 6" cake is basically half the size of this cake so divide all quantities by 2 for all components. Unfortunately I am not an expert in eggless baking so I cannot comment on that
anu says
Hey , i am a vegetarian and i really want to try this recipe can you plz give me an egg and sour cream replacement and can i bake it in three 8 inch pans ?
Zoha Malik says
Hi Anu, unfortunately I have not tested this recipe with those alternatives so I am not able to guide you on this
Anu says
okay , i have a request i want to try your recipes plz give egg replacement im a vegetarian option too in your future recipes. Thank you
Ranjitha says
Best cake ever!
Zoha Malik says
yay!
Mehandi Mittal says
Hi Zoha , for the cream cheese frosting i have to take castor sugar or powder sugar or icing sugar?
thank you
Zoha Malik says
caster or fine granulated sugar!
Anushree says
HI Zoha , may i know what oven setting do you use to bake all your cake sponges ... 1. Both rods on or only bottom rod on ? 2. fan on or off ? 3. rack placement .
P.S - I have a built in oven
Zoha Malik says
HI Anushree! Always just bottom heating, middle rack, no fan. Hope that helps 🙂
Mehandi Mittal says
HI zoha , I made brooklyn black out cake using an eggless sponge recipe , for the frosting and pudding i followed your instructions and it turned out soo yummy . Thank you so much
Zoha Malik says
Hi Mehandi! So glad you were able to make it work and liked the recipe!
Shehnaz Shaik says
Best choc cake ever!! I finally baked this yesterday. This is the best chocolate cake ever I had in the USA. I’m from India & I have had hard time finding the right chocolate cake in the states, they’re either too sweet or too dense or lack the right chocolate flavor. This recipe is Perfection! My friends loved it too.
I actually overbaked my cake for 10min and was worried I ruined it but I water(not sugar syrup just water) soaked the layers with about 2-3 tbsp of water per layer and my oh my the cake stayed moist and tender in the refrigerator. I’m so obsessed I usually share the cake with friends but I kept major portion of my cake for myself,
Zoha Malik says
AW, Shehnaz, you made my day! Thank you so much for the kind review. I am so glad you were able to turn around the overbaking issue and it was as good as you hoped <3