Description
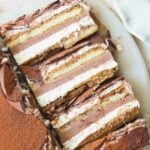
Easy tiramisu ice cream cake with layers of homemade no-churn chocolate ice cream, vanilla ice cream and coffee-soaked ladyfingers.
Ingredients
- 1 can of sweetened condensed milk (14 oz or 397g) - divided into 2 halves
- 3 cups of heavy whipping cream, chilled (720g) - divided into 2 halves
- 2 tsp vanilla bean paste
- 1/3 cup cocoa powder (33g), plus 1 tbsp more to dust on top
- 28 ladyfingers
- 1 cup strong brewed coffee, room temperature (240g)*
- Optional: 200g semi sweet chocolate
Instructions
- Take two bowls. Divide the sweetened condensed milk and heavy cream equally between the two. To one bowl, add the vanilla bean paste, and to the other bowl, sift in the cocoa powder
- Take an electric hand mixer and whisk the vanilla bowl first. Start at slow speed and slowly increase to medium, whisking for a few minutes until the mixture becomes thick, fluffy and spreadable. It should be a medium peak consistency. Don't overmix as that can cause the cream to split and become grainy
- Use the same whisk to gently stir the cocoa powder into the cream (without turning it on). You want the cocoa powder to become wet first so it doesn't fly everywhere once you turn on the mixer. Then whisk, starting at slow speed and increasing to medium, until the mixture reaches medium peaks
- Take a 9x9 pan and spread a large sheet of plastic cling wrap on the bottom, tucking it into the edges and corners neatly and ensuring it rises to the edges. Add 1-2 more layers of cling wrap on top. This step can be tedious, but taking your time here will help ensure you can easily remove the cake after it sets
- The cake is assembled upside down. Start by adding half of the chocolate ice cream mix and spread it out evenly using a cake scraper or offset spatula. Then spread on half of the vanilla ice cream mix
- Dip the ladyfingers into the coffee one by one, for about 1-2 seconds per side (I recommend dipping for slightly longer than a regular tiramisu), and arrange them in a neat layer on top of the vanilla ice cream
- Repeat the layers once again, with the rest of the chocolate ice cream, vanilla ice cream, and coffee soaked ladyfingers
- Cover the cake with cling wrap, and freeze for 6 hours or until the ice cream is fully set
- Once set, use the cling wrap sheets to carefully lift the cake out of the pan and turn it upside down onto a serving stand (the ladyfingers should be on the bottom)
- If adding the melted chocolate, melt it in the microwave in 20 second bursts, mixing in between, until it's warm and runny. Quickly pour the chocolate on top of the ice cream cake and spread it out with a spatula as thinly as you can
- Dust the cake with ~1 tbsp of cocoa powder
- Cut into slices using a sharp knife, serve and enjoy!
Video Tutorial
[adthrive-in-post-video-player video-id="cofnfJIV" upload-date="2026-06-11T00:32:37+00:00" name="Tiramisu Ice Cream Cake" description="How to make tiramisu ice cream cake with homemade, no churn chocolate and vanilla ice creams and coffee soaked ladyfingers" player-type="default" override-embed="default" orientation="vertical"]Notes
- Coffee: The strength of coffee depends on how much you like its flavor (some people use espresso), but my general guidance is to make the coffee twice as strong as you usually would. It can be brewed coffee, French press coffee, or instant coffee mixed in hot water. I make it in a French press with 1 cup water and 3 tablespoon ground coffee
- Make ahead and storage: You can easily make this cake ahead of time and keep it covered in the freezer for up to 2 months
- Prep Time: 20 minutes
- Chilling Time: 6 hours
- Cook Time: 0 minutes
- Category: Dessert
- Method: Freezing, No Bake
- Cuisine: American, Italian